Масляный Радиатор Двигателя - Установка

Land Cruiser Prado GRJ150 TRJ150 TRJ155 KDJ150 TRJ155 LJ150 - СИСТЕМА СМАЗКИ ДВИГАТЕЛЯ 5L-E

INSTALL OIL COOLER ASSEMBLY

INSTALL OIL FILTER BRACKET SUB-ASSEMBLY

INSTALL OIL FILTER SUB-ASSEMBLY

CONNECT VACUUM PUMP OIL INLET HOSE

INSTALL EXHAUST MANIFOLD

INSTALL GENERATOR ASSEMBLY

ADD ENGINE OIL

ADD ENGINE COOLANT

INSPECT FOR ENGINE OIL LEAK

INSPECT FOR ENGINE COOLANT LEAK

INSPECT FOR EXHAUST GAS LEAK

МАСЛЯНЫЙ РАДИАТОР ДВИГАТЕЛЯ - УСТАНОВКА

1. INSTALL OIL COOLER ASSEMBLY

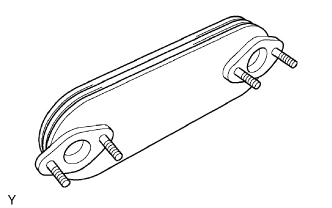
Install 2 new gaskets and the oil cooler to the filter bracket with the 4 nuts.

  • Момент затяжки:
  • 16 N*m{ 158 kgf*cm, 11 ft.*lbf}
2. INSTALL OIL FILTER BRACKET SUB-ASSEMBLY
Масляный Радиатор Двигателя - Установка. СИСТЕМА СМАЗКИ ДВИГАТЕЛЯ 5L-E. Land Cruiser Prado GRJ150 TRJ150 TRJ155 KDJ150 TRJ155 LJ150

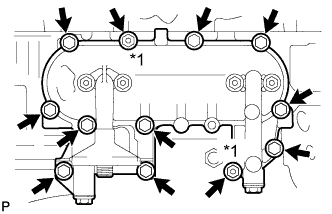
Install a new gasket and the oil filter bracket with the 10 bolts and 2 nuts.

  • Момент затяжки:
  • 30 N*m{ 301 kgf*cm, 22 ft.*lbf}
Text in Illustration
*1Nut
3. INSTALL OIL FILTER SUB-ASSEMBLY

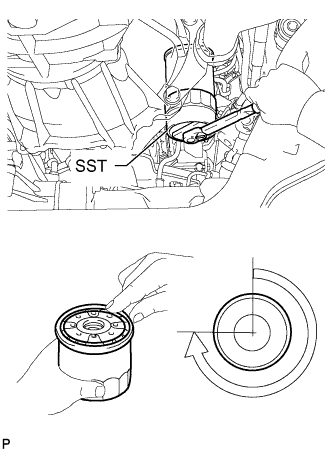
Check and clean the oil filter installation surface.

Apply clean engine oil to the gasket of a new oil filter.

Install the oil filter and tighten it by hand until the gasket contacts the installation surface.

Using SST, tighten the oil filter. Choose from the following to further tighten the oil filter.

  • SST
  • 09228-44011

Масляный Радиатор Двигателя - Установка. СИСТЕМА СМАЗКИ ДВИГАТЕЛЯ 5L-E. Land Cruiser Prado GRJ150 TRJ150 TRJ155 KDJ150 TRJ155 LJ150

Using a torque wrench, tighten the oil filter.

  • Момент затяжки:
  • 17 N*m{ 173 kgf*cm, 13 ft.*lbf}

Tighten the oil filter a 3/4 turn by hand or with a common wrench.

Text in Illustration
Масляный Радиатор Двигателя - Установка. СИСТЕМА СМАЗКИ ДВИГАТЕЛЯ 5L-E. Land Cruiser Prado GRJ150 TRJ150 TRJ155 KDJ150 TRJ155 LJ1503/4 turn
4. CONNECT VACUUM PUMP OIL INLET HOSE
Масляный Радиатор Двигателя - Установка. СИСТЕМА СМАЗКИ ДВИГАТЕЛЯ 5L-E. Land Cruiser Prado GRJ150 TRJ150 TRJ155 KDJ150 TRJ155 LJ150

Connect the vacuum pump oil inlet hose with a new gasket and the union bolt.

  • Момент затяжки:
  • 14 N*m{ 140 kgf*cm, 10 ft.*lbf}
  • УКАЗАНИЕ:
  • When tightening the inlet hose, hang the stopper-bar of the inlet hose on the filter bracket to prevent the inlet hose from rotating.
Text in Illustration
*1Stopper-bar
5. INSTALL EXHAUST MANIFOLD

Install the exhaust manifold (See page ).

6. INSTALL GENERATOR ASSEMBLY

Install the generator (See page ).

7. ADD ENGINE OIL

Add fresh engine oil.

  • Standard Engine Oil:
  • Oil GradeOil Viscosity (SAE)
    API CF-4 or CF10W-30
  • Standard Capacity:
  • ItemSpecified Condition
    Drain and refill without oil filter change6.0 liters (6.3 US qts, 5.3 Imp. qts)
    Drain and refill with oil filter change6.9 liters (7.3 US qts, 6.1 Imp. qts)
    Dry fill7.6 liters (8.0 US qts, 6.7 Imp. qts)

Install the oil filler cap.

8. ADD ENGINE COOLANT

Затяните пробку сливного крана радиатора вручную.

Затяните пробку сливного крана блока цилиндров.

  • Момент затяжки:
  • 13 N*m{ 130 kgf*cm, 9 ft.*lbf}

Медленно заполните систему охлаждающей жидкостью двигателя.

  • Номинальный объем:
  • 8,6 литра (9,0 кварты США, 7,6 английской кварты)
  • ПРИМЕЧАНИЕ:
  • Не доливайте простую воду вместо охлаждающей жидкости двигателя.
  • УКАЗАНИЕ:
Разрешается использовать только охлаждающую жидкость "Toyota Super Long Life Coolant" или аналогичную высококачественную охлаждающую жидкость на основе этиленгликоля (но не на силикатной, аминовой, нитритной или борнокислой основе), изготовленную по гибридной технологии органических кислот с длительным сроком годности (охлаждающая жидкость, изготовленная по гибридной технологии органических кислот, состоит из низкофосфатных соединений и органических кислот.)
Новые автомобили Toyota заправлены охлаждающей жидкостью "Toyota Super Long Life Coolant". Для замены рекомендуется использовать охлаждающую жидкость "Toyota Super Long Life Coolant" (розового цвета, предварительно смешанная, с концентрацией этиленгликоля около 50% и температурой замерзания -35°C (-31°F)).

Медленно залейте охлаждающую жидкость в расширительный бачок радиатора до отметки "FULL".

Установите пробку расширительного бачка.

Несколько раз сожмите рукой патрубки радиатора № 1 и № 2, а затем проверьте уровень охлаждающей жидкости. Если уровень охлаждающей жидкости недостаточен, добавьте жидкость.

Установите на место пробку радиатора.

Запустите двигатель и прогрейте его до открывания термостата.

  • УКАЗАНИЕ:
  • Время открывания термостата можно распознать, сжав шланг радиатора № 2 рукой и отметив момент, когда охлаждающая жидкость двигателя начнет поступать в шланг.

Поддерживайте частоту вращения коленчатого вала двигателя 2000–2500 об/мин.

  • ПРИМЕЧАНИЕ:
Убедитесь, что в расширительном бачке радиатора осталась охлаждающая жидкость.
Обратите внимание на стрелку датчика температуры охлаждающей жидкости. Убедитесь, что значение температуры не превышает норму.
В случае недостатка охлаждающей жидкости двигатель может закипеть или перегреться.
Если в расширительном бачке радиатора нет охлаждающей жидкости, сразу после запуска двигателя выполните следующие действия: 1) остановите двигатель, 2) подождите, пока охлаждающая жидкость остынет, и 3) долейте охлаждающую жидкость до линии "F".
Запустите двигатель, обеспечив частоту вращения коленчатого вала 2000 об/мин, и дайте ему поработать, пока уровень охлаждающей жидкости не стабилизируется.

Несколько раз сожмите патрубки радиатора № 1 и № 2 рукой, чтобы удалить воздух.

  • ПРЕДОСТЕРЕЖЕНИЕ:
Работайте в защитных перчатках. Нагретые участки деталей могут травмировать руки.
Будьте осторожны: патрубки радиатора горячие.
Не приближайте свои руки к вентилятору.

Остановите двигатель и подождите, пока охлаждающая жидкость остынет до температуры окружающего воздуха.

  • ПРЕДОСТЕРЕЖЕНИЕ:
  • Не снимайте пробку радиатора, пока двигатель и радиатор не остынут. Выброс горячей охлаждающей жидкости и пара под давлением может стать причиной серьезных ожогов.

Убедитесь, что уровень охлаждающей жидкости находится между отметками "LOW" и "FULL".


Если уровень охлаждающей жидкости ниже линии "Low", повторите все вышеперечисленные действия.


Если уровень охлаждающей жидкости выше уровня "FULL", слейте охлаждающую жидкость до уровня между отметками "FULL" и "LOW".

9. INSPECT FOR ENGINE OIL LEAK

Start the engine. Make sure that there are no oil leaks from the areas that were worked on.

10. INSPECT FOR ENGINE COOLANT LEAK
  • ПРЕДОСТЕРЕЖЕНИЕ:
  • To avoid being burned, do not remove the radiator reservoir cap while the engine and radiator are still hot. Thermal expansion may cause hot engine coolant and steam to blow out from the radiator.

Fill the radiator with coolant and attach a radiator cap tester to the radiator.

Warm up the engine.

Using a radiator cap tester, increase the pressure inside the radiator to 123 kPa (1.3 kgf/cm2, 18 psi), and check that the pressure does not drop.


If the pressure drops, check the hoses, radiator or water pump for leaks. If no external leaks are found, check the heater core, cylinder block, and cylinder head.

11. INSPECT FOR EXHAUST GAS LEAK
If gas is leaking, tighten the areas necessary to stop the leak. Replace damaged parts as necessary.

Масляный Радиатор Двигателя - Повторная Сборка

Land Cruiser Prado GRJ150 TRJ150 TRJ155 KDJ150 TRJ155 LJ150 - СИСТЕМА СМАЗКИ ДВИГАТЕЛЯ 5L-E

INSTALL OIL FILTER UNION

INSTALL OIL SAFETY VALVE SUB-ASSEMBLY

МАСЛЯНЫЙ РАДИАТОР ДВИГАТЕЛЯ - ПОВТОРНАЯ СБОРКА

1. INSTALL OIL FILTER UNION

Using a 12 mm socket hexagon wrench, install the union.

  • Момент затяжки:
  • 32 N*m{ 326 kgf*cm, 24 ft.*lbf}
2. INSTALL OIL SAFETY VALVE SUB-ASSEMBLY

Install the safety valve and spring and a new gasket with the plug.

  • Момент затяжки:
  • 36 N*m{ 367 kgf*cm, 27 ft.*lbf}

Масляный Радиатор Двигателя - Проверка

Land Cruiser Prado GRJ150 TRJ150 TRJ155 KDJ150 TRJ155 LJ150 - СИСТЕМА СМАЗКИ ДВИГАТЕЛЯ 5L-E

INSPECT OIL SAFETY VALVE SUB-ASSEMBLY

INSPECT OIL COOLER ASSEMBLY

МАСЛЯНЫЙ РАДИАТОР ДВИГАТЕЛЯ - ПРОВЕРКА

1. INSPECT OIL SAFETY VALVE SUB-ASSEMBLY
Масляный Радиатор Двигателя - Проверка. СИСТЕМА СМАЗКИ ДВИГАТЕЛЯ 5L-E. Land Cruiser Prado GRJ150 TRJ150 TRJ155 KDJ150 TRJ155 LJ150

Coat the valve with engine oil and check that it falls smoothly into the oil filter bracket by its own weight.

If it does not fall smoothly into the bracket, replace the valve. If necessary, replace the oil filter bracket sub-assembly.
2. INSPECT OIL COOLER ASSEMBLY
Масляный Радиатор Двигателя - Проверка. СИСТЕМА СМАЗКИ ДВИГАТЕЛЯ 5L-E. Land Cruiser Prado GRJ150 TRJ150 TRJ155 KDJ150 TRJ155 LJ150

Check the oil cooler for damage or clogging.

If necessary, replace the oil cooler assembly.

Масляный Радиатор Двигателя - Снятие

Land Cruiser Prado GRJ150 TRJ150 TRJ155 KDJ150 TRJ155 LJ150 - СИСТЕМА СМАЗКИ ДВИГАТЕЛЯ 5L-E

REMOVE GENERATOR ASSEMBLY

REMOVE EXHAUST MANIFOLD

DRAIN ENGINE COOLANT

DRAIN ENGINE OIL

DISCONNECT OIL FILTER SUB-ASSEMBLY

DISCONNECT VACUUM PUMP OIL INLET HOSE

REMOVE OIL FILTER BRACKET SUB-ASSEMBLY

REMOVE OIL COOLER ASSEMBLY

МАСЛЯНЫЙ РАДИАТОР ДВИГАТЕЛЯ - СНЯТИЕ

1. REMOVE GENERATOR ASSEMBLY

Remove the generator (See page ).

2. REMOVE EXHAUST MANIFOLD

Remove the exhaust manifold (See page ).

3. DRAIN ENGINE COOLANT
  • ПРЕДОСТЕРЕЖЕНИЕ:
  • Не снимайте пробку расширительного бачка радиатора, пока двигатель и радиатор не остынут. Выброс горячей охлаждающей жидкости и пара под давлением может стать причиной серьезных ожогов.

Ослабьте пробку сливного крана радиатора.

Масляный Радиатор Двигателя - Снятие. СИСТЕМА СМАЗКИ ДВИГАТЕЛЯ 5L-E. Land Cruiser Prado GRJ150 TRJ150 TRJ155 KDJ150 TRJ155 LJ150

Обозначения на рисунке
*1Пробка радиатора*2Бачок радиатора
*3Пробка сливного крана радиатора*4Пробка сливного крана блока цилиндров
  • УКАЗАНИЕ:
  • Слейте охлаждающую жидкость в контейнер и утилизируйте ее в соответствии с местными требованиями.

Слейте охлаждающую жидкость, сняв крышку радиатора.

Ослабьте пробку сливного крана блока цилиндров.

Ослабьте пробку сливного крана блока цилиндров и слейте охлаждающую жидкость из двигателя.

  • ПРИМЕЧАНИЕ:
  • Если охлаждающая жидкость не сливается через пробку сливного крана радиатора, пробки сливных кранов блока цилиндров и расширительный бачок радиатора, возможны засорение радиатора и утечка охлаждающей жидкости через уплотнение насоса системы охлаждения.
4. DRAIN ENGINE OIL

Remove the oil filler cap.

Remove the oil drain plug and gasket, and then drain the oil into a container.

Clean the drain plug and install it with a new gasket.

  • Момент затяжки:
  • 35 N*m{ 352 kgf*cm, 25 ft.*lbf}
5. DISCONNECT OIL FILTER SUB-ASSEMBLY
Масляный Радиатор Двигателя - Снятие. СИСТЕМА СМАЗКИ ДВИГАТЕЛЯ 5L-E. Land Cruiser Prado GRJ150 TRJ150 TRJ155 KDJ150 TRJ155 LJ150

Using SST, remove the oil filter.

  • SST
  • 09228-44011
6. DISCONNECT VACUUM PUMP OIL INLET HOSE
Масляный Радиатор Двигателя - Снятие. СИСТЕМА СМАЗКИ ДВИГАТЕЛЯ 5L-E. Land Cruiser Prado GRJ150 TRJ150 TRJ155 KDJ150 TRJ155 LJ150

Remove the union bolt and gasket, and then disconnect the vacuum pump oil inlet hose from the cylinder block.

7. REMOVE OIL FILTER BRACKET SUB-ASSEMBLY
Масляный Радиатор Двигателя - Снятие. СИСТЕМА СМАЗКИ ДВИГАТЕЛЯ 5L-E. Land Cruiser Prado GRJ150 TRJ150 TRJ155 KDJ150 TRJ155 LJ150

Remove the 10 bolts, 2 nuts, oil filter bracket and gasket.

8. REMOVE OIL COOLER ASSEMBLY

Remove the 4 nuts, oil cooler and 2 gaskets.

Масляный Насос - Установка

Land Cruiser Prado GRJ150 TRJ150 TRJ155 KDJ150 TRJ155 LJ150 - СИСТЕМА СМАЗКИ ДВИГАТЕЛЯ 5L-E

INSTALL FRONT CRANKSHAFT OIL SEAL

INSTALL TIMING BELT CASE SUB-ASSEMBLY

INSTALL OIL STRAINER SUB-ASSEMBLY

INSTALL OIL PAN SUB-ASSEMBLY

INSTALL CRANKSHAFT TIMING PULLEY

INSTALL NO. 2 TIMING BELT IDLER SUB-ASSEMBLY

INSTALL NO. 1 TIMING BELT IDLER SUB-ASSEMBLY

INSTALL WATER PUMP ASSEMBLY

INSTALL NO. 2 TIMING BELT COVER

INSTALL CAMSHAFT TIMING PULLEY

INSTALL NO. 1 GENERATOR BRACKET

INSTALL NO. 1 FRONT ENGINE MOUNTING BRACKET RH

INSTALL NO. 1 FRONT ENGINE MOUNTING BRACKET LH

INSTALL PUMP BRACKET

INSTALL WATER BY-PASS HOSE UNION

INSTALL WATER OUTLET HOUSING

INSTALL INJECTION PUMP ASSEMBLY

INSTALL TIMING BELT

INSTALL NO. 1 COMPRESSOR MOUNTING BRACKET

INSTALL ENGINE ASSEMBLY

МАСЛЯНЫЙ НАСОС - УСТАНОВКА

1. INSTALL FRONT CRANKSHAFT OIL SEAL
Масляный Насос - Установка. СИСТЕМА СМАЗКИ ДВИГАТЕЛЯ 5L-E. Land Cruiser Prado GRJ150 TRJ150 TRJ155 KDJ150 TRJ155 LJ150

Using SST and a hammer, tap in a new oil seal until its surface is flush with the timing belt case edge.

  • SST
  • 09214-60010

Apply MP grease to the lip of the oil seal.

2. INSTALL TIMING BELT CASE SUB-ASSEMBLY

Place a new gasket on the cylinder block.

Install the timing belt case with the 5 bolts.

  • Момент затяжки:
  • 23 N*m{ 230 kgf*cm, 17 ft.*lbf}
3. INSTALL OIL STRAINER SUB-ASSEMBLY

Install a new gasket and the oil strainer with the 2 bolts and 2 nuts.

  • Момент затяжки:
  • for nut:
  • 21 N*m{ 210 kgf*cm, 17 ft.*lbf}
  • for bolt:
  • 18 N*m{ 184 kgf*cm, 13 ft.*lbf}
4. INSTALL OIL PAN SUB-ASSEMBLY

Remove any old packing (FIPG) material and do not drop any oil on the contact surfaces of the oil pan and cylinder block.

Using a gasket scraper, remove all the old packing (FIPG) material from the installation surface.
Thoroughly clean all components to remove all the loose material.
Using a non-residue solvent, clean both of the sealing surfaces.
  • ПРИМЕЧАНИЕ:
  • Do not use a solvent which will affect the painted surfaces.
Масляный Насос - Установка. СИСТЕМА СМАЗКИ ДВИГАТЕЛЯ 5L-E. Land Cruiser Prado GRJ150 TRJ150 TRJ155 KDJ150 TRJ155 LJ150

Apply seal packing to the oil pan as shown in the illustration.

  • Seal packing:
  • Toyota Genuine Seal Packing Black, Three Bond 1207B or equivalent
  • Application Specification:
  • ItemSeal Packing DiameterSeal Packing Application Length
    Dashed line7.0 mm (0.276 in.)128 mm (5.04 in.)
    Continuous line5.0 mm (0.197 in.)-
Text in Illustration
*1Seal Packing
*aTiming Belt Case Contact Portion
*bRear Oil Seal Retainer Contact Portion
  • УКАЗАНИЕ:
Do not apply an excessive amount to the surface, especially near the oil passages.
Parts must be assembled within 5 minutes of application. Otherwise the material must be removed and reapplied.

Install the oil pan with the 16 bolts and 2 nuts. Uniformly tighten the bolts and nuts in several steps.

  • Момент затяжки:
  • 18 N*m{ 184 kgf*cm, 13 ft.*lbf}
5. INSTALL CRANKSHAFT TIMING PULLEY
Масляный Насос - Установка. СИСТЕМА СМАЗКИ ДВИГАТЕЛЯ 5L-E. Land Cruiser Prado GRJ150 TRJ150 TRJ155 KDJ150 TRJ155 LJ150

Align the key groove of the timing pulley with the pulley set key.

Using SST and a hammer, tap in the timing pulley with the flange side facing inward.

  • SST
  • 09223-46011
Text in Illustration
*aInside
6. INSTALL NO. 2 TIMING BELT IDLER SUB-ASSEMBLY

Install the spacer and No. 2 timing belt idler with the bolt.

  • Момент затяжки:
  • 33 N*m{ 337 kgf*cm, 24 ft.*lbf}

Check that the No. 2 timing belt idler moves smoothly.

7. INSTALL NO. 1 TIMING BELT IDLER SUB-ASSEMBLY
Масляный Насос - Установка. СИСТЕМА СМАЗКИ ДВИГАТЕЛЯ 5L-E. Land Cruiser Prado GRJ150 TRJ150 TRJ155 KDJ150 TRJ155 LJ150

Install the No. 1 belt idler with the 3 bolts.

  • Момент затяжки:
  • for bolt A:
  • 44 N*m{ 449 kgf*cm, 32 ft.*lbf}
  • for bolt B, C:
  • 19 N*m{ 195 kgf*cm, 14 ft.*lbf}
  • УКАЗАНИЕ:
Масляный Насос - Установка. СИСТЕМА СМАЗКИ ДВИГАТЕЛЯ 5L-E. Land Cruiser Prado GRJ150 TRJ150 TRJ155 KDJ150 TRJ155 LJ150
The bolt lengths for bolt A, B and C as follows.
Bolt C is combined with the No. 1 timing belt idler.
  • Standard Bolt:
  • ItemLength
    A76.5 mm (3.01 in.)
    B42.9 mm (1.69 in.)
    C41.3 mm (1.63 in.)
8. INSTALL WATER PUMP ASSEMBLY

Install a new gasket, the water pump and tension spring bracket with the 6 bolts.

  • Момент затяжки:
  • 23 N*m{ 236 kgf*cm, 17 ft.*lbf}
9. INSTALL NO. 2 TIMING BELT COVER

Install the timing belt cover with the 4 bolts.

  • Момент затяжки:
  • 18 N*m{ 184 kgf*cm, 13 ft.*lbf}
10. INSTALL CAMSHAFT TIMING PULLEY

Install the woodruff key to the key groove of the camshaft.

Масляный Насос - Установка. СИСТЕМА СМАЗКИ ДВИГАТЕЛЯ 5L-E. Land Cruiser Prado GRJ150 TRJ150 TRJ155 KDJ150 TRJ155 LJ150

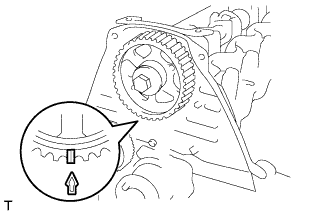
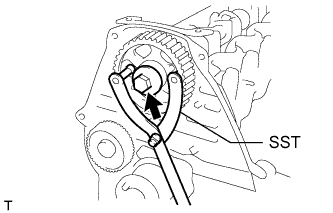
Align the timing mark on the camshaft timing pulley with the timing mark on the No. 2 timing belt cover and temporarily install the pulley with the bolt.

Масляный Насос - Установка. СИСТЕМА СМАЗКИ ДВИГАТЕЛЯ 5L-E. Land Cruiser Prado GRJ150 TRJ150 TRJ155 KDJ150 TRJ155 LJ150

Using SST, tighten the bolt.

  • SST
  • 09960-10010(09962-01000,09963-01000)
  • Момент затяжки:
  • 98 N*m{ 999 kgf*cm, 72 ft.*lbf}
11. INSTALL NO. 1 GENERATOR BRACKET

Install the generator bracket with the 3 bolts.

  • Момент затяжки:
  • 49 N*m{ 500 kgf*cm, 36 ft.*lbf}
12. INSTALL NO. 1 FRONT ENGINE MOUNTING BRACKET RH

Install the engine mounting bracket with the 4 bolts.

  • Момент затяжки:
  • 49 N*m{ 500 kgf*cm, 36 ft.*lbf}
13. INSTALL NO. 1 FRONT ENGINE MOUNTING BRACKET LH

Install the engine mounting bracket with the 4 bolts.

  • Момент затяжки:
  • 49 N*m{ 500 kgf*cm, 36 ft.*lbf}
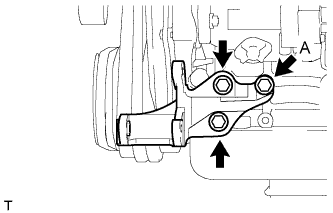
14. INSTALL PUMP BRACKET
Масляный Насос - Установка. СИСТЕМА СМАЗКИ ДВИГАТЕЛЯ 5L-E. Land Cruiser Prado GRJ150 TRJ150 TRJ155 KDJ150 TRJ155 LJ150

Install the pump bracket with the 3 bolts.

  • Момент затяжки:
  • for bolt A:
  • 57 N*m{ 581 kgf*cm, 42 ft.*lbf}
  • except bolt A:
  • 78 N*m{ 795 kgf*cm, 58 ft.*lbf}
15. INSTALL WATER BY-PASS HOSE UNION

Clean the threads of the water by-pass hose union and apply adhesive to them.

  • Adhesive:
  • Toyota Genuine Adhesive 1324, Three Bond 1324 or equivalent

Install the water by-pass hose union.

  • Момент затяжки:
  • 39 N*m{ 398 kgf*cm, 29 ft.*lbf}
16. INSTALL WATER OUTLET HOUSING

Install a new gasket to the cylinder head.

Install the outlet hosing with the 3 bolts

  • Момент затяжки:
  • 19 N*m{ 194 kgf*cm, 14 ft.*lbf}
17. INSTALL INJECTION PUMP ASSEMBLY

Install the injection pump (See page ).

18. INSTALL TIMING BELT

Install the timing belt (See page ).

19. INSTALL NO. 1 COMPRESSOR MOUNTING BRACKET
Масляный Насос - Установка. СИСТЕМА СМАЗКИ ДВИГАТЕЛЯ 5L-E. Land Cruiser Prado GRJ150 TRJ150 TRJ155 KDJ150 TRJ155 LJ150

Install the No. 1 compressor mounting bracket with the 4 bolts.

  • Момент затяжки:
  • 81 N*m{ 829 kgf*cm, 60 ft.*lbf}
20. INSTALL ENGINE ASSEMBLY

Install the engine (See page ).

Масляный Насос - Повторная Сборка

Land Cruiser Prado GRJ150 TRJ150 TRJ155 KDJ150 TRJ155 LJ150 - СИСТЕМА СМАЗКИ ДВИГАТЕЛЯ 5L-E

INSTALL OIL PUMP DRIVE GEAR

INSTALL OIL PUMP COVER

INSTALL OIL PUMP RELIEF VALVE

МАСЛЯНЫЙ НАСОС - ПОВТОРНАЯ СБОРКА

1. INSTALL OIL PUMP DRIVE GEAR

Place the timing belt case on wooden blocks.

  • ПРИМЕЧАНИЕ:
  • Do not damage the timing pointer.
Масляный Насос - Повторная Сборка. СИСТЕМА СМАЗКИ ДВИГАТЕЛЯ 5L-E. Land Cruiser Prado GRJ150 TRJ150 TRJ155 KDJ150 TRJ155 LJ150

Insert the drive and driven gears into the timing belt case with the marks facing the oil pump cover side.

Text in Illustration
*1Mark
2. INSTALL OIL PUMP COVER

Apply adhesive to 2 or 3 threads of the screws.

  • Adhesive:
  • Toyota Genuine Adhesive 1344, Three Bond 1344 or equivalent

Install the oil pump cover with the 8 screws.

  • Момент затяжки:
  • 10 N*m{ 105 kgf*cm, 8 ft.*lbf}
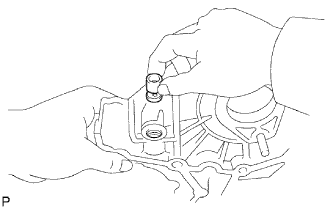
3. INSTALL OIL PUMP RELIEF VALVE

Insert the relief valve and spring into the installation hole of the timing belt case.

Using a 12 mm hexagon wrench, install a new gasket and the plug.

  • Момент затяжки:
  • 37 N*m{ 375 kgf*cm, 27 ft.*lbf}

Масляный Насос - Проверка

Land Cruiser Prado GRJ150 TRJ150 TRJ155 KDJ150 TRJ155 LJ150 - СИСТЕМА СМАЗКИ ДВИГАТЕЛЯ 5L-E

INSPECT OIL PUMP RELIEF VALVE

INSPECT OIL PUMP DRIVE GEAR

МАСЛЯНЫЙ НАСОС - ПРОВЕРКА

1. INSPECT OIL PUMP RELIEF VALVE
Масляный Насос - Проверка. СИСТЕМА СМАЗКИ ДВИГАТЕЛЯ 5L-E. Land Cruiser Prado GRJ150 TRJ150 TRJ155 KDJ150 TRJ155 LJ150

Coat the valve with engine oil and check that it falls smoothly into the valve hole by its own weight.

If the valve does not fall smoothly into the valve hole, replace the relief valve. If necessary, replace the timing belt case sub-assembly.
2. INSPECT OIL PUMP DRIVE GEAR
Масляный Насос - Проверка. СИСТЕМА СМАЗКИ ДВИГАТЕЛЯ 5L-E. Land Cruiser Prado GRJ150 TRJ150 TRJ155 KDJ150 TRJ155 LJ150

Install the rotors to the timing belt case with the marks on the rotors facing outward. Check that the rotors revolve smoothly.

Text in Illustration
*1Mark

Inspect the gear tip clearance.

Using a feeler gauge, measure the clearance between the drive and driven gear tips.

  • Standard tip clearance:
  • 0.110 to 0.240 mm (0.00433 to 0.00945 in.)
  • Maximum tip clearance:
  • 0.30 mm (0.0118 in.)
If the tip clearance is more than the maximum, replace the gears as a set.
Масляный Насос - Проверка. СИСТЕМА СМАЗКИ ДВИГАТЕЛЯ 5L-E. Land Cruiser Prado GRJ150 TRJ150 TRJ155 KDJ150 TRJ155 LJ150

Inspect the gear body clearance.

Using a feeler gauge, measure the clearance between the driven gear and timing belt case.

  • Standard body clearance:
  • 0.144 to 0.219 mm (0.00566 to 0.00862 in.)
  • Maximum body clearance:
  • 0.40 mm (0.0157 in.)
If the body clearance is more than the maximum, replace the gears as a set. If necessary, replace the timing belt case sub-assembly.
Масляный Насос - Проверка. СИСТЕМА СМАЗКИ ДВИГАТЕЛЯ 5L-E. Land Cruiser Prado GRJ150 TRJ150 TRJ155 KDJ150 TRJ155 LJ150

Inspect the gear side clearance.

Using a feeler gauge and precision straightedge, measure the clearance between the gears and precision straightedge.

  • Standard side clearance:
  • 0.035 to 0.085 mm (0.00138 to 0.00335 in.)
  • Maximum side clearance:
  • 0.15 mm (0.00590 in.)
If the side clearance is more than the maximum, replace the gears as a set. If necessary, replace the timing belt case sub-assembly.

Масляный Насос - Разборка

Land Cruiser Prado GRJ150 TRJ150 TRJ155 KDJ150 TRJ155 LJ150 - СИСТЕМА СМАЗКИ ДВИГАТЕЛЯ 5L-E

REMOVE OIL PUMP RELIEF VALVE

REMOVE OIL PUMP COVER

REMOVE OIL PUMP DRIVE GEAR

МАСЛЯНЫЙ НАСОС - РАЗБОРКА

1. REMOVE OIL PUMP RELIEF VALVE
Масляный Насос - Разборка. СИСТЕМА СМАЗКИ ДВИГАТЕЛЯ 5L-E. Land Cruiser Prado GRJ150 TRJ150 TRJ155 KDJ150 TRJ155 LJ150

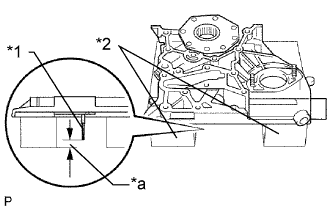
Place the timing belt case on wooden blocks.

Text in Illustration
*1Timing Pointer
*2Wooden Block
*aClearance
  • ПРИМЕЧАНИЕ:
  • Do not damage the timing pointer.
Масляный Насос - Разборка. СИСТЕМА СМАЗКИ ДВИГАТЕЛЯ 5L-E. Land Cruiser Prado GRJ150 TRJ150 TRJ155 KDJ150 TRJ155 LJ150

Using a 12 mm hexagon wrench, remove the plug, gasket, spring and relief valve.

Text in Illustration
*112 mm Hexagon Wrench
2. REMOVE OIL PUMP COVER

Remove the 8 screws and oil pump cover.

3. REMOVE OIL PUMP DRIVE GEAR

Remove the drive gear and driven gear.