INSTALL REAR SEAT ASSEMBLY (for 60/40 Split Seat Type RH Side)
INSTALL REAR SEAT ASSEMBLY (for 60/40 Split Seat Type LH Side)
Rear Seat Outer Belt Assembly (For Hatchback 5 Door) -- Installation |
- HINT:
- The procedure described below is for the RH side. Use the same procedure for both the RH and LH sides, unless otherwise specified.
| 1. INSTALL SEAT BELT HOLE SEAL |
Engage the 2 claws to install the seat belt hole seal.
| 2. INSTALL REAR SEAT 3 POINT TYPE OUTER BELT ASSEMBLY |
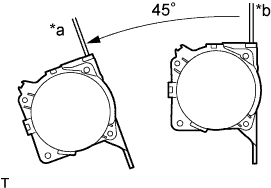
Check the angle of inclination required to lock the retractor.
Text in Illustration *a Lock *b Unlock Gently incline the retractor from its initial position. Check that the belt does not lock when the retractor is inclined 15° or less in any direction. Also, check that the belt locks when the inclination of the retractor is 45° or more.
- NOTICE:
- Do not disassemble the retractor.
 |
Engage the 2 hooks to install the rear seat 3 point type outer belt assembly.
Install the bolt.
- Torque:
- 41 N*m{420 kgf*cm, 30 ft.*lbf}
Install the floor anchor with the bolt.
- Torque:
- 41 N*m{420 kgf*cm, 30 ft.*lbf}
Check that the ELR locks.
- NOTICE:
- Perform the check with the rear seat 3 point type outer belt assembly installed.
With the belt installed, check that the belt locks when it is pulled out quickly.
- NOTICE:
- If the operation is not as specified, replace the rear seat 3 point type outer belt.
Remove the bolt and disconnect the floor anchor.
| 3. INSTALL ROOF SIDE INNER GARNISH |
Pass the rear seat 3 point type outer belt through the slit in the roof side inner garnish.
Engage the 4 clips and install the roof side inner garnish.
| 4. INSTALL DECK TRIM SIDE PANEL ASSEMBLY RH (for RH Side) |
Engage the 3 clips.
Engage the guide and the 4 claws and install the deck trim side panel.
Install the 3 screws.
| 5. INSTALL DECK TRIM SIDE PANEL ASSEMBLY LH (for LH Side) |
- HINT:
- Use the same procedure as for the RH side.
| 6. CONNECT REAR SEAT 3 POINT TYPE OUTER BELT ASSEMBLY |
Engage the 2 claws and install the rear seat 3 point type outer belt.
Tighten the bolt.
- Torque:
- 41 N*m{420 kgf*cm, 30 ft.*lbf}
| 7. INSTALL REAR DOOR OPENING TRIM WEATHERSTRIP |
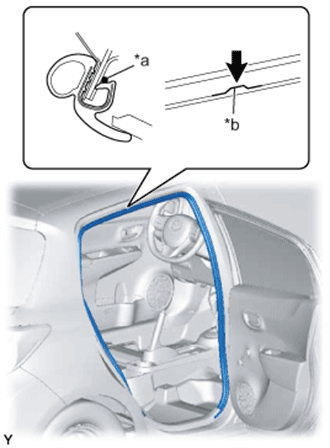
Align the paint mark on the rear door opening trim weatherstrip with the flange position on the vehicle body and install the weatherstrip.
Text in Illustration *a Paint Mark *b Flange Position - Paint Mark:
Area Color RH Side Purple LH Side Pink
- NOTICE:
- After installation, check that the corners fit correctly.
 |
| 8. INSTALL REAR DOOR SCUFF PLATE |
Engage the guide and the 5 claws and install the rear door scuff plate.
| 9. INSTALL REAR FLOOR FINISH PLATE |
Engage the 4 guides and the 4 claws to install the rear floor finish plate.
| 10. INSTALL JACK HANDLE (for RH Side) |
| 11. INSTALL NO. 2 ROOM LIGHT ASSEMBLY |
Connect the connector.
Engage the claw to install the No. 2 room light assembly.
 |
| 12. INSTALL DECK BOARD ASSEMBLY |
Install the deck board.
| 13. INSTALL REAR SEAT ASSEMBLY (for Fold Down Seat Type) |
| 14. INSTALL REAR SEAT ASSEMBLY (for 60/40 Split Seat Type RH Side) |
| 15. INSTALL REAR SEAT ASSEMBLY (for 60/40 Split Seat Type LH Side) |