Rear Door Speaker Installation
INSTALL REAR NO. 1 SPEAKER ASSEMBLY
INSTALL REAR DOOR TRIM BOARD SUB-ASSEMBLY LH
INSTALL REAR DOOR ARMREST BASE UPPER PANEL LH
CONNECT CABLE TO NEGATIVE BATTERY TERMINAL
Rear Door Speaker -- Installation |
- HINT:
- Use the same procedure for the RH side and LH sides.
- The procedure listed below are for the LH side.
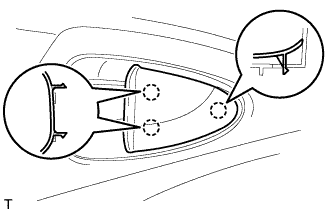
| 1. INSTALL REAR NO. 1 SPEAKER ASSEMBLY |
Using an air riveter or hand riveter, install the speaker with 3 new rivets.
- NOTICE:
- Do not pry the rivet with the riveter, as this will cause damage to the riveter and mandrel.
- Confirm that the rivets are seated properly against the speaker.
- Do not tilt the riveter when installing the rivet to the speaker.
- Do not leave any space between the rivet head and speaker.
- Do not leave any space between the speaker and door. Firmly hold together the 2 items while installing the rivet.
Connect the connector.
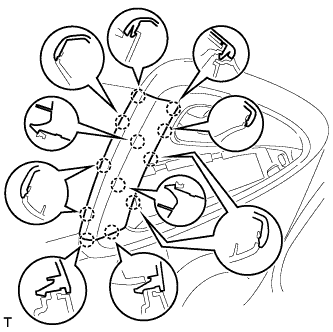
| 2. INSTALL REAR DOOR TRIM BOARD SUB-ASSEMBLY LH |
Attach the 6 claws to install the weatherstrip inner.
Attach the 2 claws to install the inside handle.
for 8 Clip Type:
Attach the 8 clips to install the trim board.
for 7 Clip Type:
Attach the 7 clips to install the trim board.
Install the 3 screws.
Attach the 3 claws to install the door inside handle bezel plug.
Attach the 12 claws to install the door assist grip cover.
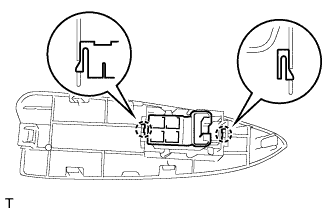
| 3. INSTALL REAR DOOR ARMREST BASE UPPER PANEL LH |
Attach the 2 claws and install the power window regulator switch to the panel.
Connect the switch connector.
Attach the clip and 5 claws to install the panel (with the switch).
| 4. CONNECT CABLE TO NEGATIVE BATTERY TERMINAL |