Engine Hybrid System. Yaris. Ncp93, 131
1Nz-Fe Engine Mechanical. Yaris. Ncp93, 131
REMOVE AUTOMATIC TRANSAXLE ASSEMBLY (for Automatic Transaxle)
REMOVE DRIVE PLATE AND RING GEAR SUB-ASSEMBLY (for Automatic Transaxle)
Rear Crankshaft Oil Seal (For Hatchback) -- Removal |
| 1. REMOVE AUTOMATIC TRANSAXLE ASSEMBLY (for Automatic Transaxle) |
| 2. REMOVE MANUAL TRANSAXLE ASSEMBLY (for Manual Transaxle) |
| 3. REMOVE CLUTCH COVER ASSEMBLY (for Manual Transaxle) |
Align the matchmark on the clutch cover assembly with the one on the flywheel.
Text in Illustration *a matchmarks
 |
Loosen each set bolt one turn at a time until the spring tension is released.
Remove the set bolts and pull off the clutch cover.
- NOTICE:
- Do not drop the clutch disc.
| 4. REMOVE CLUTCH DISC ASSEMBLY (for Manual Transaxle) |
| 5. REMOVE DRIVE PLATE AND RING GEAR SUB-ASSEMBLY (for Automatic Transaxle) |
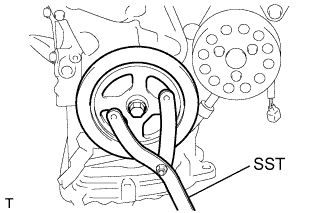 |
Hold the crankshaft with SST.
- SST
- 09960-10010(09962-01000,09963-01000)
Remove the 6 bolts, rear drive plate spacer, drive plate and ring gear sub-assembly, and front drive plate spacer.
 |
| 6. REMOVE FLYWHEEL SUB-ASSEMBLY (for Manual Transaxle) |
|
Hold the crankshaft with SST.
- SST
- 09960-10010(09962-01000,09963-01000)
Remove the 6 bolts and flywheel.
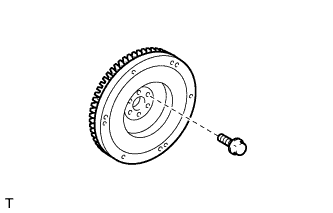 |
| 7. REMOVE REAR ENGINE OIL SEAL |
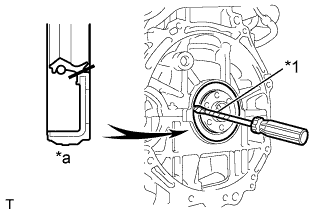 |
Using a knife, cut off the lip of the oil seal.
Text in Illustration *1 Protective Tape *a Cut Position
Using a screwdriver with its tip wrapped with tape, pry out the rear engine oil seal.
- NOTICE:
- After removing, check the crankshaft for damage. If damaged, smooth the surface with 400-grit sandpaper.