Brake Master Cylinder (For Hatchback) -- Installation |
| 1. INSTALL BRAKE MASTER CYLINDER SUB-ASSEMBLY (w/o VSC) |
Install a new O-ring onto the brake master cylinder sub-assembly.
Install the brake master cylinder sub-assembly with the 2 nuts.
- Torque:
- 13 N*m{128 kgf*cm, 9 ft.*lbf}
Using a union nut wrench 10 mm, install the 2 brake tubes onto the brake master cylinder sub-assembly.
- Torque:
- 15 N*m{155 kgf*cm, 11 ft.*lbf}
- NOTICE:
- Use the formula to calculate special torque values for situations where a union nut wrench is combined with a torque wrench (YARIS_NCP93 RM00000482L007X.html).
Connect the brake fluid level warning switch connector.
| 2. INSTALL BRAKE MASTER CYLINDER SUB-ASSEMBLY (w/ VSC) |
Install a new O-ring onto the brake master cylinder sub-assembly.
Install the brake master cylinder sub-assembly with the 2 nuts.
- Torque:
- 13 N*m{128 kgf*cm, 9 ft.*lbf}
Using a union nut wrench 12 mm, install the 2 brake tubes onto the brake master cylinder sub-assembly.
- Torque:
- 20 N*m{199 kgf*cm, 14 ft.*lbf}
- NOTICE:
- Use the formula to calculate special torque values for situations where a union nut wrench is combined with a torque wrench (YARIS_NCP93 RM00000482L007X.html).
Connect the brake fluid level warning switch connector.
| 3. CONNECT CLUTCH RESERVOIR TUBE (for Manual Transaxle) |
Connect the clutch reservoir tube with the clip.
| 4. INSTALL BATTERY CARRIER |
Install the battery carrier with the 5 bolts.
- Torque:
- 17 N*m{173 kgf*cm, 13 ft.*lbf}
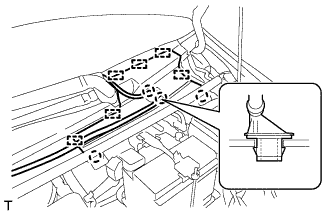
Engage the 6 clamps and connect the wire harness to the battery carrier.
| 5. INSTALL BATTERY TRAY |
| 6. INSTALL BATTERY |
Install the battery onto the battery tray with the battery clamp.
- Torque:
- 3.5 N*m{36 kgf*cm, 31 in.*lbf}
Connect the cable to the battery terminal.
- Torque:
- 5.4 N*m{55 kgf*cm, 48 in.*lbf}
| 7. BLEED BRAKE LINE |
| 8. BLEED CLUTCH LINE (for Manual Transaxle) |
| 9. INSTALL CENTER COWL TOP VENTILATOR LOUVER |
 |
Engage the 2 claws and 6 guides and install the cowl top ventilator louver center.
Engage the 2 claws and install the washer hose joint.
Engage the 2 clips and slide the hood to cowl top seal as shown in the illustration.
 |