Стартер - Узлы И Детали
Land Cruiser Prado GRJ150 TRJ150 TRJ155 KDJ150 TRJ155 LJ150 - СИСТЕМА ЗАПУСКА ДВИГАТЕЛЯ 5L-E
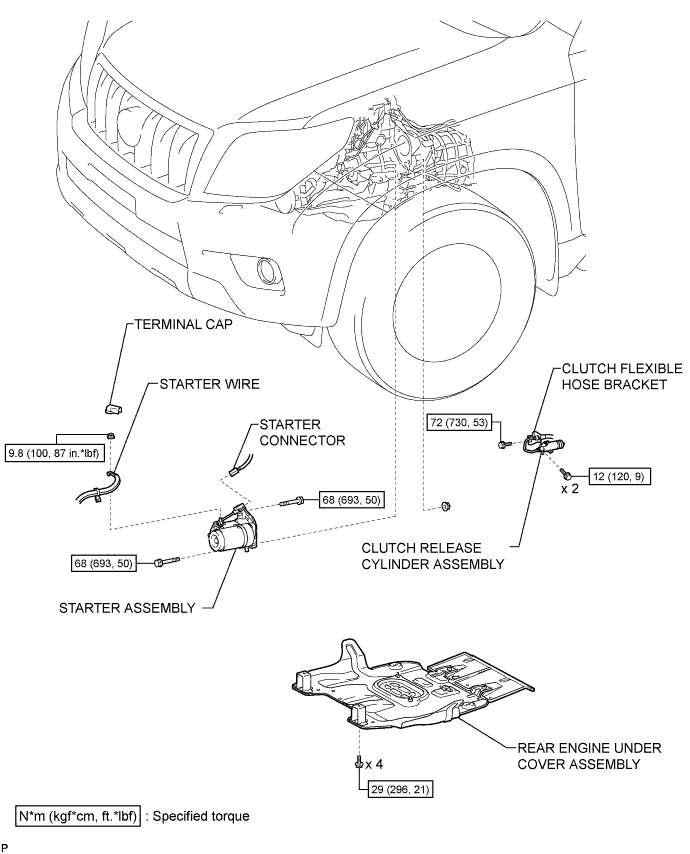
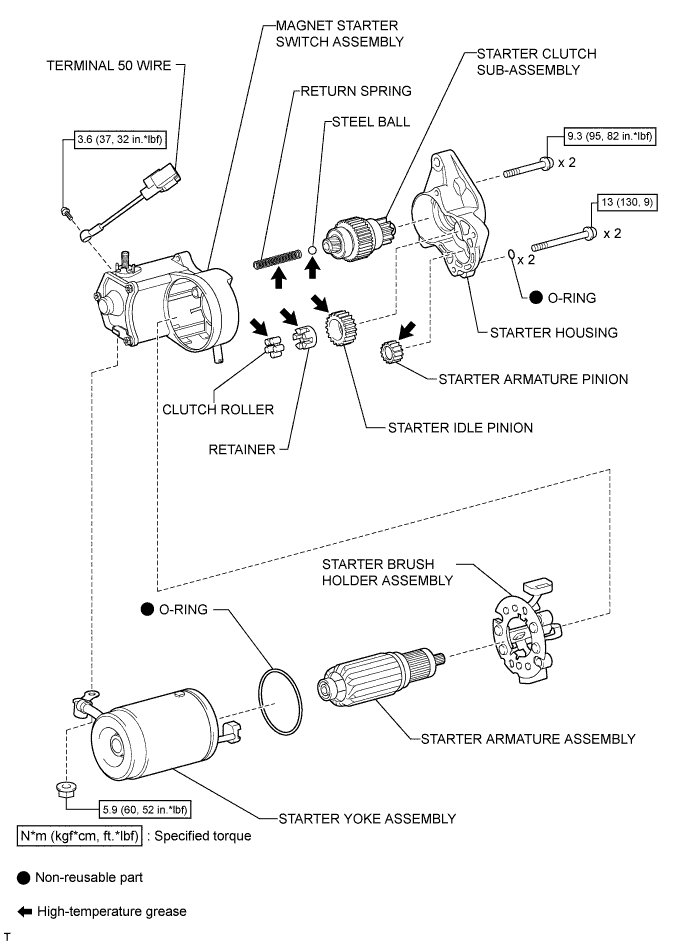
СТАРТЕР - УЗЛЫ И ДЕТАЛИ
1 / 2
2 / 2
| 1. INSTALL GLOW PLUG ASSEMBLY |
Using a 12 mm deep socket wrench, install the 4 glow plugs.
| 2. INSTALL NO. 1 GLOW PLUG CONNECTOR |
Install the No. 1 glow plug resistor insulator and No. 1 glow plug connector.

Install the glow plug connector with the 4 nuts. Uniformly tighten the nuts.
| *1 | Nut |
| *2 | Washer |
| *3 | No. 2 Glow Plug Resistor Insulator |
| *4 | Engine Wire |
| *5 | No. 1 Glow Plug Connector |
| *6 | No. 1 Glow Plug Resistor Insulator |
| *7 | Bolt |
Install the 4 screw grommets.
Connect the engine wire and install the No. 2 glow plug resistor insulator and washer with the bolt.
| 3. CONNECT VENTILATION HOSE |
Connect the ventilation hose.
| 4. INSTALL INTAKE PIPE |
Install the intake pipe with the 2 bolts and tighten the hose clamp.
| 5. INSTALL RESONATOR WITH AIR CLEANER CAP SUB-ASSEMBLY |
Вставьте петли крышки воздушного фильтра и шланг в корпус воздушного фильтра, а затем закрепите 4 откидных защелки.
Установите крышку воздушного фильтра и закрепите ее зажимом.
Закрепите зажим жгута проводов.
Подсоедините 2 зажима и разъем.
| 6. CONNECT CABLE TO NEGATIVE BATTERY TERMINAL |
| 1. DISCONNECT CABLE FROM NEGATIVE BATTERY TERMINAL |
| 2. REMOVE RESONATOR WITH AIR CLEANER CAP SUB-ASSEMBLY |

Disconnect the sensor connector.
Detach the wire harness clamp.
Loosen the hose clamp and remove the resonator with air cleaner cap.

Detach the 4 hook clamps, and then remove the air cleaner cap and resonator with air cleaner cap.
| 3. REMOVE INTAKE PIPE |

Remove the 2 bolts.
Loosen the hose clamp and remove the intake pipe.
| 4. DISCONNECT VENTILATION HOSE |

Disconnect the ventilation hose.
| 5. REMOVE NO. 1 GLOW PLUG CONNECTOR |

Remove the nut, No. 2 glow plug resistor insulator and washer and disconnect the wire harness.
Remove the 4 screw grommets and 4 nuts.
Remove the No. 1 glow plug connector and No. 1 glow plug resistor insulator.
| 6. REMOVE GLOW PLUG ASSEMBLY |
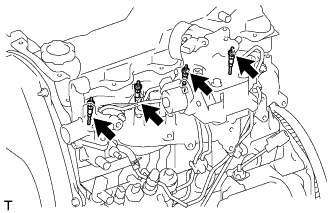
Using a 12 mm deep socket wrench, remove the 4 glow plugs.
| 1. INSPECT GLOW PLUG |

Measure the resistance according to the value(s) in the table below.
| Tester Connection | Condition | Specified Condition |
| Glow plug terminal - Body ground | 20°C (68°F) | Approximately 1.0 Ω |

| 1. INSPECT LIGHTING TIME OF GLOW INDICATOR LIGHT |
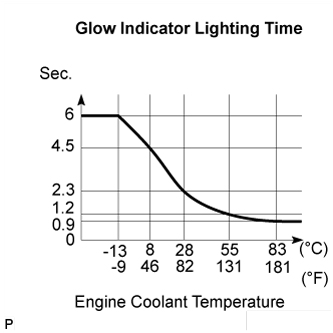
Turn the ignition switch to the ON position, and measure the lighting time.
| 2. INSPECT PRE-HEATING |
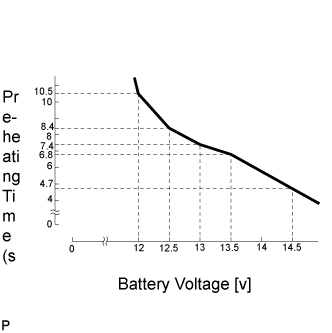
Turn the ignition switch to the ON position, measure the time when the battery voltage is applied to the glow plugs.
| Engine coolant temperature | Pre-Heating time |
| 40°C or more | 1 sec. |
| 40°C or less | Refer to the chart graph (15 sec. at the longest) |
Turn the ignition switch to the START position, and check the battery voltage is applied to the glow plugs.
While cranking the engine, measure the time when the battery voltage is applied to the glow plugs.
| Engine coolant temperature | Pre-Heating time |
| 40°C or more | 1 sec. |
| 40°C or less | Refer to the chart graph (15 sec. at the longest) |
| 3. INSPECT AFTER GLOW TIME |

After starting the engine starting, measure the time when the battery voltage is applied to the terminal SREL of the ECM.
| 4. INSPECT GLOW PLUGS |

Using an ohmmeter, measure the resistance between the glow plug terminal and ground.


