Радиатор - Установка
Land Cruiser Prado GRJ150 TRJ150 TRJ155 KDJ150 TRJ155 LJ150 - СИСТЕМА ОХЛАЖДЕНИЯ ДВИГАТЕЛЯ 5L-E
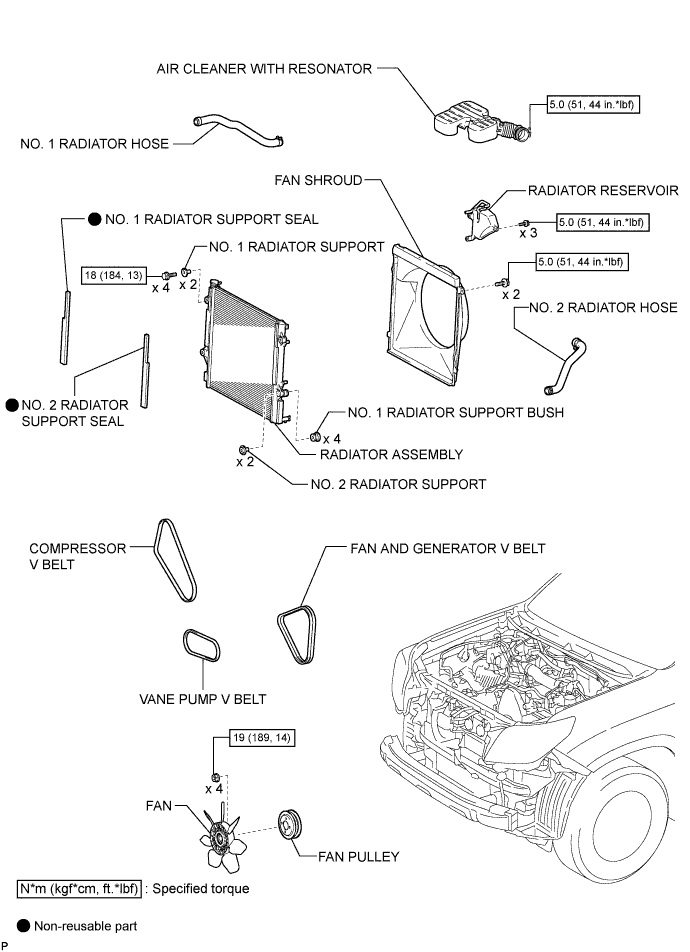
INSTALL NO. 1 RADIATOR SUPPORT SEAL
INSTALL NO. 2 RADIATOR SUPPORT SEAL
INSTALL NO. 2 RADIATOR SUPPORT
INSTALL NO. 1 RADIATOR SUPPORT
INSTALL RADIATOR ASSEMBLY
INSTALL FAN SHROUD
INSTALL RADIATOR RESERVOIR
INSTALL NO. 2 RADIATOR HOSE
INSTALL NO. 1 RADIATOR HOSE
INSTALL RADIATOR SIDE DEFLECTOR LH
INSTALL RADIATOR SIDE DEFLECTOR RH
INSTALL UPPER FRONT BUMPER RETAINER
INSTALL FRONT BUMPER COVER
ADD ENGINE COOLANT
INSPECT FOR ENGINE COOLANT LEAK
INSTALL NO. 1 ENGINE UNDER COVER SUB-ASSEMBLY
INSTALL FRONT BUMPER COVER LOWER
INSTALL UPPER RADIATOR SUPPORT SEAL
РАДИАТОР - УСТАНОВКА
| 1. INSTALL NO. 1 RADIATOR SUPPORT SEAL |
Install a new No. 1 radiator support seal to the radiator.
| 2. INSTALL NO. 2 RADIATOR SUPPORT SEAL |

Install a new No. 2 radiator support seal to the radiator.
| 3. INSTALL NO. 2 RADIATOR SUPPORT |
Install the 2 radiator supports and 2 No. 1 radiator support bushes as shown in the illustration.
| 4. INSTALL NO. 1 RADIATOR SUPPORT |

Install the 2 radiator supports and 2 No. 1 radiator support bushes as shown in the illustration.
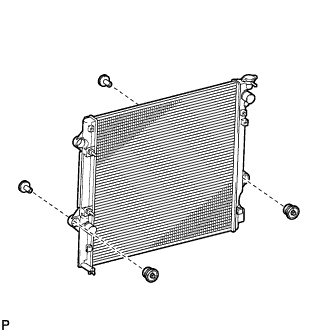
| 5. INSTALL RADIATOR ASSEMBLY |
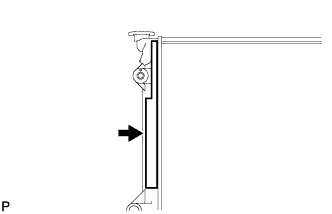
Insert the tabs of the radiator support into the radiator service holes.
Install the radiator with the 4 bolts.
- Момент затяжки:
- 18 N*m{ 184 kgf*cm, 13 ft.*lbf}
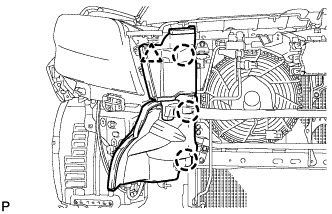
| 6. INSTALL FAN SHROUD |
Install the fan pulley to the water pump.
Install the shroud together with the coupling fan between the radiator and engine.
- ПРИМЕЧАНИЕ:
- Be careful not to damage the radiator core.
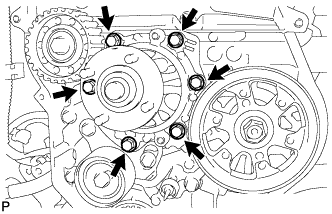
Temporarily install the fluid coupling fan to the fan pulley with the 4 nuts. Tighten the nuts as much as possible by hand.
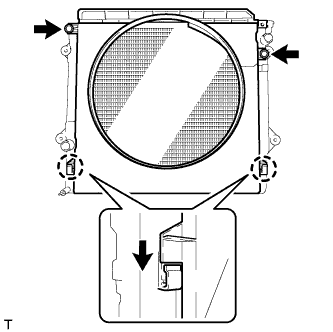
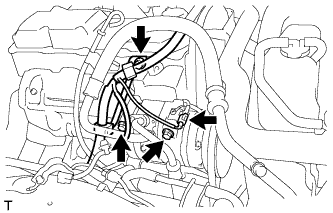
Attach the claws of the shroud as shown in the illustration.
Install the shroud with the 2 bolts.
- Момент затяжки:
- 5.0 N*m{ 51 kgf*cm, 44 in.*lbf}
Install the fan and generator V belt and vane pump V belt (See page ).
Tighten the 4 nuts of the fluid coupling fan.
- Момент затяжки:
- 19 N*m{ 189 kgf*cm, 14 ft.*lbf}
| 7. INSTALL RADIATOR RESERVOIR |
Install the radiator reservoir with the 3 bolts.
- Момент затяжки:
- 5.0 N*m{ 51 kgf*cm, 44 in.*lbf}
Connect the radiator reservoir hose to the radiator tank side.
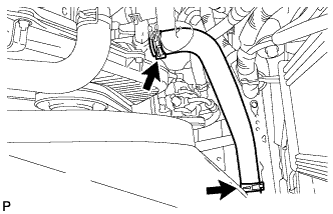
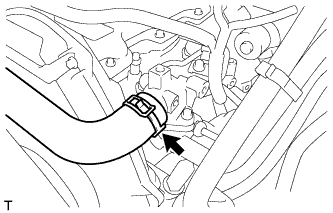
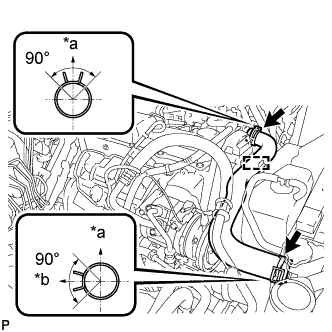
| 8. INSTALL NO. 2 RADIATOR HOSE |

Install the radiator hose.
| *a | Upper |
| *b | Front Side of Vehicle |
| *c | LH Side |
| *1 | Protrusion |
| *2 | Paint Mark |
- УКАЗАНИЕ:
- Position the hose clamps as shown in the illustration.
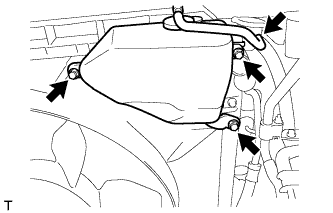
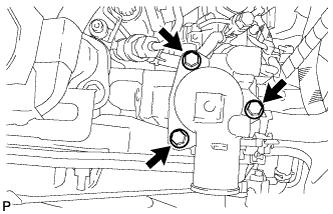
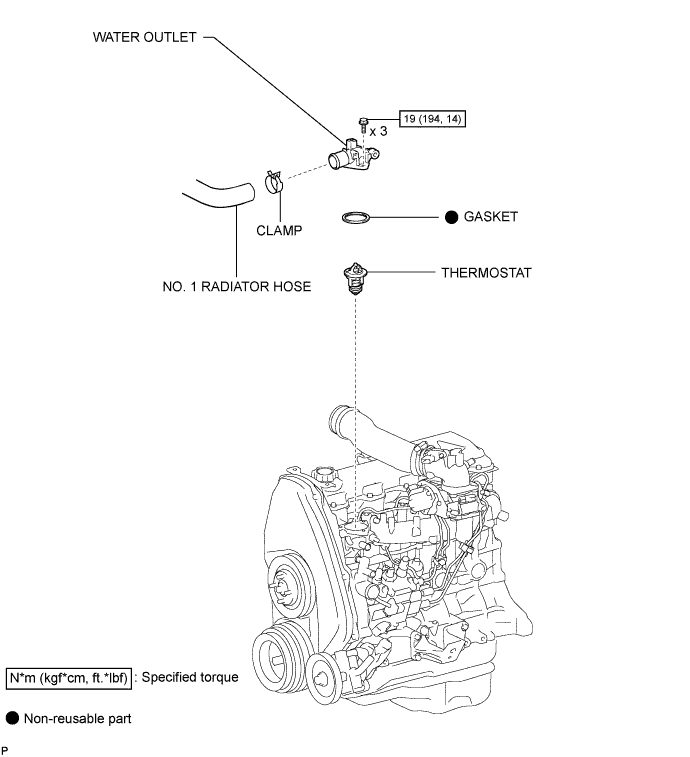
| 9. INSTALL NO. 1 RADIATOR HOSE |
Install the hose clamp with the 2 nuts.
- Момент затяжки:
- 8.5 N*m{ 87 kgf*cm, 75 in.*lbf}
Install the radiator hose.
| *a | Upper |
| *b | RH Side |
- УКАЗАНИЕ:
- Position the hose clamps as shown in the illustration.
| 10. INSTALL RADIATOR SIDE DEFLECTOR LH |
Attach the 3 claws.
Install the deflector with the clip.
| 11. INSTALL RADIATOR SIDE DEFLECTOR RH |
Attach the 3 claws.
Install the deflector with the clip.
| 12. INSTALL UPPER FRONT BUMPER RETAINER |
Install the upper retainer with the 3 bolts.
- Момент затяжки:
- 8.0 N*m{ 82 kgf*cm, 71 in.*lbf}
| 13. INSTALL FRONT BUMPER COVER |
Install the front bumper cover (See page ).
| 14. ADD ENGINE COOLANT |
Затяните пробку сливного крана радиатора вручную.
Затяните пробку сливного крана блока цилиндров.
- Момент затяжки:
- 13 N*m{ 130 kgf*cm, 9 ft.*lbf}
Медленно заполните систему охлаждающей жидкостью двигателя.
- Номинальный объем:
- 8,6 литра (9,0 кварты США, 7,6 английской кварты)
- ПРИМЕЧАНИЕ:
- Не доливайте простую воду вместо охлаждающей жидкости двигателя.
- УКАЗАНИЕ:
Медленно залейте охлаждающую жидкость в расширительный бачок радиатора до отметки "FULL".
Установите пробку расширительного бачка.
Несколько раз сожмите рукой патрубки радиатора № 1 и № 2, а затем проверьте уровень охлаждающей жидкости. Если уровень охлаждающей жидкости недостаточен, добавьте жидкость.
Установите на место пробку радиатора.
Запустите двигатель и прогрейте его до открывания термостата.
- УКАЗАНИЕ:
- Время открывания термостата можно распознать, сжав шланг радиатора № 2 рукой и отметив момент, когда охлаждающая жидкость двигателя начнет поступать в шланг.
Поддерживайте частоту вращения коленчатого вала двигателя 2000–2500 об/мин.
- ПРИМЕЧАНИЕ:
Несколько раз сожмите патрубки радиатора № 1 и № 2 рукой, чтобы удалить воздух.
- ПРЕДОСТЕРЕЖЕНИЕ:
Остановите двигатель и подождите, пока охлаждающая жидкость остынет до температуры окружающего воздуха.
- ПРЕДОСТЕРЕЖЕНИЕ:
- Не снимайте пробку радиатора, пока двигатель и радиатор не остынут. Выброс горячей охлаждающей жидкости и пара под давлением может стать причиной серьезных ожогов.
Убедитесь, что уровень охлаждающей жидкости находится между отметками "LOW" и "FULL".
Если уровень охлаждающей жидкости ниже линии "Low", повторите все вышеперечисленные действия.
Если уровень охлаждающей жидкости выше уровня "FULL", слейте охлаждающую жидкость до уровня между отметками "FULL" и "LOW".
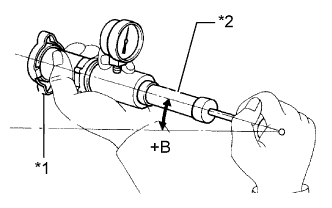
| 15. INSPECT FOR ENGINE COOLANT LEAK |
- ПРЕДОСТЕРЕЖЕНИЕ:
- To avoid being burned, do not remove the radiator reservoir cap while the engine and radiator are still hot. Thermal expansion may cause hot engine coolant and steam to blow out from the radiator.
Fill the radiator with coolant and attach a radiator cap tester to the radiator.
Warm up the engine.
Using a radiator cap tester, increase the pressure inside the radiator to 123 kPa (1.3 kgf/cm2, 18 psi), and check that the pressure does not drop.
If the pressure drops, check the hoses, radiator or water pump for leaks. If no external leaks are found, check the heater core, cylinder block, and cylinder head.
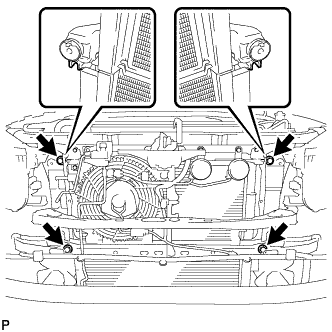
| 16. INSTALL NO. 1 ENGINE UNDER COVER SUB-ASSEMBLY |
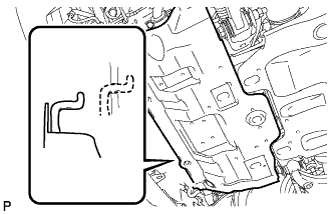
Hook the engine under cover to the vehicle body as shown in the illustration.
Install the 4 bolts.
- Момент затяжки:
- 29 N*m{ 296 kgf*cm, 21 ft.*lbf}
| 17. INSTALL FRONT BUMPER COVER LOWER |
Install the front bumper cover lower with the 5 bolts and clip.
- Момент затяжки:
- 8.0 N*m{ 82 kgf*cm, 71 in.*lbf}
| 18. INSTALL UPPER RADIATOR SUPPORT SEAL |
Установите верхнее уплотнение кронштейна радиатора и закрепите его 13 фиксаторами.