Navigation System -- Navigation Check Mode |
| GPS INFORMATION |
- HINT:
- This mode displays GPS satellite information.
- Illustrations may differ from the actual vehicle depending on the device settings and options.
Enter diagnostic mode (Click here).
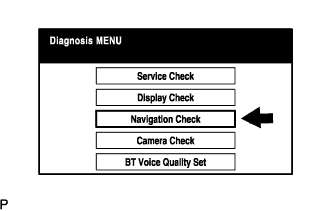
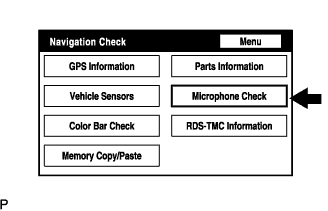
Select "Navigation Check" from the "Diagnosis MENU" screen.
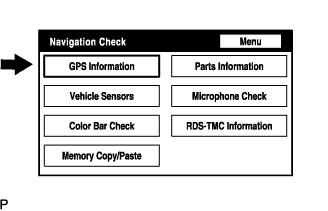
Select "GPS Information" from the "Navigation Check" screen.
When GPS information is displayed, check the GPS conditions.
- HINT:
- This screen is updated once per second when input signals to the vehicle are changed.
 |
 |
 |
| VEHICLE SENSORS |
- HINT:
- This mode checks the vehicle signal status to the navigation ECU.
- Illustrations may differ from the actual vehicle depending on the device settings and options.
Enter diagnostic mode (Click here).
Select "Navigation Check" from the "Diagnosis MENU" screen.
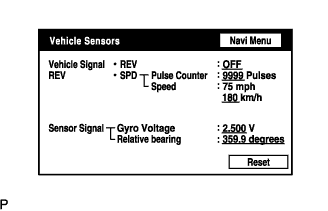
Select "Vehicle Sensors" from the "Navigation Check" screen.
Check all the signals and sensors when vehicle signal information is displayed.
- HINT:
- This screen is updated once per second when input signals to the vehicle are changed.
|
 |
 |
| NAVI COLOR BAR CHECK |
- HINT:
- This mode checks the navigation color bars on the multi-display.
- Illustrations may differ from the actual vehicle depending on the device settings and options.
Enter diagnostic mode (Click here).
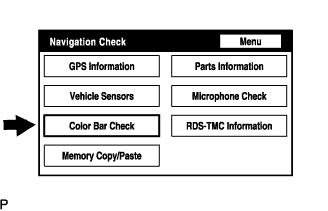
Select "Navigation Check" from the "Diagnosis MENU" screen.
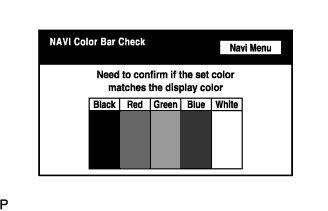
Select "Color Bar Check" from the "Navigation Check" screen.
Check each color of the color bar when the "NAVI Color Bar Check" screen is displayed.
- HINT:
- The selected color will not be displayed full-screen as in "Display Check Mode".
|
 |
 |
| PARTS INFORMATION |
- HINT:
- This mode checks the part information display function.
- Illustrations may differ from the actual vehicle depending on the device settings and options.
Enter diagnostic mode (Click here).
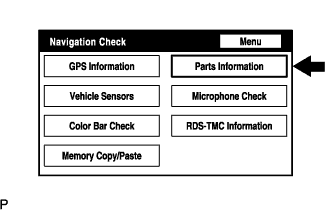
Select "Navigation Check" from the "Diagnosis MENU" screen.
Select "Parts Information" from the "Navigation Check" screen.
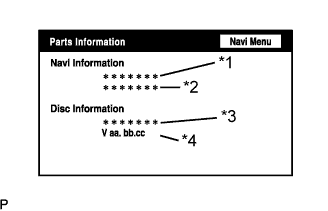
Check the navigation and disc information when the "Parts Information" screen is displayed.
Display Contents Navigation Manufacturer / *1 Navigation ECU manufacturer name is displayed Navigation Version / *2 Navigation ECU version is displayed Disc Manufacturer / *3 Map disc manufacturer is displayed Disc Version / *4 Map disc version is displayed
|
 |
 |
| MICROPHONE CHECK |
- HINT:
- The microphone is checked in the "Navigation Check (Microphone Check)" mode.
- Illustrations may differ from the actual vehicle depending on vehicle specifications.
Start diagnostic mode (Click here).
Select "Navigation Check" from the "Diagnosis MENU" screen.
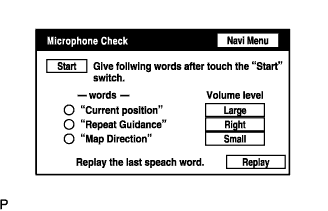
Select "Microphone Check" from the "Navigation Check" screen.
Perform the microphone check by following the directions on the "Microphone Check" screen.
|
 |
 |
| SCREEN NOISE AUTOMATIC ADJUSTMENT |
- HINT:
- This adjustment is performed to reduce noise when screen noise occurs upon replacing the multi-display, the navigation ECU or the television camera ECU.
- Illustrations may differ from the actual vehicle depending on the device settings and options.
- Perform both procedures below when the multi-display is replaced.
When either the multi-display or the navigation ECU is replaced:
Turn the engine switch on (ACC) and wait for at least 6 seconds to activate the diagnostic mode (Click here).
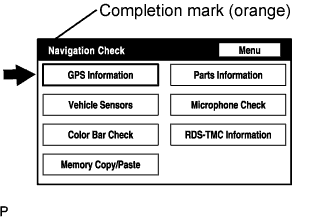
Select "Navigation Check" from the "Diagnosis MENU" screen.
The screen enters "Navigation Check" with a "beep" sound. Adjustment is completed when the completion mark is displayed.
Cancel the diagnostic mode (Click here).