Roof Speaker Installation
INSTALL ROOF SPEAKER ASSEMBLY
INSTALL NO. 2 PACKAGE TRAY TRIM PANEL ASSEMBLY (w/ Rear Sunshade)
INSTALL PACKAGE TRAY TRIM PANEL ASSEMBLY
INSTALL AUTOMATIC LIGHT CONTROL SENSOR
INSTALL HIGH MOUNTED STOP LIGHT ASSEMBLY
INSTALL ROOF SIDE GARNISH INNER LH
INSTALL ROOF SIDE GARNISH INNER RH
INSTALL REAR SEAT SIDE GARNISH LH
INSTALL REAR SEAT SIDE GARNISH RH
INSTALL REAR DOOR SCUFF PLATE LH
INSTALL REAR DOOR SCUFF PLATE RH
INSTALL REAR SEAT OUTER BELT ASSEMBLY
INSTALL REAR SEAT INNER WITH CENTER BELT ASSEMBLY RH
INSTALL REAR SEATBACK ASSEMBLY
INSTALL REAR SEAT HEADREST ASSEMBLY LH AND RH
REMOVE REAR SEAT HEADREST ASSEMBLY CENTER
INSTALL REAR SEAT CUSHION ASSEMBLY
PERFORM INITIALIZATION
Roof Speaker -- Installation |
- HINT:
- Use the same procedures for the LH side and RH side.
- The procedures listed below are for the LH side.
- A bolt without a torque specification is shown in the standard bolt chart (Click here).
| 1. INSTALL ROOF SPEAKER ASSEMBLY |
Connect the connector.
Install the speaker and attach the clip.
Install the bolt.
- HINT:
- Do not touch the cone part of the speaker.
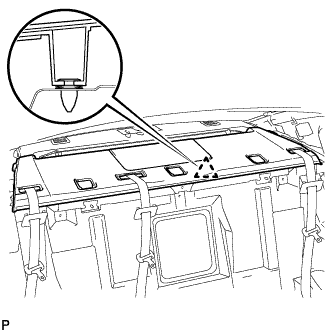
| 2. INSTALL NO. 2 PACKAGE TRAY TRIM PANEL ASSEMBLY (w/ Rear Sunshade) |
Connect the connector.
Attach the 5 claws and 3 clips to install the panel.
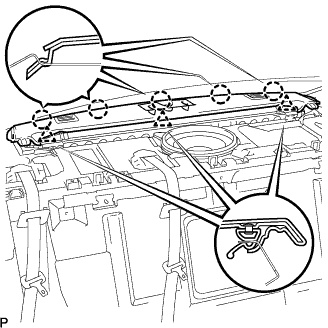
| 3. INSTALL PACKAGE TRAY TRIM PANEL ASSEMBLY |
Attach the clip to install the package tray trim panel.
Attach the 4 claws to install the belt guide center.
Attach the 4 claws to install the belt guide LH.
| 4. INSTALL AUTOMATIC LIGHT CONTROL SENSOR |
Connect the connector and install the sensor.
| 5. INSTALL HIGH MOUNTED STOP LIGHT ASSEMBLY |
Install the high mounted stop light.
| 6. INSTALL ROOF SIDE GARNISH INNER LH |
Attach the 2 claws and 4 clips, and install the garnish.
| 7. INSTALL ROOF SIDE GARNISH INNER RH |
- HINT:
- Use the same procedures described for the LH side.
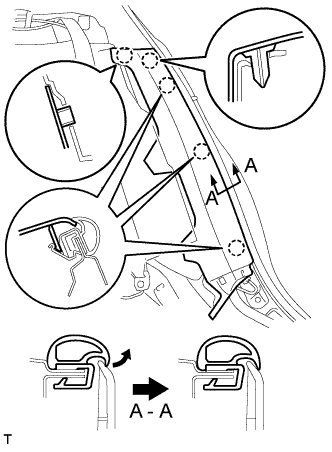
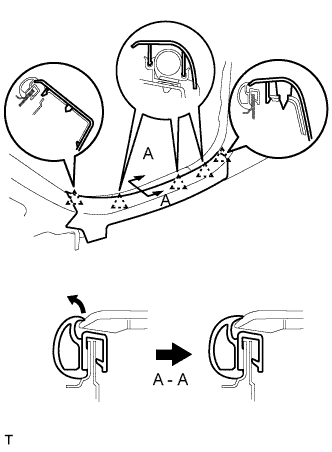
| 8. INSTALL REAR SEAT SIDE GARNISH LH |
Attach the 5 claws and install the garnish.
Pull out the folded lip of the weatherstrip.
| 9. INSTALL REAR SEAT SIDE GARNISH RH |
- HINT:
- Use the same procedures described for the LH side.
| 10. INSTALL REAR DOOR SCUFF PLATE LH |
Attach the 5 claws to install the scuff plate.
Pull out the folded lip of the weatherstrip.
| 11. INSTALL REAR DOOR SCUFF PLATE RH |
- HINT:
- Use the same procedures described for the LH side.
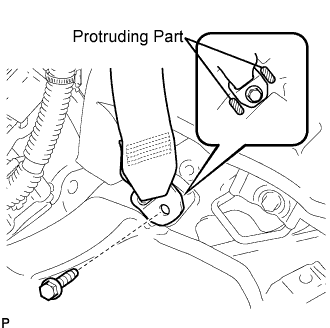
| 12. INSTALL REAR SEAT OUTER BELT ASSEMBLY |
Install the anchor part of the rear seat outer belt assembly with the bolt.
- NOTICE:
- Do not overlap the anchor part of the seat belt and protruding parts of the vehicle body.
- Torque:
- 42 N*m{428 kgf*cm, 31 ft.*lbf}
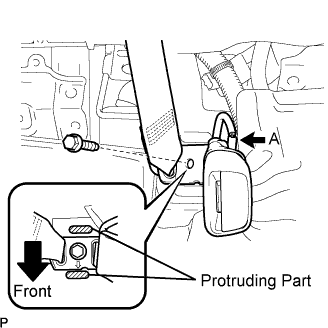
| 13. INSTALL REAR SEAT INNER WITH CENTER BELT ASSEMBLY RH |
Install the anchor part of the rear seat inner with center belt assembly RH seat belt with the bolt as shown in the illustration.
Connect the connector labeled A.
- NOTICE:
- Do not overlap the anchor part of the seat belt and protruding parts of the vehicle body.
- Torque:
- 42 N*m{428 kgf*cm, 31 ft.*lbf}
| 14. INSTALL REAR SEATBACK ASSEMBLY |
Place the seatback in the cabin.
- NOTICE:
- Be careful not to damage the vehicle body.
Install the seatback with the 4 bolts and 2 nuts.
- Torque:
- 18.1 N*m{185 kgf*cm, 13 ft.*lbf}
Install the 2 rear seat covers.
Pass the 3 seat belts through and close the cap of the 3 rear seat shoulder belt guides.
Install the floor anchor part with the bolt.
| 15. INSTALL REAR SEAT HEADREST ASSEMBLY LH AND RH |
| 16. REMOVE REAR SEAT HEADREST ASSEMBLY CENTER |
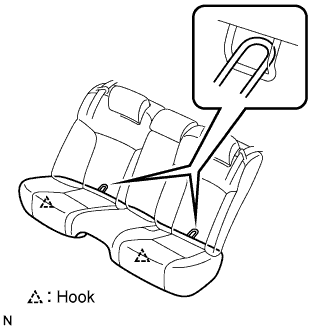
| 17. INSTALL REAR SEAT CUSHION ASSEMBLY |
Attach the seat cushion's 2 rear hooks to the seatback.
Attach the seat cushion's 2 front hooks to the vehicle body.
Confirm that the seat cushion is firmly installed.
- NOTICE:
- When installing the seat cushion, make sure the seat belt buckle is not under the seat cushion.
| 18. PERFORM INITIALIZATION |
Perform initialization (Click here).
- NOTICE:
- Certain systems need to be initialized after disconnecting and reconnecting the cable from the negative (-) battery terminal.