SET RADIO RECEIVER ASSEMBLY TO SHIPMENT MODE
DISCONNECT CABLE FROM NEGATIVE BATTERY TERMINAL
REMOVE FRONT CONSOLE UPPER PANEL GARNISH
REMOVE CONSOLE UPPER PANEL ASSEMBLY
REMOVE INSTRUMENT PANEL FINISH PANEL END LH
REMOVE INSTRUMENT PANEL FINISH PANEL END RH
REMOVE MULTI-DISPLAY WITH RADIO RECEIVER ASSEMBLY
CONFIRM RADIO RECEIVER ASSEMBLY SHIPMENT MODE SETTING
REMOVE NO. 2 RADIO BRACKET
REMOVE NO. 1 RADIO BRACKET
REMOVE MULTI-DISPLAY
REMOVE RADIO RECEIVER ASSEMBLY
Radio Receiver -- Removal |
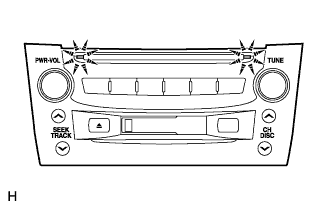
| 1. SET RADIO RECEIVER ASSEMBLY TO SHIPMENT MODE |
Remove all discs and tapes.
- NOTICE:
- If the discs or tapes cannot be removed, do not attempt to remove them forcibly. Send the unit to a repair shop.
Turn the engine switch off.
While simultaneously pressing the "SEEK UP" and "DISC" switches, turn the engine switch on (ACC).
- HINT:
- The CD loading door indicator light blinks during mode setting and it remains lit after the setting is completed.
Turn the engine switch off.
| 2. DISCONNECT CABLE FROM NEGATIVE BATTERY TERMINAL |
- CAUTION:
- Wait at least 90 seconds after disconnecting the cable from the negative (-) battery terminal to prevent airbag and seat belt pretensioner activation.
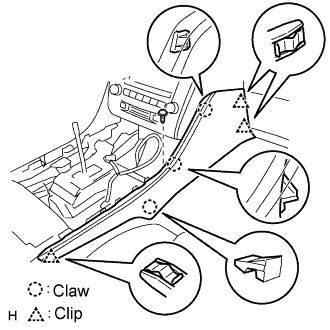
| 3. REMOVE FRONT CONSOLE UPPER PANEL GARNISH |
Using a clip remover, detach the claws and remove the garnish.
- HINT:
- Tape the clip remover tip before use.
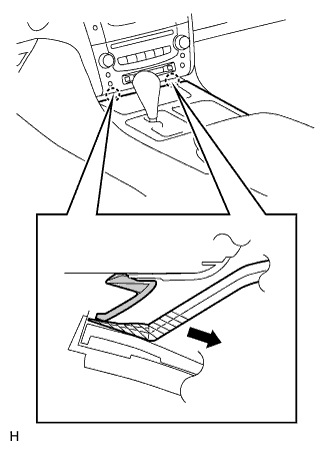
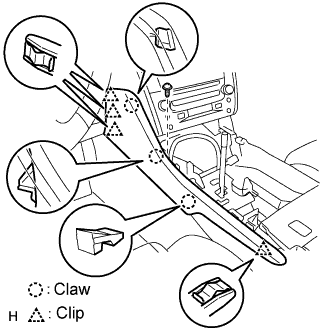
| 4. REMOVE CONSOLE UPPER PANEL ASSEMBLY |
Twist the shift lever knob in the direction indicated by the arrow and remove it.
Using a screwdriver, detach the 9 clips.
- HINT:
- Tape the screwdriver tip before use.
Remove the ash receptacle and then disconnect the connector.
| 5. REMOVE INSTRUMENT PANEL FINISH PANEL END LH |
Remove the screw.
Using a screwdriver, detach the 4 clips and 3 claws.
- HINT:
- Tape the screwdriver tip before use.
Remove the finish panel end.
| 6. REMOVE INSTRUMENT PANEL FINISH PANEL END RH |
Remove the screw.
Using a screwdriver, detach the 3 clips and 3 claws.
- HINT:
- Tape the screwdriver tip before use.
Remove the finish panel end.
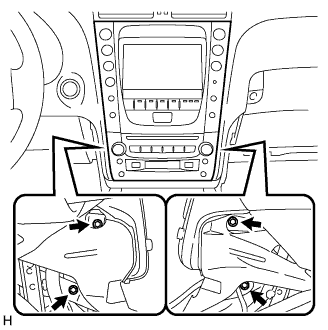
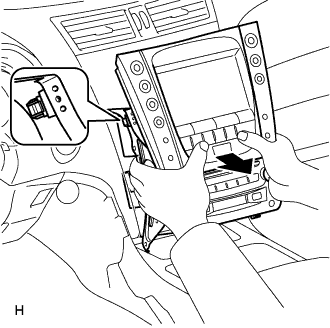
| 7. REMOVE MULTI-DISPLAY WITH RADIO RECEIVER ASSEMBLY |
Remove the 4 bolts.
Pull the multi-display with radio receiver to detach the 2 clips on the backside of the multi-display.
Disconnect the connectors and remove the multi-display with radio receiver.
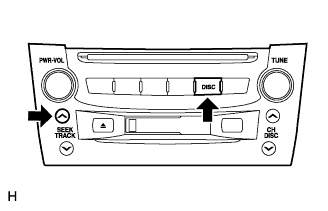
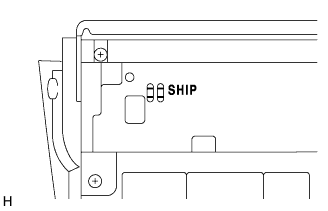
| 8. CONFIRM RADIO RECEIVER ASSEMBLY SHIPMENT MODE SETTING |
Look at the backside of the radio receiver and check that a metal plate can be seen through the hole near the "SHIP" mark.
- NOTICE:
- If a metal plate cannot be seen, perform the shipment mode setting again.
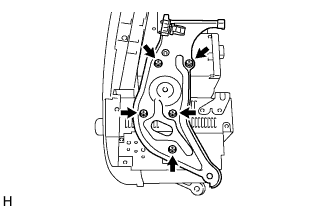
| 9. REMOVE NO. 2 RADIO BRACKET |
Remove the 5 bolts and bracket.
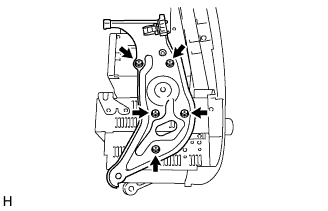
| 10. REMOVE NO. 1 RADIO BRACKET |
Remove the 5 bolts and bracket.
| 12. REMOVE RADIO RECEIVER ASSEMBLY |