Meter / Gauge System Cluster Glass Does Not Become Tinted
Meter. Lexus Gs430, Gs300. Uzs190 Grs190
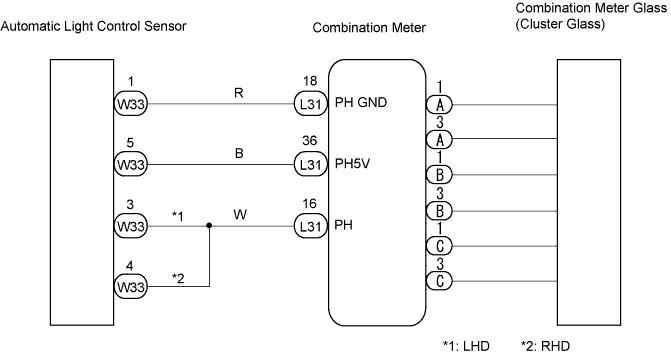
WIRING DIAGRAM
INSPECTION PROCEDURE
PERFORM ACTIVE TEST BY INTELLIGENT TESTER
READ VALUE OF INTELLIGENT TESTER
CHECK HARNESS AND CONNECTOR (COMBINATION METER - AUTOMATIC LIGHT CONTROL SENSOR)
INSPECT COMBINATION METER
INSPECT COMBINATION METER
METER / GAUGE SYSTEM - Cluster Glass does not Become Tinted |
WIRING DIAGRAM
INSPECTION PROCEDURE
| 1.PERFORM ACTIVE TEST BY INTELLIGENT TESTER |
Cover the automatic light control sensor with a cloth to prevent it from sensing.
Operate the intelligent tester according to the display and select the "Active Test".
- Combination meter:
Item
| Test Details
| Diagnostic Note
|
Indicat. ECD ON
| Indicat. ECD ON (OFF/ON)
| -
|
- OK:
- Cluster glass becomes tinted (minimum value) when the Active Test is ON.
| 2.READ VALUE OF INTELLIGENT TESTER |
Operate the intelligent tester according to the display and select the "Data List".
- Combination meter:
Item
| Measurement Item/ Range (Display)
| Normal Condition
| Diagnostic Note
|
ECD Sunlight Sensor
| ECD sunlight sensor input value/
Min.: 0, Max.: 255
| Between 50 to 70
| Light is not shined on automatic light control sensor
|
Between "light is not shined on automatic light control sensor" value and 195*1
| Shine light on automatic light control sensor
|
- HINT:
- *1: The value changes according to the intensity of the light.
| | REPLACE COMBINATION METER |
|
|
| 3.CHECK HARNESS AND CONNECTOR (COMBINATION METER - AUTOMATIC LIGHT CONTROL SENSOR) |
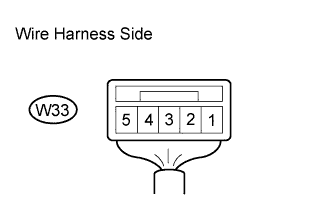
Disconnect the L31 connector.
Disconnect the W33 automatic light control sensor connector.
Measure the resistance of the wire harness side connectors.
- Standard resistance:
- LHD
Tester Connection
| Condition
| Specified Condition
|
L31-36 - W33-5
| Always
| Below 1 Ω
|
L31-16 - W33-3
| Always
| Below 1 Ω
|
L31-18 - W33-1
| Always
| Below 1 Ω
|
L31-16 - W33-5
| Always
| 10 kΩ or higher
|
L31-16 - W33-1
| Always
| 10 kΩ or higher
|
L31-16 - Body ground
| Always
| 10 kΩ or higher
|
L31-18 - Body ground
| Always
| 10 kΩ or higher
|
Measure the resistance of the wire harness side connectors.
- Standard resistance:
- RHD
Tester Connection
| Condition
| Specified Condition
|
L31-36 - W33-5
| Always
| Below 1 Ω
|
L31-16 - W33-4
| Always
| Below 1 Ω
|
L31-18 - W33-1
| Always
| Below 1 Ω
|
L31-16 - W33-5
| Always
| 10 kΩ or higher
|
L31-16 - W33-1
| Always
| 10 kΩ or higher
|
L31-16 - Body ground
| Always
| 10 kΩ or higher
|
L31-18 - Body ground
| Always
| 10 kΩ or higher
|
| | REPAIR OR REPLACE HARNESS AND CONNECTOR |
|
|
| 4.INSPECT COMBINATION METER |
Connect the L31 connector to the combination meter.
Disconnect the W33 automatic light control sensor connector.
Measure the resistance of the wire harness side connector.
- Standard resistance:
- LHD
Tester Connection
| Condition
| Specified Condition
|
W33-3 - W33-5
| Always
| 275 to 325 Ω
|
- Standard resistance:
- RHD
Tester Connection
| Condition
| Specified Condition
|
W33-4 - W33-5
| Always
| 275 to 325 Ω
|
Measure the voltage of the wire harness side connector.
- Standard voltage:
Tester Connection
| Condition
| Specified Condition
|
W33-1 - W33-5
| Engine switch on (IG)
| 4.6 to 5.4 V
|
| | REPLACE COMBINATION METER |
|
|
| OK |
|
|
|
| REPLACE AUTOMATIC LIGHT CONTROL SENSOR |
|
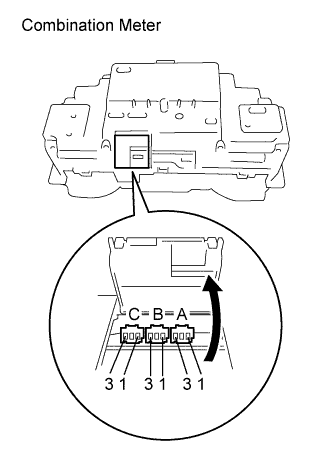
| 5.INSPECT COMBINATION METER |
Disconnect the connectors labeled A, B and C in the illustration.
Measure the voltage of the wire harness side connector on the combination meter.
- Standard voltage:
Tester Connection
| Condition
| Specified Condition
|
A-1 - A-3
| 60 seconds after performing Active Test "Indicate ECD ON"
| 1.22 to 1.32 V
|
B-1 - B-3
| 60 seconds after performing Active Test "Indicate ECD ON"
| 1.22 to 1.32 V
|
C-1 - C-3
| 60 seconds after performing Active Test "Indicate ECD ON"
| 1.22 to 1.32 V
|
| | REPLACE COMBINATION METER |
|
|
| OK |
|
|
|
| REPLACE COMBINATION METER GLASS |
|