Meter / Gauge System Seat Belt Warning Light For Passenger Seat Does Not Operate
Meter. Lexus Gs430, Gs300. Uzs190 Grs190
DESCRIPTION
WIRING DIAGRAM
INSPECTION PROCEDURE
CHECK SUPPLEMENTAL RESTRAINT SYSTEM
PERFORM ACTIVE TEST BY INTELLIGENT TESTER (SEAT BELT WARNING LIGHT FOR PASSENGER SIDE)
CHECK COMBINATION METER
INSPECT FUSE (ECU-IG RH, AM2, TV)
CHECK WIRE HARNESS (MULTI-DISPLAY - BATTERY AND BODY GROUND)
INSPECT MULTI-DISPLAY (SEAT BELT WARNING LIGHT FOR PASSENGER SIDE)
CHECK WIRE HARNESS (COMBINATION METER - MULTI-DISPLAY)
METER / GAUGE SYSTEM - Seat Belt Warning Light for Passenger Seat does not Operate |
DESCRIPTION
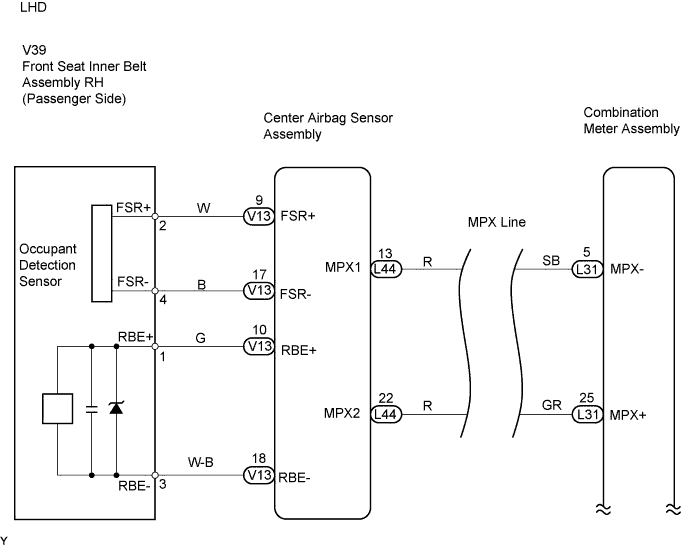
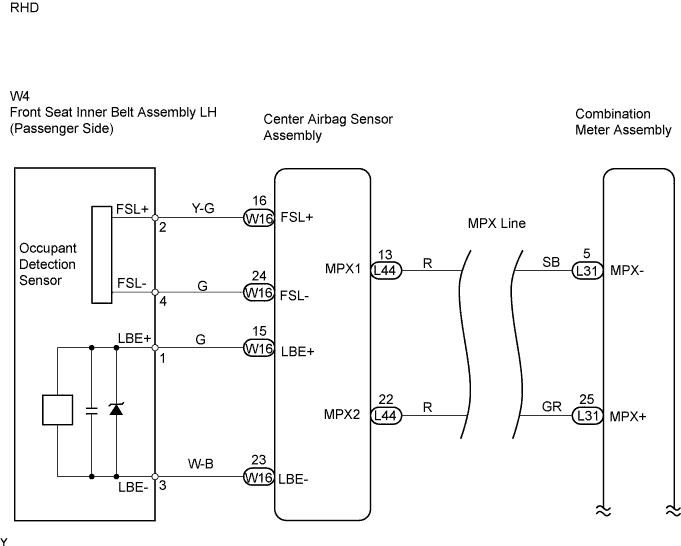
When the engine switch is on (IG) and the passenger seat is occupied, the center airbag sensor communicates the status of the front seat inner belt (passenger side) to the combination meter using the BEAN line. When the seat belt is unfastened, the combination meter flashes the passenger side seat belt warning light on the multi-display. When the seat belt is fastened, the combination meter stops flashing the passenger side seat belt warning light.
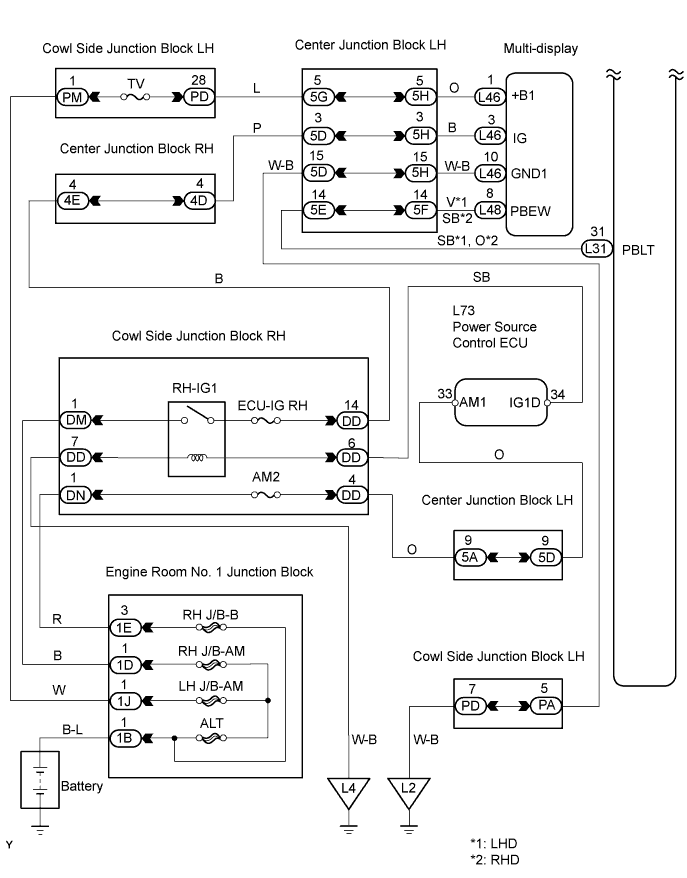
WIRING DIAGRAM
INSPECTION PROCEDURE
| 1.CHECK SUPPLEMENTAL RESTRAINT SYSTEM |
Check for supplemental restraint system (SRS) DTCs.
- Result:
Result
| Proceed to
|
No SRS DTCs are output
| A
|
SRS DTCs are output
| B
|
| | GO TO SUPPLEMENTAL RESTRAINT SYSTEM |
|
|
| 2.PERFORM ACTIVE TEST BY INTELLIGENT TESTER (SEAT BELT WARNING LIGHT FOR PASSENGER SIDE) |
Select the Active Test, use the intelligent tester to generate a control command, and then check that the seat belt warning light operates.
- Combination meter:
Item
| Test Details
| Diagnostic Note
|
Indicat. Lamp P-Seat Belt
| Seat belt warning light for passenger side / OFF or ON
| Confirm that vehicle is stopped and engine is idling
|
- OK:
- Seat belt warning light for passenger side operates normally.
| OK |
|
|
|
| REPLACE CENTER AIRBAG SENSOR |
|
| 3.CHECK COMBINATION METER |
Check that the entire combination meter operates normally.
- OK:
- Entire combination meter operates normally.
| 4.INSPECT FUSE (ECU-IG RH, AM2, TV) |
Remove the ECU-IG RH and AM2 fuses from the cowl side junction block RH.
Remove the TV fuse from the cowl side junction block LH.
Measure the resistance of the fuses.
- Standard resistance:
- Below 1 Ω
| 5.CHECK WIRE HARNESS (MULTI-DISPLAY - BATTERY AND BODY GROUND) |
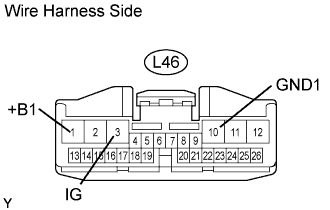
Disconnect the L46 Multi-display connector.
Measure the voltage and resistance of the wire harness side connector.
- Standard voltage:
Tester connection
| Switch Condition
| Specified Condition
|
L46-3(IG) - Body ground
| Engine switch on (IG)
| 10 to 14 V
|
L46-1(+B1) - Body ground
| Always
| 10 to 14 V
|
- Standard resistance:
Tester Connection
| Switch Condition
| Specified Condition
|
L46-10(GND1) - Body ground
| Always
| Below 1 Ω
|
| | REPAIR OR REPLACE HARNESS AND CONNECTOR |
|
|
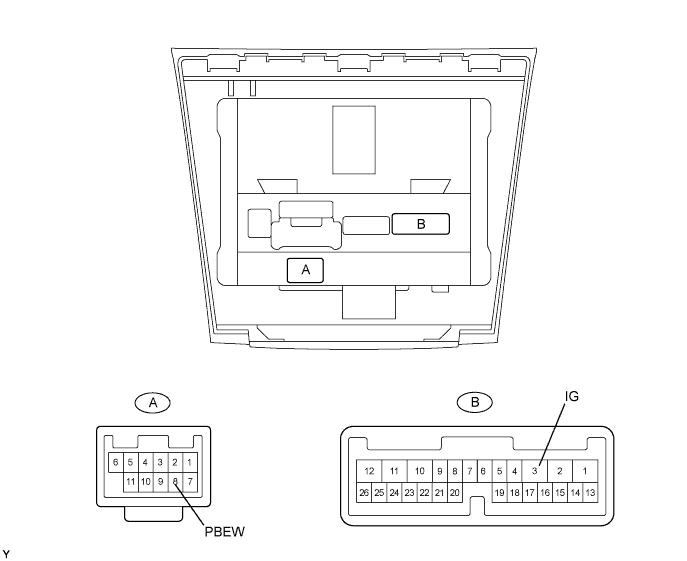
| 6.INSPECT MULTI-DISPLAY (SEAT BELT WARNING LIGHT FOR PASSENGER SIDE) |
Remove the multi-display.
Apply battery voltage to the panel and check that the light illuminates.
- OK:
Measurement Connection
| Specified Condition
|
Battery positive (+) → B-3 (IG)
Battery negative (-) → A-8 (PBEW)
| Seat belt warning light for passenger side illuminates
|
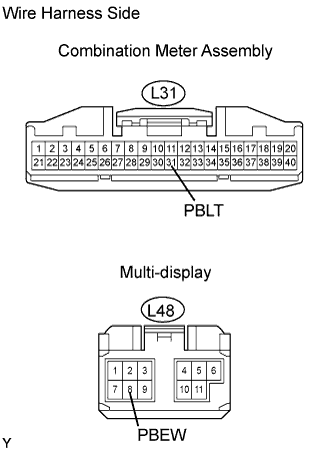
| 7.CHECK WIRE HARNESS (COMBINATION METER - MULTI-DISPLAY) |
Disconnect the L31 meter connector.
Disconnect the L48 multi-display connector.
Measure the resistance of the wire harness side connectors.
- Standard resistance:
Tester Connection
| Specified Condition
|
L31-31 (PBLT) - L48-8 (PBEW)
| Below 1 Ω
|
| | REPAIR OR REPLACE HARNESS AND CONNECTOR |
|
|
| OK |
|
|
|
| REPLACE COMBINATION METER |
|