Toe Control Link Installation
TEMPORARILY TIGHTEN TOE CONTROL LINK
STABILIZE SUSPENSION
FULLY TIGHTEN TOE CONTROL LINK
INSTALL REAR WHEEL
INSPECT AND ADJUST REAR WHEEL ALIGNMENT
Toe Control Link -- Installation |
| 1. TEMPORARILY TIGHTEN TOE CONTROL LINK |
Install the toe control link, and insert the toe adjust cam from the front of the vehicle. Then, install the toe adjust plate No.2 and temporarily tighten the nut.
- NOTICE:
- Align the matchmarks on the rear suspension member and rear suspension toe adjust plate No.2.
Install the rear suspension toe control link with a new nut.
- Torque:
- 70 N*m{714 kgf*cm, 52 ft.*lbf}
Jack up the axle carrier, with a wooden block placed between the jack and axle carrier, to apply load to the rear suspension so that the rear drive shaft assembly becomes level.
| 3. FULLY TIGHTEN TOE CONTROL LINK |
Fully tighten the nut on the rear suspension member side.
- Torque:
- 50 N*m{510 kgf*cm, 37 ft.*lbf}
- NOTICE:
- Check that matchmarks on the rear suspension member and rear suspension toe adjust plate No.2 are aligned.
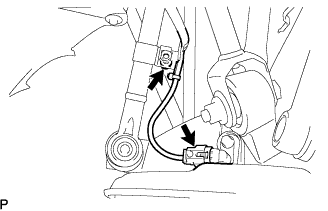
Install the skid control sensor wire with the bolt.
- Torque:
- 6.0 N*m{61 kgf*cm, 53 in.*lbf}
Connect the skid control sensor connector.
- Torque:
- 103 N*m{1,050 kgf*cm, 76 ft.*lbf}
| 5. INSPECT AND ADJUST REAR WHEEL ALIGNMENT |
(Click here)