Rear Differential Carrier Assembly (For 3Uz-Fe) Installation
INSTALL REAR DIFFERENTIAL CARRIER ASSEMBLY
INSTALL REAR SUSPENSION MEMBER ASSEMBLY
INSTALL SUSPENSION MEMBER BRACE REAR LOWER LH
INSTALL REAR SUSPENSION MEMBER BRACE REAR LOWER RH
CONNECT HEIGHT CONTROL SENSOR REAR LH
INSTALL REAR DRIVE SHAFT ASSEMBLY LH
INSTALL REAR DRIVE SHAFT ASSEMBLY RH
INSTALL PARKING BRAKE CABLE ASSEMBLY NO.3
INSTALL PARKING BRAKE CABLE ASSEMBLY NO.2
INSTALL REAR SUSPENSION MEMBER BRACE LH
INSTALL REAR SUSPENSION MEMBER BRACE RH
INSTALL DIFFERENTIAL SUPPORT PROTECTOR NO.2
INSTALL DIFFERENTIAL SUPPORT PROTECTOR NO.1
TEMPORARILY TIGHTEN REAR SHOCK ABSORBER WITH COIL SPRING LH
TEMPORARILY TIGHTEN REAR SHOCK ABSORBER WITH COIL SPRING RH
INSTALL REAR AXLE ASSEMBLY LH
INSTALL REAR AXLE ASSEMBLY RH
INSTALL REAR FLOOR SIDE MEMBER COVER LH
INSTALL REAR FLOOR SIDE MEMBER COVER RH
FULLY TIGHTEN REAR SHOCK ABSORBER WITH COIL SPRING LH
FULLY TIGHTEN REAR SHOCK ABSORBER WITH COIL SPRING RH
INSTALL REAR PROPELLER SHAFT ASSEMBLY
ADD DIFFERENTIAL OIL
INSPECT AND ADJUST DIFFERENTIAL OIL
INSTALL REAR WHEEL
INSTALL EXHAUST PIPE ASSEMBLY
INSPECT PARKING BRAKE PEDAL TRAVEL
ADJUST PARKING BRAKE PEDAL TRAVEL
INSPECT AND ADJUST REAR WHEEL ALIGNMENT
CHECK FOR EXHAUST GAS LEAKS
CHECK ABS SPEED SENSOR SIGNAL
Rear Differential Carrier Assembly (For 3Uz-Fe) -- Installation |
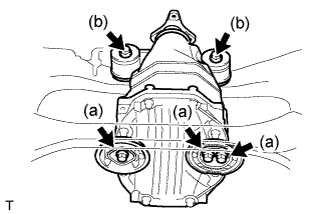
| 1. INSTALL REAR DIFFERENTIAL CARRIER ASSEMBLY |
Using a hexagon wrench (12 mm), temporarily install the differential carrier to the suspension member with 3 new bolts.
Install the mount stopper upper and mount stopper lower. Temporarily install the differential carrier rear to the suspension member with 2 new bolts.
Using a hexagon wrench (12 mm) and torque wrench, tighten the 3 bolts to the specified torque.
- Torque:
- 142 N*m{1,450 kgf*cm, 105 ft.*lbf}
Using a torque wrench, tighten 2 bolts to the specified torque.
- Torque:
- 95 N*m{970 kgf*cm, 70 ft.*lbf}
- NOTICE:
- Do not tilt the inner tube and rubber parts when fully tightening the differential mount stopper.
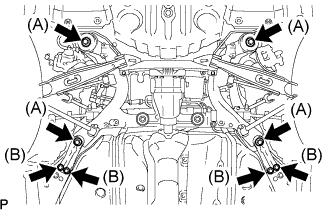
| 2. INSTALL REAR SUSPENSION MEMBER ASSEMBLY |
Support the rear suspension member along with the differential using a jack.
- HINT:
- Install the rear suspension member along with the rear differential carrier assembly.
Install the 2 rear suspension member stoppers and 2 differential support member stoppers to the rear suspension member.
Install the rear suspension member along with the rear suspension member stopper lower with the 8 bolts.
- Torque:
- Bolt A:
- 127 N*m{1,300 kgf*cm, 94 ft.*lbf}
- Bolt B:
- 19 N*m{195 kgf*cm, 14 ft.*lbf}
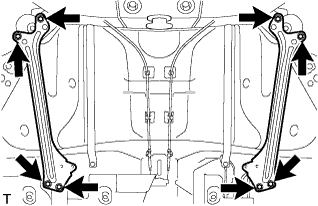
| 3. INSTALL SUSPENSION MEMBER BRACE REAR LOWER LH |
Install the suspension member brace rear lower LH with the 4 bolts.
- Torque:
- 19 N*m{195 kgf*cm, 14 ft.*lbf}
| 4. INSTALL REAR SUSPENSION MEMBER BRACE REAR LOWER RH |
Install the suspension member brace rear lower RH with the 4 bolts.
- Torque:
- 19 N*m{195 kgf*cm, 14 ft.*lbf}
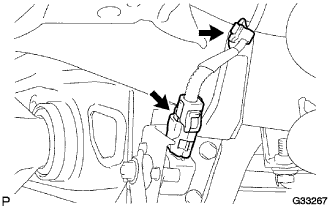
| 5. CONNECT HEIGHT CONTROL SENSOR REAR LH |
Install the clamp to the rear suspension member.
Connect the height control sensor connector.
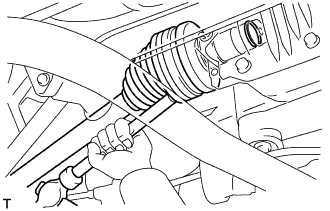
| 6. INSTALL REAR DRIVE SHAFT ASSEMBLY LH |
Coat the spline of the inboard joint shaft assembly with gear oil.
Set the shaft snap ring with the opening side facing down.
Align the shaft splines and install the drive shaft assembly with a brass bar and hammer.
- NOTICE:
- Be careful not to damage the drive shaft dust cover, boot and oil seal.
- Move the drive shaft assembly while keeping it level.
- HINT:
- Whether the inboard joint shaft is in contact with the pinion shaft or not can be known from the sound or feeling when driving it in.
Install the rear drive shaft assembly to the rear axle carrier.
- NOTICE:
- Be careful not to damage the drive shaft boot.
| 7. INSTALL REAR DRIVE SHAFT ASSEMBLY RH |
- HINT:
- Installation procedure of the RH side is the same as that of the LH side.
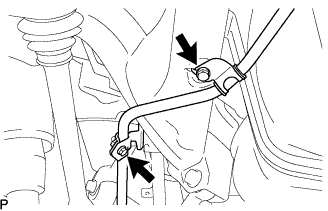
| 8. INSTALL PARKING BRAKE CABLE ASSEMBLY NO.3 |
Install the parking brake cable assembly No.3 with the 2 bolts.
- Torque:
- 19 N*m{194 kgf*cm, 14 ft.*lbf}
| 9. INSTALL PARKING BRAKE CABLE ASSEMBLY NO.2 |
- HINT:
- Installation procedure of the RH side is the same as that of the LH side.
| 10. INSTALL REAR SUSPENSION MEMBER BRACE LH |
Install the rear suspension member brace with the 2 bolts.
- Torque:
- 50 N*m{510 kgf*cm, 37 ft.*lbf}
| 11. INSTALL REAR SUSPENSION MEMBER BRACE RH |
- HINT:
- Installation procedure of the RH side is the same as that of the LH side.
| 12. INSTALL DIFFERENTIAL SUPPORT PROTECTOR NO.2 |
Install the differential support protector No.2 to the rear suspension member brace with the 2 nuts.
- Torque:
- 5.4 N*m{55 kgf*cm, 48 in.*lbf}
| 13. INSTALL DIFFERENTIAL SUPPORT PROTECTOR NO.1 |
- HINT:
- Installation procedure of the RH side is the same as that of the LH side.
| 14. TEMPORARILY TIGHTEN REAR SHOCK ABSORBER WITH COIL SPRING LH |
Temporarily install the rear shock absorber with coil spring with the bolt and nut.
Temporarily install the rear stabilizer link assembly and the load sensing valve sensor bracket to the rear No.2 suspension arm assembly with the bolt and nut.
| 15. TEMPORARILY TIGHTEN REAR SHOCK ABSORBER WITH COIL SPRING RH |
- HINT:
- Installation procedure of the RH side is the same as that of the LH side.
| 16. INSTALL REAR AXLE ASSEMBLY LH |
(Click here)
| 17. INSTALL REAR AXLE ASSEMBLY RH |
- HINT:
- Installation procedure of the RH side is the same as that of the LH side.
| 18. INSTALL REAR FLOOR SIDE MEMBER COVER LH |
Install the side member cover LH with the 3 screws.
| 19. INSTALL REAR FLOOR SIDE MEMBER COVER RH |
- HINT:
- Installation procedure of the RH side is the same as that of the LH side.
| 20. FULLY TIGHTEN REAR SHOCK ABSORBER WITH COIL SPRING LH |
Fully tighten the bolt holding the rear shock absorber with coil spring.
- Torque:
- 110 N*m{1,120 kgf*cm, 81 ft.*lbf}
- NOTICE:
- Turn the bolt while holding the nut.
Fully tighten the nut holding the rear stabilizer link assembly.
- Torque:
- 27 N*m{275 kgf*cm, 20 ft.*lbf}
| 21. FULLY TIGHTEN REAR SHOCK ABSORBER WITH COIL SPRING RH |
- HINT:
- Installation procedure of the RH side is the same as that of the LH side.
| 22. INSTALL REAR PROPELLER SHAFT ASSEMBLY |
(Click here)
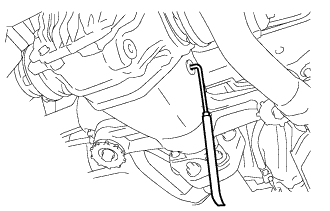
Using a hexagon wrench (10 mm), remove the differential filler plug and gasket.
Add oil.
- Capacity:
- 1.30 to 1.40 liter (1.38 to 1.48 US qts, 1.15 to 1.23 lmp. qts)
- Oil grade:
- Differential synthetic gear oil GL-5 75W-90 or equivalent
Check the oil level.
Using a hexagon wrench (10 mm), install the differential filler filler plug with a new gasket.
- Torque:
- 49 N*m{500 kgf*cm, 36 ft.*lbf}
- NOTICE:
- After replacing the oil, recheck the oil level after driving.
| 24. INSPECT AND ADJUST DIFFERENTIAL OIL |
Stop the vehicle on a level place.
Using a hexagon wrench (10 mm), remove the differential filler plug and gasket.
Check that the oil surface is within 5 mm (0.20 in.) of the lowest position of the inner surface of the differential filler plug opening.
- NOTICE:
- Excessively large or small amounts of oil may cause trouble.
- After replacing oil, drive the vehicle and check the oil level.
- HINT:
- If necessary, fill the rear differential carrier with differential synthetic gear oil.
Check for oil leakage when the oil level is low.
Using a hexagon wrench (10 mm), install the differential filler plug and a new gasket.
- Torque:
- 49 N*m{500 kgf*cm, 36 ft.*lbf}
- Torque:
- 103 N*m{1,050 kgf*cm, 76 ft.*lbf}
| 26. INSTALL EXHAUST PIPE ASSEMBLY |
(Click here)
| 27. INSPECT PARKING BRAKE PEDAL TRAVEL |
Fully depress the parking brake pedal and release it to engage the parking brake.
Depress the pedal to the floor again, and release it to disengage the parking brake.
Slowly depress the parking brake pedal to the floor, and count the number of clicks.
- Parking brake pedal travel:
- 7 to 9 notches at 300N (31kgf, 67.5lbf)
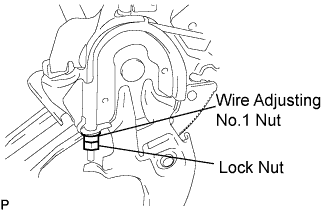
| 28. ADJUST PARKING BRAKE PEDAL TRAVEL |
Depress the parking brake pedal. Hold the wire adjusting No.1 nut using a wrench and loosen the lock nut.
Release the parking brake pedal.
Turn the wire adjusting No.1 nut until the parking brake pedal travel meets the above specification.
Hold the wire adjusting No.1 nut using a wrench or equivalent tool and tighten the lock nut.
- Torque:
- 6.0 N*m{61 kgf*cm, 53 in.*lbf}
Count the number of clicks after depressing and releasing the parking brake pedal 3 or 4 times.
Check whether the parking brake drags or not.
When operating the parking brake pedal, check that the parking brake indicator light comes on.
| 29. INSPECT AND ADJUST REAR WHEEL ALIGNMENT |
(Click here)
| 30. CHECK FOR EXHAUST GAS LEAKS |
| 31. CHECK ABS SPEED SENSOR SIGNAL |
(w/ ECB: Click here)(w/o ECB: Click here)