Land Cruiser URJ200 URJ202 GRJ200 VDJ200 - 1VD-FTV FUEL
FUEL TANK - REMOVAL
| 1. PRECAUTION |
- NOTICE:
- After turning the ignition switch off, waiting time may be required before disconnecting the cable from the battery terminal. Therefore, make sure to read the disconnecting the cable from the battery terminal notice before proceeding with work ().
| 2. REMOVE FUEL TANK CAP ASSEMBLY |
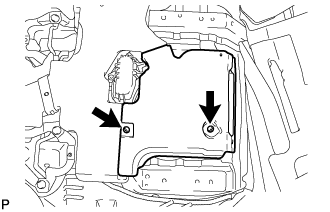
| 3. REMOVE NO. 1 FUEL TANK PROTECTOR SUB-ASSEMBLY |
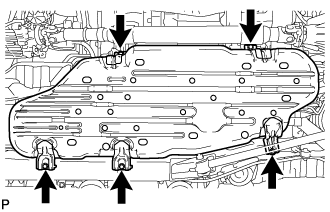
Remove the 5 bolts and fuel tank protector.
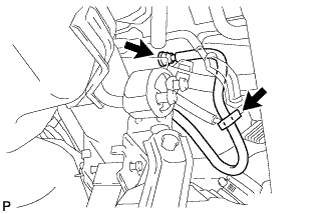
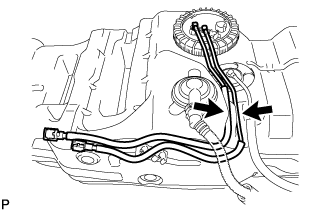
| 4. DISCONNECT FUEL TANK MAIN TUBE SUB-ASSEMBLY |
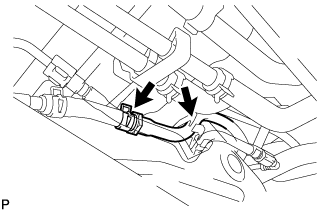
Detach the fuel tube clamp.
Disconnect the fuel tank main tube.
| 5. DRAIN FUEL |
for Double Tank Type:
Connect the intelligent tester to the DLC3.
Turn the ignition switch to ON.
- NOTICE:
- Do not start the engine.
Turn the intelligent tester on.
Enter the following menus: Powertrain / Engine and ECT / Active Test / Activate the Intank Fuel Pump Relay.
- CAUTION:
- HINT:

- for Single Tank Type:
- Remove the fuel tube joint clip and disconnect the fuel tank return tube, and drain fuel from the port shown in the illustration.
- for Double Tank Type:
- If the fuel pump does not operate, remove the fuel tube joint clip and disconnect the fuel tank return tube, and drain fuel from the port shown in the illustration.
| 6. DISCONNECT CABLE FROM NEGATIVE BATTERY TERMINAL |
- NOTICE:
- When disconnecting the cable, some systems need to be initialized after the cable is reconnected ().
Disconnect the cables from the negative (-) main battery and sub-battery terminals.
| 7. REMOVE REAR NO. 1 SEAT ASSEMBLY RH (for 60/40 Split Seat Type 40 Side) |
Remove the rear No. 1 seat assembly RH ().
| 8. REMOVE REAR NO. 1 SEAT ASSEMBLY LH (for 60/40 Split Seat Type 60 Side) |
Remove the rear No. 1 seat assembly LH ().
| 9. REMOVE REAR NO. 2 SEAT ASSEMBLY |
for Face to Face Seat Type:
Remove the rear No. 2 seat assembly ().
except Face to Face Seat Type:
Remove the rear No. 2 seat assembly ().
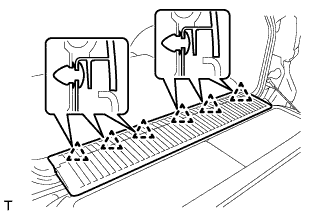
| 10. REMOVE REAR NO. 1 SEAT PROTECTOR |

Detach the 10 claws and remove the 2 seat protectors.
| 11. REMOVE REAR NO. 2 SEAT PROTECTOR |

Detach the 10 claws and remove the 2 seat protectors.
| 12. REMOVE REAR STEP COVER |

- HINT:
- Use the same procedure to remove the step cover on the other side.
Detach the 2 claws and remove the step cover.
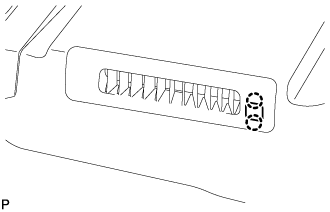
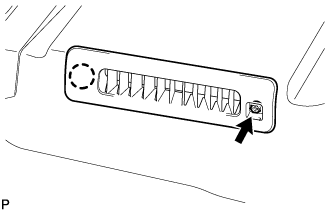
| 13. REMOVE REAR DOOR SCUFF PLATE LH |
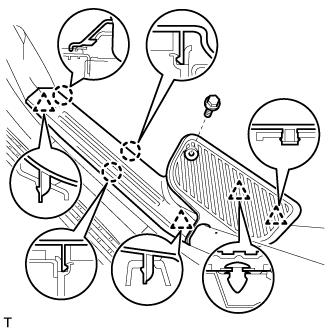
Remove the screw.
Detach the 3 claws and 4 clips, and remove the scuff plate.
| 14. REMOVE REAR DOOR SCUFF PLATE RH |
- HINT:
- Use the same procedures described for the LH side.
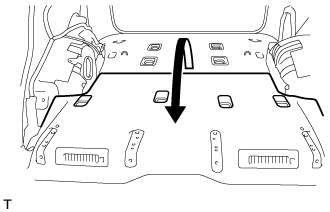
| 15. REMOVE REAR FLOOR MAT REAR SUPPORT PLATE |
Detach the 6 clips and remove the support plate.
| 16. REMOVE REAR SEAT COVER CAP (w/ Rear No. 2 Seat, except Face to Face Seat Type) |
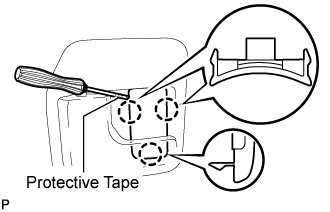
- HINT:
- Use the same procedure to remove the rear seat cover cap on the other side.
Using a screwdriver, detach the 3 claws and remove the rear seat cover cap.
- HINT:
- Tape the screwdriver tip before use.
| 17. REMOVE FRONT QUARTER TRIM PANEL ASSEMBLY LH |
w/ Sliding Roof:
Remove the front quarter trim panel assembly LH ().
w/o Sliding Roof:
Remove the front quarter trim panel assembly LH ().
| 18. REMOVE FRONT QUARTER TRIM PANEL ASSEMBLY RH |
w/ Sliding Roof:
Remove the front quarter trim panel assembly RH ().
w/o Sliding Roof:
Remove the front quarter trim panel assembly RH ().
| 19. REMOVE AIR DUCT PLUG (w/ Rear Air Conditioning System) |
Detach the 2 claws and remove the plug.
- HINT:
- Use the same procedures for both sides.
| 20. REMOVE REAR AIR DUCT GUIDE (w/ Rear Air Conditioning System) |
Remove the screw.
Detach the claw and remove the guide.
- HINT:
- Use the same procedures for both sides.
| 21. REMOVE FRONT FLOOR CARPET ASSEMBLY |
w/ Rear Air Conditioning System:
Fold back the floor carpet.
- HINT:
- Fold back the floor carpet so that the air duct can be removed.
w/o Rear Air Conditioning System:
Fold back the floor carpet.
- HINT:
- Fold back the floor carpet so that the service hole cover can be removed.
| 22. REMOVE REAR FLOOR NO. 2 SERVICE HOLE COVER |
w/ Rear Air Conditioning System:
Remove the 2 screws and air duct.

Remove the service hole cover.

Disconnect the fuel pump and fuel sender gauge connector.
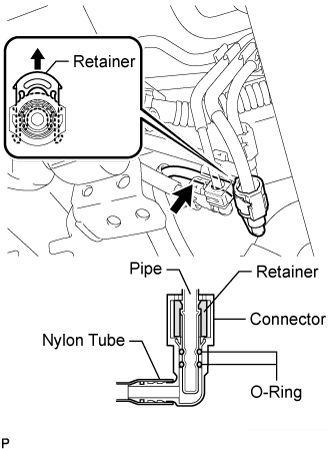
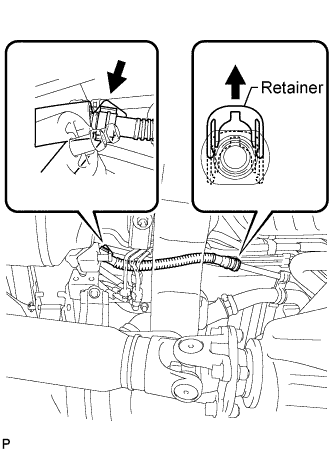
| 23. DISCONNECT FUEL TANK RETURN TUBE |

Detach the fuel tube clamp.
Pull up the retainer and disconnect both ends of the fuel tank return tube.
- NOTICE:
| 24. DISCONNECT NO. 2 FUEL TANK BREATHER TUBE (for Single Tank Type) |
Detach the fuel tube clamp.
Disconnect the No. 2 fuel tank breather tube from the body.
| 25. DISCONNECT NO. 2 FUEL MAIN TUBE SUB-ASSEMBLY (for Double Tank Type) |
Detach the fuel tube clamp.
Pull up the retainer and disconnect the fuel main tube.
- NOTICE:
| 26. DISCONNECT NO. 2 FUEL TANK BREATHER TUBE (for Double Tank Type) |
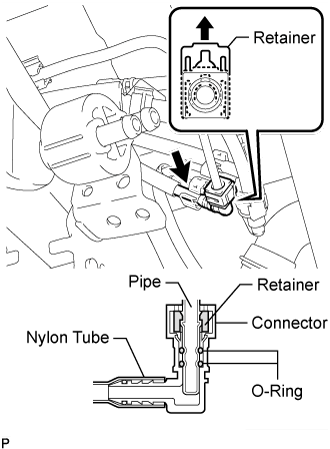
Detach the fuel tube clamp.
Pull up the retainer and disconnect the fuel tank breather tube.
- NOTICE:
| 27. DISCONNECT FUEL TANK BREATHER TUBE (for Single Tank Type) |

Detach the fuel tube clamp.
Pull up the retainer and disconnect the fuel tank breather tube.
- NOTICE:
| 28. DISCONNECT FUEL TANK BREATHER TUBE (for Double Tank Type) |
Detach the fuel tube clamp.
Pull up the retainer and disconnect the fuel tank breather tube.
- NOTICE:
| 29. DISCONNECT FUEL TANK TO FILLER PIPE HOSE (for Single Tank Type) |

Disconnect the hose from the filler pipe.
| 30. DISCONNECT FUEL TANK TO FILLER PIPE HOSE (for Double Tank Type) |
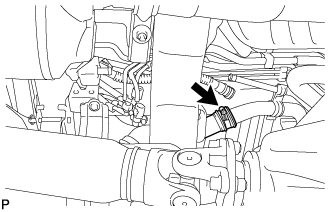
Disconnect the hose from the filler pipe.
| 31. REMOVE FUEL TANK SUB-ASSEMBLY |
Place a transmission jack under the fuel tank.

Remove the 2 bolts, 2 clips, 2 pins and 2 fuel tank bands.
Lower the transmission jack to remove the fuel tank from the vehicle.
- NOTICE:
- Do not allow the fuel tank to contact the vehicle, especially the differential.
- HINT:
- Lower the transmission jack slowly.
| 32. REMOVE FUEL TANK MAIN TUBE SUB-ASSEMBLY AND FUEL TANK RETURN TUBE (for Single Tank Type) |
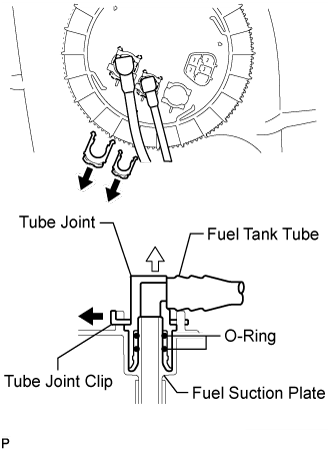
Remove the 2 fuel tube joint clips and pull out the 2 fuel tubes.
- NOTICE:
Remove the 2 fuel tubes from the fuel tank.
| 33. REMOVE FUEL TANK MAIN TUBE SUB-ASSEMBLY, FUEL TANK RETURN TUBE AND NO. 2 FUEL MAIN TUBE SUB-ASSEMBLY (for Double Tank Type) |
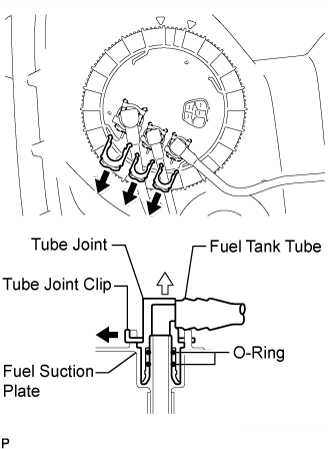
Remove the 3 fuel tube joint clips and pull out the 3 fuel tubes.
- NOTICE:

Remove the 3 fuel tubes from the fuel tank.
| 34. REMOVE FUEL SUCTION WITH PUMP AND GAUGE TUBE ASSEMBLY |
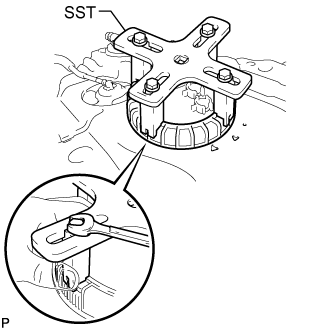
Set SST on the retainer.
- SST
- 09808-14030
- HINT:
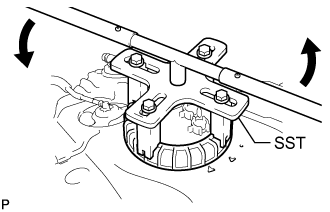
Using SST, loosen the retainer.
- SST
- 09808-14030
 | Turn |
- NOTICE:
- HINT:
- The protrusion of the retainer fit in the ends of SST.
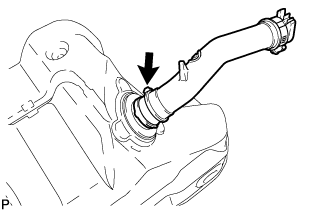
Remove the retainer.
Remove the retainer while holding the fuel suction tube assembly by hand.
- NOTICE:
- Be careful not to bend the arm of the fuel sender gauge.
Remove the gasket from the fuel tank.
| 35. REMOVE FUEL TANK TO FILLER PIPE HOSE |
Remove the hose from the fuel tank.
| 36. REMOVE NO. 1 FUEL TANK HEAT INSULATOR |

Remove the fuel tube clamp from the heat insulator.
Using needle-nose pliers, remove the 4 clips shown in the illustration and then remove the heat insulator.