Exhaust Pipe Installation
Engine. Lexus Gs430, Gs300. Uzs190 Grs190
INSTALL TAILPIPE ASSEMBLY
INSTALL FRONT TWC
INSTALL NO. 1 EXHAUST PIPE SUPPORT BRACKET SUB-ASSEMBLY
INSTALL FRONT EXHAUST PIPE ASSEMBLY
INSTALL HEATED OXYGEN SENSOR
INSTALL REAR NO. 1 FLOOR PANEL BRACE
INSTALL FRONT FLOOR BRACE CENTER
CHECK FOR EXHAUST GAS LEAKS
INSTALL NO. 2 ENGINE UNDER COVER
PERFORM INITIALIZATION
Exhaust Pipe -- Installation |
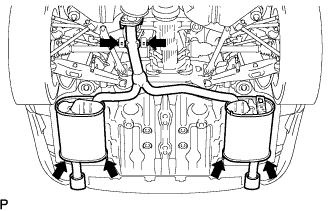
| 1. INSTALL TAILPIPE ASSEMBLY |
Connect the 6 exhaust pipe supports to install the exhaust pipe.
Install 2 new gaskets to the 2 TWCs.
- NOTICE:
- Do not reuse the gaskets.
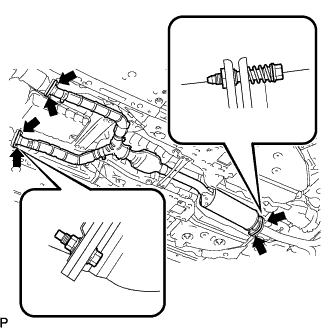
Install the 2 TWCs to the exhaust manifold with the 6 nuts.
- Torque:
- 62 N*m{632 kgf*cm, 46 ft.*lbf}
| 3. INSTALL NO. 1 EXHAUST PIPE SUPPORT BRACKET SUB-ASSEMBLY |
Install the support bracket with the 2 bolts.
- Torque:
- 43 N*m{438 kgf*cm, 32 ft.*lbf}
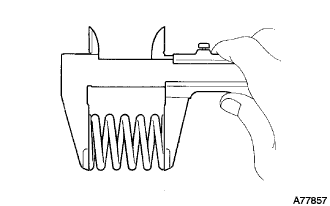
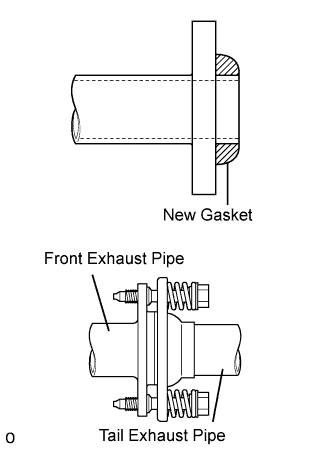
| 4. INSTALL FRONT EXHAUST PIPE ASSEMBLY |
Using a vernier caliper, measure the free length of the compression spring.
- Minimum length:
- 38.5 mm (1.516 in.)
If the free length is less than the minimum, replace the compression spring.
Install a new gasket to the rear side of the front exhaust pipe.
- HINT:
- Using a plastic-faced hammer, uniformly strike the gasket so that the gasket and front exhaust pipe are properly fit.
- NOTICE:
- Be careful with the installation direction of the gasket.
- Do not reuse the gasket.
- To ensure a proper seal, do not use the tailpipe to force the gasket onto the front exhaust pipe.
Install 2 new gaskets and the 2 TWCs with the 4 bolts.
- Torque:
- 62 N*m{632 kgf*cm, 46 ft.*lbf}
- NOTICE:
- Do not reuse the gaskets.
Install the front exhaust pipe to the tailpipe with the 2 compression springs and 2 bolts.
- Torque:
- 43 N*m{438 kgf*cm, 32 ft.*lbf}
| 5. INSTALL HEATED OXYGEN SENSOR |
Install the 2 sensors (Click here).
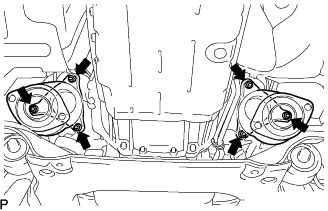
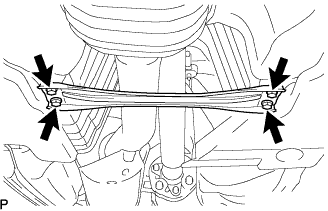
| 6. INSTALL REAR NO. 1 FLOOR PANEL BRACE |
Install the panel brace with the 4 bolts.
- Torque:
- 19 N*m{195 kgf*cm, 14 ft.*lbf}
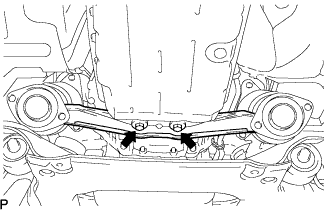
| 7. INSTALL FRONT FLOOR BRACE CENTER |
Install the floor brace with the 4 bolts.
- Torque:
- 7.4 N*m{75 kgf*cm, 65 in.*lbf}
| 8. CHECK FOR EXHAUST GAS LEAKS |
If gas is leaking, tighten the areas necessary to stop the leak. Replace damaged parts as necessary.
| 9. INSTALL NO. 2 ENGINE UNDER COVER |
| 10. PERFORM INITIALIZATION |
Perform initialization (Click here).
- NOTICE:
- Certain systems need to be initialized after disconnecting and reconnecting the cable from the negative (-) battery terminal.