Rear Bumper (For Double Swing Out Type) -- Installation |
- HINT:
- A bolt without a torque specification is shown in the standard bolt chart (Click here).
| 1. INSTALL NO. 2 LUGGAGE COMPARTMENT SIDE COVER PROTECTOR |
Install the No. 2 luggage compartment side cover protector with 2 new grommets.
Install the 2 screws.
| 2. INSTALL NO. 1 LUGGAGE COMPARTMENT SIDE COVER PROTECTOR |
- HINT:
- Use the same procedure described for the No. 2 luggage compartment side cover protector.
| 3. INSTALL REAR BUMPER ARM BRACKET LH |
Install the rear bumper arm bracket with the 2 bolts and nut.
Attach the clamp.
| 4. INSTALL REAR BUMPER ARM BRACKET |
- HINT:
- Use the same procedure for both rear bumper arm brackets.
Install the rear bumper arm bracket with the bolt.
| 5. INSTALL REAR BUMPER NO. 2 REINFORCEMENT |
Install the rear bumper No. 2 reinforcement with the 2 bolts.
| 6. INSTALL REAR BUMPER SIDE SUPPORT LH |
Attach the 6 claws to install the rear bumper side support.
Install the 3 screws.
| 7. INSTALL REAR BUMPER SIDE SUPPORT RH |
- HINT:
- Use the same procedure described for the LH side.
| 8. INSTALL REAR BUMPER UPPER RETAINER LH |
Attach the 2 clips to install the rear bumper upper retainer.
| 9. INSTALL REAR BUMPER UPPER RETAINER RH |
- HINT:
- Use the same procedure described for the LH side.
| 10. INSTALL REAR COMBINATION LIGHT ASSEMBLY LH |
Connect the connector.
Text in Illustration *1 Protective tape
 |
Attach the 3 clips, 2 guides and 2 claws to install the rear combination light assembly LH.
- NOTICE:
- Attach the bolt installation bracket form outside the body while being careful not to bend it.
Install the 2 bolts.
| 11. INSTALL REAR COMBINATION LIGHT ASSEMBLY RH |
- HINT:
- Use the same procedure described for the LH side.
| 12. INSTALL REAR BUMPER COVER |
Open the back doors one notch.
Attach the 14 claws to install the rear bumper cover.
Connect the No. 2 frame wire connector.
Install the 5 bolts and 2 clips.
Install the 2 bolts, 2 clips and 6 screws.
| 13. INSTALL REAR BUMPER NO. 1 PLATE |
Attach the 20 claws to install the rear bumper No. 1 plate.
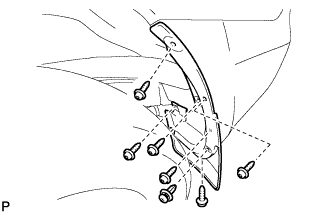
| 14. INSTALL REAR QUARTER PANEL MUDGUARD LH |
 |
Install the mudguard with the clip.
Using a T30 "TORX" socket, install the 6 screws.
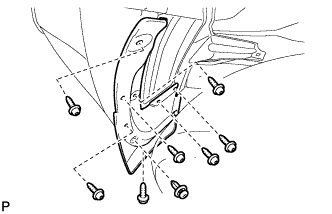
| 15. INSTALL REAR QUARTER PANEL MUDGUARD RH |
 |
Install the mudguard with the clip.
Using a T30 "TORX" socket, install the 7 screws.
| 16. INSTALL PINTLE HOOK ASSEMBLY (w/ Pintle Hook) |
Install the pintle hook assembly and pintle hook bracket with the 2 bolts, 2 eyelet pintle hooks and 4 nuts.
- Torque:
- for nut:
- 65 N*m{663 kgf*cm, 48 ft.*lbf}
For vehicles with a spare installed to the underbody, install the spare tire.
| 17. INSTALL SPARE WHEEL CARRIER SUB-ASSEMBLY (w/ Tire Carrier) |
Clean the threaded surfaces on the vehicle body with a non-residue solvent.
Apply adhesive to the threads of bolt A and B.
- Adhesive:
- Toyota Genuine Adhesive 1324, Three Bond 1324 or equivalent
Install the spare wheel carrier with the 9 bolts.
- Torque:
- Bolt A:
- 29 N*m{196 kgf*cm, 21 ft.*lbf}
- Bolt B:
- 15 N*m{148 kgf*cm, 11 ft.*lbf}
Text in Illustration *1 Bolt A *2 Bolt B
 |
Install the spare tire with the 3 bolts.
- Torque:
- 90 N*m{918 kgf*cm, 66 ft.*lbf}
| 18. INSTALL SPARE WHEEL COVER SUB-ASSEMBLY (w/ Tire Carrier) |
Attach the clip to install the spare wheel cover.
Install the 2 nuts.
| 19. INSTALL SPARE WHEEL CARRIER HINGE BRACKET (w/ Tire Carrier) |
Attach the 2 claws to install the spare wheel carrier hinge bracket.