Lighting System -- Initialization |
- NOTICE:
- When the conditions shown in the table below are met, it is necessary to perform vehicle information registration or initialization for the headlight leveling ECU assembly.
- for LED Headlight
Adjust the headlight aim after initializing the headlight leveling ECU (Click here).
Adjust the headlight aim after initializing the headlight swivel ECU (Click here). - for Halogen Headlight and LED Headlight
Adjust the headlight aim after initializing the headlight leveling ECU (Click here).
Adjust the headlight aim after initializing the headlight swivel ECU (Click here).
| Operation Performed | Necessary Procedure | Proceed to |
| The headlight leveling ECU assembly is replaced with a new one. | Headlight leveling ECU assembly initialization (w/ Static Headlight Auto Leveling) | Proceed to step 1 or step 2 |
| Headlight swivel ECU assembly initialization (w/ Dynamic Headlight Auto Leveling) | Proceed to step 3 or step 4 | |
| The vehicle height changes due to replacement of suspension components or after performing such operations as removal and reinstallation or replacement of the rear height control sensor sub-assembly. | Headlight leveling ECU assembly initialization (w/ Static Headlight Auto Leveling) | Proceed to step 1 or step 2 |
| Headlight swivel ECU assembly initialization (w/ Dynamic Headlight Auto Leveling) | Proceed to step 3 or step 4 |
| HEADLIGHT LEVELING ECU ASSEMBLY INITIALIZATION (USING GTS) |
- HINT:
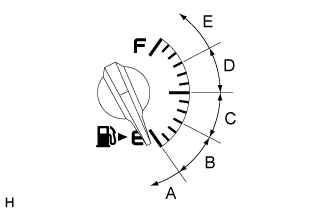
- Initialization for the headlight leveling ECU assembly is performed based on the fuel level, which is divided into 5 levels, indicated by the needle of the fuel receiver gauge.
Check the vehicle condition.
Put the vehicle in the following condition:
- Vehicle is unloaded (except spare tire and spare tire tools, etc.).
- No occupants other than the driver are in the vehicle.
- Headlights are turned off.
- Vehicle is stopped and vehicle height remains constant (vehicle is on a level surface and stable).
- HINT:
- If the above conditions are not met, initialization cannot be performed normally.
- Vehicle is unloaded (except spare tire and spare tire tools, etc.).
Check that the warning message "Headlight System Malfunction Visit Your Dealer" is displayed on the combination meter assembly.
Check the warning message on the combination meter assembly 6 seconds after turning the ignition switch to ON.
- Standard:
Condition Specified Condition Headlight leveling ECU assembly initialization malfunction Warning flashes 6 times at 2 Hz continuously Removal/installation or replacement of the rear height control sensor sub-assembly, replacement of the suspension, etc. Warning message is not illuminated
- HINT:
- If the warning message condition is not as specified, check the wire harness(es) and connector(s) of the headlight leveling ECU assembly.
Initialization procedure
Turn the ignition switch to ON.
Enter the following menus: Body Electrical / HL AutoLeveling / Utility / Height Sensor Initialization.
Check what is displayed on the screen of the GTS and press "Next".
The appropriate position ID is determined by the fuel level (remaining amount of fuel) of the fuel receiver gauge as shown in the chart below.
Fuel Level Position ID Number of Times Warning Indicator Blinks (N) Fuel level is within range A. EMPTY 1 Fuel level is within range B. EMPTY to 1/4 full 2 Fuel level is within range C. 1/4 to 1/2 full 3 Fuel level is within range D. 1/2 to 3/4 full 4 Fuel level is within range E. 3/4 to FULL 5 Input the position ID determined by the chart above into the GTS and press "Next".
Check that the warning message "Headlight System Malfunction Visit Your Dealer" is displayed on the combination meter assembly.
- Standard:
Condition Specified Condition Headlight leveling ECU assembly initialization malfunction Warning flashes 6 times at 2 Hz → Warning flashes N* times at 2 Hz continuously (initialization completes normally) Removal/installation or replacement of the rear height control sensor sub-assembly, replacement of the suspension, etc. Off → Warning flashes N* times at 2 Hz continuously (initialization completes normally)
- HINT:
- *: Refer to the chart above for N.
- If the warning message condition on the combination meter assembly does not change, perform the procedure from the beginning once again.
- If the warning message illuminates continuously, there may be a malfunction in the headlight leveling ECU assembly.
Check that initialization has completed normally, and then turn the ignition switch off.
- HINT:
- The flashing warning message that indicates that initialization has completed normally continues until the ignition switch off.
 |
| HEADLIGHT LEVELING ECU ASSEMBLY INITIALIZATION (NOT GTS) |
- HINT:
- Initialization for the headlight leveling ECU assembly is performed based on the fuel level, which is divided into 5 levels, indicated by the needle of the fuel receiver gauge.
Check the vehicle condition.
Put the vehicle in the following condition:
- Vehicle is unloaded (except spare tire and spare tire tools, etc.).
- No occupants other than the driver are in the vehicle.
- Headlights are turned off.
- Vehicle is stopped and vehicle height remains constant (vehicle is on a level surface and stable).
- HINT:
- If the above conditions are not met, initialization cannot be performed normally.
- Vehicle is unloaded (except spare tire and spare tire tools, etc.).
Check that the warning message "Headlight System Malfunction Visit Your Dealer" is displayed on the combination meter assembly.
Check the warning message on the combination meter assembly 6 seconds after turning the ignition switch to ON.
- Standard:
Condition Specified Condition Headlight leveling ECU assembly initialization malfunction Warning flashes 6 times at 2 Hz continuously Removal/installation or replacement of the rear height control sensor sub-assembly, replacement of the suspension, etc. Warning is not illuminated
- HINT:
- If the warning message condition is not as specified, check the wire harness(es) and connector(s) of the headlight leveling ECU assembly.
Initialization procedure
Turn the ignition switch to ON.
The number of times the headlight dimmer switch operates is determined by the fuel level (remaining amount of fuel) of the fuel receiver gauge as shown in the chart below.
- HINT:
- The number of times the switch is operated is necessary in a later procedure.
Fuel Level Number of Times Switch is Operated (N) Fuel level is within range A. 1 Fuel level is within range B. 2 Fuel level is within range C. 3 Fuel level is within range D. 4 Fuel level is within range E. 5 Enter initialization mode. (w/ Entry and Start System)
- Turn the engine switch and headlight dimmer switch off.
- Cover the automatic light control sensor with a lightproof object.
- Perform the following steps within 5 seconds.
- Press the engine switch 2 times.
- HINT:
- Turn the engine switch on (IG).
- While keeping the headlight dimmer switch pulled forward, turn it from off to AUTO to off again 3 times or more.
- HINT:
- Check that the clearance lights turn from off to on and back off again.
- Turn the headlight dimmer switch off.
- HINT:
- Perform the above operation within 5 seconds.
- When initialization mode has been entered, the warning message on the combination meter assembly starts flashing at 1 Hz.
- Turn the engine switch and headlight dimmer switch off.
Enter initialization mode. (w/o Entry and Start System)
- Turn the ignition switch and headlight dimmer switch off.
- Cover the automatic light control sensor with a lightproof object.
- Perform the following steps within 5 seconds.
- Ignition switch ON.
- While keeping the headlight dimmer switch pulled forward, turn it from off to AUTO to off again 3 times or more.
- HINT:
- Check that the clearance lights turn from off to on and back off again.
- Turn the headlight dimmer switch off.
- HINT:
- Perform the above operation within 5 seconds.
- When initialization mode has been entered, the warning message on the combination meter assembly starts flashing at 1 Hz.
- Turn the ignition switch and headlight dimmer switch off.
After entering initialization mode, turn the low beam headlights from off to on and back off again N* times.
- HINT:
- *: The number of times to turn the headlight dimmer switch on and off (N) is determined by the fuel level of the fuel receiver gauge.
- Turn the headlight dimmer switch on and off within 20 seconds of entering initialization mode.
- Turn the headlight dimmer switch on and off at intervals of approximately 3 seconds.
Check the warning message on the combination meter assembly 3 seconds after the headlight dimmer switch is operated.
- Standard:
Condition Specified Condition Headlight leveling ECU assembly initialization malfunction Warning flashes 6 times at 2 Hz → flashes N* times at 2 Hz continuously (initialization completes normally) Removal/installation or replacement of the rear height control sensor sub-assembly, replacement of the suspension, etc. Off → flashes N* times at 2 Hz continuously (initialization completes normally)
- HINT:
- *: N is the number of times that the headlight dimmer switch has been operated.
- If the warning message condition on the combination meter assembly does not change, perform the procedure from the beginning once again after turning the ignition switch off.
- If the warning message illuminates continuously, there may be a malfunction in the headlight leveling ECU assembly.
Check that initialization has completed normally, and then turn the ignition switch off.
- HINT:
- The flashing warning message that indicates that initialization has completed normally continues until the ignition switch off.
|
- NOTICE:
- When the conditions shown in the table below are met, it is necessary to perform vehicle information registration or initialization for the headlight leveling ECU assembly.
| HEADLIGHT SWIVEL ECU ASSEMBLY INITIALIZATION (USING GTS) |
- HINT:
- Initialization for the headlight swivel ECU assembly is performed based on the fuel level, which is divided into 5 levels, indicated by the needle of the fuel receiver gauge.
Check the vehicle condition.
Put the vehicle in the following condition:
- Vehicle is unloaded (except spare tire and spare tire tools, etc.).
- No occupants other than the driver are in the vehicle.
- Headlights are turned off.
- Vehicle is stopped and vehicle height remains constant (vehicle is on a level surface and stable).
- HINT:
- If the above conditions are not met, initialization cannot be performed normally.
- Vehicle is unloaded (except spare tire and spare tire tools, etc.).
Check that the warning message "Headlight System Malfunction Visit Your Dealer" is displayed on the combination meter assembly.
Check the warning message on the combination meter assembly 6 seconds after turning the ignition switch to ON.
- Standard:
Condition Specified Condition Headlight swivel ECU assembly initialization malfunction Warning flashes 6 times at 2 Hz continuously Removal/installation or replacement of the rear height control sensor sub-assembly, replacement of the suspension, etc. Warning message is not illuminated
- HINT:
- If the warning message condition is not as specified, check the wire harness(es) and connector(s) of the headlight swivel ECU assembly.
Initialization procedure
Turn the ignition switch to ON.
Enter the following menus: Body Electrical / AFS / Utility / Height Sensor Initialization.
Check what is displayed on the screen of the GTS and press "Next".
The appropriate position ID is determined by the fuel level (remaining amount of fuel) of the fuel receiver gauge as shown in the chart below.
Fuel Level Position ID Number of Times Warning Indicator Blinks (N) Fuel level is within range A. EMPTY 1 Fuel level is within range B. EMPTY to 1/4 full 2 Fuel level is within range C. 1/4 to 1/2 full 3 Fuel level is within range D. 1/2 to 3/4 full 4 Fuel level is within range E. 3/4 to FULL 5 Input the position ID determined by the chart above into the GTS and press "Next".
Check that the warning message "Headlight System Malfunction Visit Your Dealer" is displayed on the combination meter assembly.
- Standard:
Condition Specified Condition Headlight swivel ECU assembly initialization malfunction Warning flashes 6 times at 2 Hz → Warning flashes N* times at 2 Hz continuously (initialization completes normally) Removal/installation or replacement of the rear height control sensor sub-assembly, replacement of the suspension, etc. Off → Warning flashes N* times at 2 Hz continuously (initialization completes normally)
- HINT:
- *: Refer to the chart above for N.
- If the warning message condition on the combination meter assembly does not change, perform the procedure from the beginning once again.
- If the warning message illuminates continuously, there may be a malfunction in the headlight swivel ECU assembly.
Check that initialization has completed normally, and then turn the ignition switch off.
- HINT:
- The flashing warning message that indicates that initialization has completed normally continues until the ignition switch off.
|
| HEADLIGHT SWIVEL ECU ASSEMBLY INITIALIZATION (NOT GTS) |
- HINT:
- Initialization for the headlight swivel ECU assembly is performed based on the fuel level, which is divided into 5 levels, indicated by the needle of the fuel receiver gauge.
Check the vehicle condition.
Put the vehicle in the following condition:
- Vehicle is unloaded (except spare tire and spare tire tools, etc.).
- No occupants other than the driver are in the vehicle.
- Headlights are turned off.
- Vehicle is stopped and vehicle height remains constant (vehicle is on a level surface and stable).
- HINT:
- If the above conditions are not met, initialization cannot be performed normally.
- Vehicle is unloaded (except spare tire and spare tire tools, etc.).
Check that the warning message "Headlight System Malfunction Visit Your Dealer" is displayed on the combination meter assembly.
Check the warning message on the combination meter assembly 6 seconds after turning the ignition switch to ON.
- Standard:
Condition Specified Condition Headlight swivel ECU assembly initialization malfunction Warning flashes 6 times at 2 Hz continuously Removal/installation or replacement of the rear height control sensor sub-assembly, replacement of the suspension, etc. Warning is not illuminated
- HINT:
- If the warning message condition is not as specified, check the wire harness(es) and connector(s) of the headlight swivel ECU assembly.
Initialization procedure
Turn the ignition switch to ON.
The number of times the headlight dimmer switch operates is determined by the fuel level (remaining amount of fuel) of the fuel receiver gauge as shown in the chart below.
- HINT:
- The number of times the switch is operated is necessary in a later procedure.
Fuel Level Number of Times Switch is Operated (N) Fuel level is within range A. 1 Fuel level is within range B. 2 Fuel level is within range C. 3 Fuel level is within range D. 4 Fuel level is within range E. 5 Enter initialization mode. (w/ Entry and Start System)
- Turn the engine switch and headlight dimmer switch off.
- Cover the automatic light control sensor with a lightproof object.
- Perform the following steps within 5 seconds.
- Press the engine switch 2 times.
- HINT:
- Turn the engine switch on (IG).
- While keeping the headlight dimmer switch pulled forward, turn it from off to AUTO to off again 3 times or more.
- HINT:
- Check that the clearance lights turn from off to on and back off again.
- Turn the headlight dimmer switch off.
- HINT:
- Perform the above operation within 5 seconds.
- When initialization mode has been entered, the warning message on the combination meter assembly starts flashing at 1 Hz.
- Turn the engine switch and headlight dimmer switch off.
Enter initialization mode. (w/o Entry and Start System)
- Turn the ignition switch and headlight dimmer switch off.
- Cover the automatic light control sensor with a lightproof object.
- Perform the following steps within 5 seconds.
- Ignition switch ON.
- While keeping the headlight dimmer switch pulled forward, turn it from off to AUTO to off again 3 times or more.
- HINT:
- Check that the clearance lights turn from off to on and back off again.
- Turn the headlight dimmer switch off.
- HINT:
- Perform the above operation within 5 seconds.
- When initialization mode has been entered, the warning message on the combination meter assembly starts flashing at 1 Hz.
- Turn the ignition switch and headlight dimmer switch off.
After entering initialization mode, turn the low beam headlights from off to on and back off again N* times.
- HINT:
- *: The number of times to turn the headlight dimmer switch on and off (N) is determined by the fuel level of the fuel receiver gauge.
- Turn the headlight dimmer switch on and off within 20 seconds of entering initialization mode.
- Turn the headlight dimmer switch on and off at intervals of approximately 3 seconds.
Check the warning message on the combination meter assembly 3 seconds after the headlight dimmer switch is operated.
- Standard:
Condition Specified Condition Headlight swivel ECU assembly initialization malfunction Warning flashes 6 times at 2 Hz → flashes N* times at 2 Hz continuously (initialization completes normally) Removal/installation or replacement of the rear height control sensor sub-assembly, replacement of the suspension, etc. Off → flashes N* times at 2 Hz continuously (initialization completes normally)
- HINT:
- *: N is the number of times that the headlight dimmer switch has been operated.
- If the warning message condition on the combination meter assembly does not change, perform the procedure from the beginning once again after turning the ignition switch off.
- If the warning message illuminates continuously, there may be a malfunction in the headlight swivel ECU assembly.
Check that initialization has completed normally, and then turn the ignition switch off.
- HINT:
- The flashing warning message that indicates that initialization has completed normally continues until the ignition switch off.
|
- NOTICE:
- When the conditions shown in the table below are met, it is necessary to perform vehicle information registration or initialization for the headlight swivel ECU assembly.