Power Window Regulator Motor (For Front Door) -- Inspection |
- HINT:
- Use the same procedure for RHD and LHD vehicles.
- The procedure listed below is for LHD vehicles.
- Use the same procedure for the RH and LH sides.
- The procedure listed below is for the LH side.
| 1. INSPECT FRONT POWER WINDOW REGULATOR MOTOR ASSEMBLY LH (for Models with Jam Protection Function on 4 Windows) |
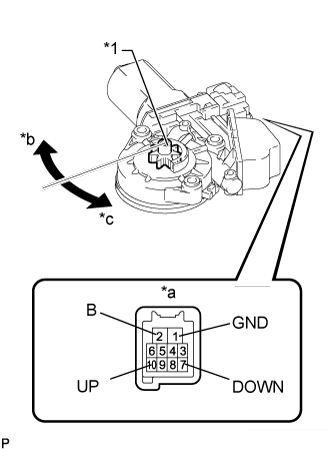
Apply positive (+) battery voltage to the connector terminal 2 (B).
- NOTICE:
- Do not apply positive (+) battery voltage to any terminals except terminal 2 (B) to avoid damaging the pulse sensor inside the motor.
 |
Apply negative (-) battery voltage to the connector terminals 1 (GND) and 7 (DOWN) or 10 (UP).
Check that the motor gear rotates smoothly as follows.
- OK:
Condition Specified Condition - Connect the positive (+) battery cable to terminal 2(B), and connect the negative (-) battery cable to terminal 1(GND), and keep them connected for 3 seconds or more.
- With terminals 2(B) and 1(GND) connected, connect the negative (-) battery cable to terminal 10(UP).
- Disconnect and reconnect the negative (-) battery cable to terminal 10(UP) within 1 second.
Motor gear rotates clockwise (Up) - Connect the positive (+) battery cable to terminal 2(B), and connect the negative (-) battery cable to terminal 1(GND), and keep them connected for 3 seconds or more.
- With terminals 2(B) and 1(GND) connected, connect the negative (-) battery cable to terminal 7(DOWN).
- Disconnect and reconnect the negative (-) battery cable to terminal 7(DOWN) within 1 second.
Motor gear rotates counterclockwise (Down) - Connect the positive (+) battery cable to terminal 2(B), and connect the negative (-) battery cable to terminal 1(GND), and keep them connected for 3 seconds or more.
- If the result is not as specified, replace the regulator motor assembly.
- CAUTION:
- Reset the power window regulator motor (initialize the pulse sensor) after installing the power window regulator motor and regulator assembly onto the door.
Text in Illustration *1 Motor Gear *a Component without harness connected
(Front Power Window Regulator Motor Assembly LH)*b Clockwise *c Counterclockwise
| 2. INSPECT FRONT POWER WINDOW REGULATOR MOTOR ASSEMBLY RH (for Models with Jam Protection Function on 4 Windows) |
for Models with Jam Protection Function on 4 Windows:
Apply positive (+) battery voltage to the connector terminal 2 (B).- NOTICE:
- Do not apply positive (+) battery voltage to any terminals except terminal 2 (B) to avoid damaging the pulse sensor inside the motor.
 |
Apply negative (-) battery voltage to the connector terminals 1 (GND) and 7 (DOWN) or 10 (UP).
Check that the motor gear rotates smoothly as follows.
- OK:
Measurement Condition Specified Condition - Connect the positive (+) battery cable to terminal 2(B), and connect the negative (-) battery cable to terminal 1(GND), and keep them connected for 3 seconds or more.
- With terminals 2(B) and 1(GND) connected, connect the negative (-) battery cable to terminal 10(UP).
- Disconnect and reconnect the negative (-) battery cable to terminal 10(UP) within 1 second.
Motor gear rotates counterclockwise (Up) - Connect the positive (+) battery cable to terminal 2(B), and connect the negative (-) battery cable to terminal 1(GND), and keep them connected for 3 seconds or more.
- With terminals 2(B) and 1(GND) connected, connect the negative (-) battery cable to terminal 7(DOWN).
- Disconnect and reconnect the negative (-) battery cable to terminal 7(DOWN) within 1 second.
Motor gear rotates clockwise (Down) - Connect the positive (+) battery cable to terminal 2(B), and connect the negative (-) battery cable to terminal 1(GND), and keep them connected for 3 seconds or more.
- If the result is not as specified, replace the regulator motor assembly.
- CAUTION:
- Reset the power window regulator motor (initialize the pulse sensor) after installing the power window regulator motor and regulator assembly onto the door.
Text in Illustration *1 Motor Gear *a Component without harness connected
(Front Power Window Regulator Motor Assembly RH)*b Clockwise *c Counterclockwise
| 3. INSPECT FRONT POWER WINDOW REGULATOR MOTOR ASSEMBLY LH (for Models with Jam Protection Function on Driver Door Window Only) |
Apply positive (+) battery voltage to the connector terminal 2 (B).
- NOTICE:
- Do not apply positive (+) battery voltage to any terminals except terminal 2 (B) to avoid damaging the pulse sensor inside the motor.
|
Apply negative (-) battery voltage to the connector terminals 1 (GND) and 7 (DOWN) or 10 (UP).
Check that the motor gear rotates smoothly as follows.
- OK:
Condition Specified Condition - Connect the positive (+) battery cable to terminal 2(B), and connect the negative (-) battery cable to terminal 1(GND), and keep them connected for 3 seconds or more.
- With terminals 2(B) and 1(GND) connected, connect the negative (-) battery cable to terminal 10(UP).
- Disconnect and reconnect the negative (-) battery cable to terminal 10(UP) within 1 second.
Motor gear rotates clockwise (Up) - Connect the positive (+) battery cable to terminal 2(B), and connect the negative (-) battery cable to terminal 1(GND), and keep them connected for 3 seconds or more.
- With terminals 2(B) and 1(GND) connected, connect the negative (-) battery cable to terminal 7(DOWN).
- Disconnect and reconnect the negative (-) battery cable to terminal 7(DOWN) within 1 second.
Motor gear rotates counterclockwise (Down) - Connect the positive (+) battery cable to terminal 2(B), and connect the negative (-) battery cable to terminal 1(GND), and keep them connected for 3 seconds or more.
- If the result is not as specified, replace the regulator motor assembly.
- CAUTION:
- Reset the power window regulator motor (initialize the pulse sensor) after installing the power window regulator motor and regulator assembly onto the door.
Text in Illustration *1 Motor Gear *a Component without harness connected
(Front Power Window Regulator Motor Assembly LH)*b Clockwise *c Counterclockwise
| 4. INSPECT FRONT POWER WINDOW REGULATOR MOTOR ASSEMBLY RH (for Models with Jam Protection Function on Driver Door Window Only) |
Check the operation of the regulator motor.
 |
Apply battery voltage to the regulator motor and check the operation of the regulator motor.
- OK:
Measurement Condition Specified Condition Battery positive (+) → Terminal 1
Battery negative (-) → Terminal 2Motor gear rotates clockwise Battery positive (+) → Terminal 2
Battery negative (-) → Terminal 1Motor gear rotates counterclockwise
- If the result is not as specified, replace the regulator motor assembly.
Text in Illustration *1 Motor Gear *a Component without harness connected
(Front Power Window Regulator Motor Assembly RH)*b Clockwise *c Counterclockwise