Dtc B157D Dab Tuner Antenna Disconnected
DESCRIPTION
WIRING DIAGRAM
INSPECTION PROCEDURE
CHECK CONNECTION OF DAB RADIO ANTENNA CABLE
CHECK QUARTER WINDOW ASSEMBLY (WINDOW GLASS ANTENNA WIRE)
CHECK ANTENNA CORD SUB-ASSEMBLY
CHECK NO. 2 ANTENNA CORD SUB-ASSEMBLY
CHECK NO. 4 ANTENNA CORD SUB-ASSEMBLY
DTC B157D DAB Tuner Antenna Disconnected |
DESCRIPTION
This DTC is stored when a malfunction occurs in the digital audio broadcasting antenna assembly which is connected to the multi-media module receiver assembly.DTC Code
| DTC Detection Condition
| Trouble Area
|
B157D
| The No. 2 amplifier antenna assembly is not connected
| - Antenna cord sub-assembly
- No. 2 antenna cord sub-assembly
- No. 4 antenna cord sub-assembly
- Quarter window glass (Window glass antenna wire)
- Multi-media module receiver assembly
|
WIRING DIAGRAM
INSPECTION PROCEDURE
- NOTICE:
- Check that the antenna cable is properly installed and does not have any sharp bends, pinching or loose connections.
| 1.CHECK CONNECTION OF DAB RADIO ANTENNA CABLE |
Check if the DAB radio antenna cable is securely connected to the multi-media module receiver assembly.
- OK:
- DAB radio antenna cable is securely connected.
| | SECURELY CONNECT DAB RADIO ANTENNA CABLE |
|
|
| 2.CHECK QUARTER WINDOW ASSEMBLY (WINDOW GLASS ANTENNA WIRE) |
Inspect the quarter window glass (window glass antenna wire) (Click here).
| 3.CHECK ANTENNA CORD SUB-ASSEMBLY |
Remove the antenna connector from the multi-media module receiver assembly.
Remove the antenna connector from the No. 2 antenna cord sub-assembly.
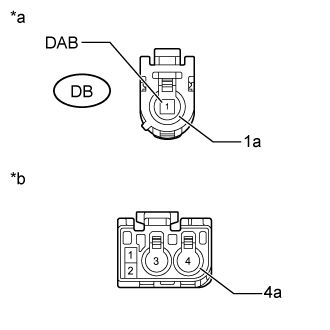
Measure the resistance according to the value(s) in the table below.
- Standard Resistance:
Tester Connection
| Condition
| Specified Condition
|
DB-1 (DAB) - 4
| Always
| Below 1 Ω
|
DB-1a - 4a
| Always
| Below 1 Ω
|
DB-1 (DAB) or 4 - Body ground
| Always
| 10 kΩ or higher
|
DB-1a or 4a - Body ground
| Always
| 10 kΩ or higher
|
Text in Illustration *a
| Front view of wire harness connector
(to Multi-media Module Receiver Assembly)
|
*b
| Front view of wire harness connector
(to No. 2 Antenna Cord Sub-assembly)
|
| 4.CHECK NO. 2 ANTENNA CORD SUB-ASSEMBLY |
Remove the antenna connector from the antenna cord sub-assembly.
Remove the antenna connector from the No. 4 antenna cord sub-assembly.
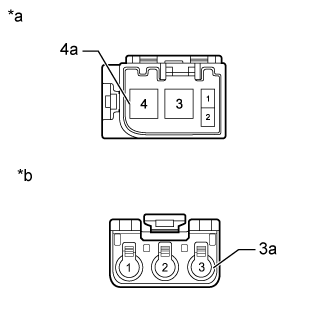
Measure the resistance according to the value(s) in the table below.
- Standard Resistance:
Tester Connection
| Condition
| Specified Condition
|
4 - 3
| Always
| Below 1 Ω
|
4a - 3a
| Always
| Below 1 Ω
|
4 or 3 - Body ground
| Always
| 10 kΩ or higher
|
4a or 3a - Body ground
| Always
| 10 kΩ or higher
|
Text in Illustration *a
| Front view of wire harness connector
(to Antenna Cord Sub-assembly)
|
*b
| Front view of wire harness connector
(to No. 4 Antenna Cord Sub-assembly)
|
| | REPLACE NO. 2 ANTENNA CORD SUB-ASSEMBLY (Click here) |
|
|
| 5.CHECK NO. 4 ANTENNA CORD SUB-ASSEMBLY |
Remove the antenna connector from the No. 2 antenna cord sub-assembly.
Remove the antenna connector from the quarter window glass.
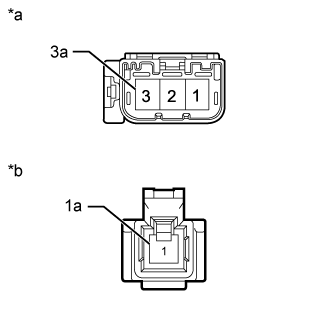
Measure the resistance according to the value(s) in the table below.
- Standard Resistance:
Tester Connection
| Condition
| Specified Condition
|
3 - 1
| Always
| Below 1 Ω
|
3a - 1a
| Always
| Below 1 Ω
|
3 or 1 - Body ground
| Always
| 10 kΩ or higher
|
3a or 1a - Body ground
| Always
| 10 kΩ or higher
|
Text in Illustration *a
| Front view of wire harness connector
(to No. 2 Antenna Cord Sub-assembly)
|
*b
| Front view of wire harness connector
(to Quarter Window Glass)
|
| | REPLACE NO. 4 ANTENNA CORD SUB-ASSEMBLY (Click here) |
|
|
| OK |
|
|
|
| REPLACE MULTI-MEDIA MODULE RECEIVER ASSEMBLY (Click here) |
|