Front Differential Carrier Oil Seal -- Replacement |
| 1. DRAIN DIFFERENTIAL OIL |
Stop the vehicle on a level place.
for Front Differential:
Remove the engine under cover.
Using a 10 mm hexagon wrench, remove the filler plug and gasket.
Using a 10 mm hexagon wrench, remove the drain plug and gasket, and drain the oil.
Using a 10 mm hexagon wrench, install a new gasket and the drain plug.
- Torque:
- 39 N*m{400 kgf*cm, 29 ft.*lbf}
 |
for Rear Differential:
Remove the filler plug and gasket.
Remove the drain plug and gasket, and drain the oil.
Install a new gasket and the drain plug.
- Torque:
- 49 N*m{500 kgf*cm, 36 ft.*lbf}
| 2. REMOVE FRONT DIFFERENTIAL CARRIER ASSEMBLY |
Remove the differential carrier (Click here).
| 3. REMOVE DIFFERENTIAL EXTENSION FLANGE TUBE |
Remove the 4 bolts.
 |
Using a plastic-faced hammer, remove the differential tube.
| 4. REMOVE FRONT DRIVE PINION COMPANION FLANGE FRONT NUT |
Using SST and a hammer, unstake the nut.
- SST
- 09930-00010
 |
Using SST to hold the companion flange, remove the nut.
- SST
- 09330-00021(09330-00030)
 |
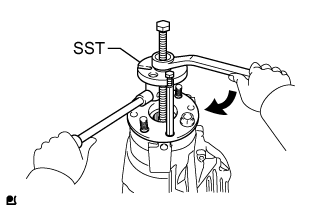
| 5. REMOVE FRONT DRIVE PINION COMPANION FLANGE FRONT SUB-ASSEMBLY |
Using SST, remove the companion flange from the differential carrier.
- SST
- 09950-30012(09951-03010,09953-03010,09954-03010,09955-03030,09956-03020)
 |
| 6. REMOVE FRONT DIFFERENTIAL CARRIER OIL SEAL |
Using SST, remove the oil seal.
- SST
- 09308-10010
 |
| 7. REMOVE FRONT DIFFERENTIAL DRIVE PINION OIL SLINGER |
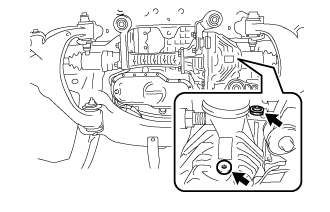
| 8. REMOVE FRONT DIFFERENTIAL CROSS SHAFT BEARING RETAINER |
Remove the bolts labeled B and front differential front support assembly LH.
 |
Remove the bolts labeled A.
Using a plastic-faced hammer, tap out the bearing retainer.
| 9. REMOVE FRONT NO. 1 DIFFERENTIAL CASE SUB-ASSEMBLY |
Remove the differential case from the differential carrier.
| 10. REMOVE DIFFERENTIAL DRIVE PINION |
Set the differential carrier to an overhaul stand as shown in the illustration.
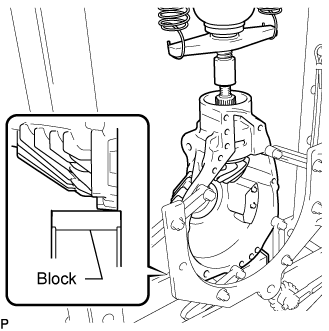 |
Using a press, press out the drive pinion.
- NOTICE:
- Do not drop the drive pinion.
| 11. REMOVE FRONT DRIVE PINION FRONT RADIAL BALL BEARING |
Remove the bearing (inner race) from the differential carrier.
| 12. REPLACE FRONT DIFFERENTIAL DRIVE PINION BEARING SPACER |
Replace the bearing spacer with a new one.
| 13. TEMPORARILY INSTALL DIFFERENTIAL DRIVE PINION |
| 14. INSTALL FRONT NO. 1 DIFFERENTIAL CASE SUB-ASSEMBLY |
| 15. INSTALL FRONT DIFFERENTIAL CROSS SHAFT BEARING RETAINER |
Remove any old FIPG material and be careful not to drop oil on the contact surfaces of the differential carrier and shaft bearing retainer.
Wipe off any residual FIPG material on the contact surface using gasoline or alcohol.
Apply seal packing to the differential carrier as shown in the illustration.
Text in Illustration *a Seal Packing - Seal packing:
- Toyota Genuine Seal Packing 1281, Three Bond 1281 or equivalent
- Seal Diameter (A):
- 2.0 to 3.0 mm (0.0788 to 0.118 in.)
- HINT:
- Install the shaft bearing retainer within 10 minutes of applying seal packing.
 |
Install the front differential cross shaft bearing retainer and front differential front support assembly LH with the 11 bolts (A) and 3 new bolts (B).
- Torque:
- for bolt A:
- 65 N*m{663 kgf*cm, 48 ft.*lbf}
- for bolt B:
- 155 N*m{1581 kgf*cm, 114 ft.*lbf}
- NOTICE:
- Do not add oil or drive the vehicle immediately after installing the cover, and leave it as is for at least an hour. Also, for 12 hours or less, avoid rapid acceleration/deceleration.
|
| 16. INSTALL FRONT DRIVE PINION FRONT RADIAL BALL BEARING |
Using SST and a hammer, lightly tap in the bearing (inner race) to install it.
- SST
- 09316-60011(09316-00041)
 |
| 17. INSTALL FRONT DIFFERENTIAL DRIVE PINION OIL SLINGER |
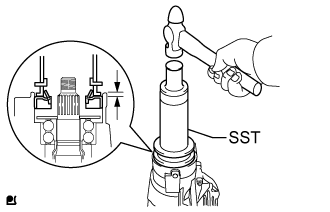
| 18. INSTALL FRONT DIFFERENTIAL CARRIER OIL SEAL |
Using SST and a hammer, tap in a new oil seal.
- SST
- 09502-12010
09316-60011(09316-00041)
- Standard oil seal depth:
- 5.6 to 6.6 mm (0.221 to 0.260 in.)
 |
Coat the lip of the oil seal with MP grease.
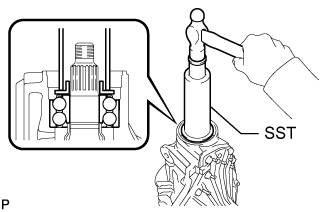
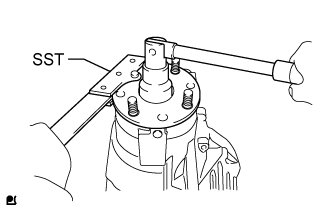
| 19. INSTALL FRONT DRIVE PINION COMPANION FLANGE SUB-ASSEMBLY |
Using SST, install the companion flange.
- SST
- 09950-30012(09951-03010,09953-03010,09954-03010,09955-03030,09956-03020)
Text in Illustration *a Turn *b Hold
 |
| 20. INSPECT DIFFERENTIAL DRIVE PINION PRELOAD |
Coat the threads of a new nut with hypoid gear oil.
Using SST to hold the companion flange in place, then slowly tighten the nut within the drive pinion preload adjustment range so that it reaches the specified drive pinion preload (at Starting).
- SST
- 09330-00021(09330-00030)
- Limit Torque Value:
- 451 N*m (4599 kgf*cm, 332ft.*lbf) or less
 |
Using a torque wrench, measure the preload of the backlash between the drive pinion and ring gear.
- Standard Preload (at Starting):
Bearing Specified Condition New 2.97 to 3.47 N*m (31 to 35 kgf*cm, 27 to 30 in.*lbf) Reused 2.14 to 2.45 N*m (22 to 24 kgf*cm, 19 to 21 in.*lbf)
If the preload is less than the specification, tighten the nut with 13 N*m (130 kgf*cm, 9 ft.*lbf) of torque at a time until the specified preload is reached.- Torque:
- 451 N*m{4599 kgf*cm, 333 ft.*lbf}or less
- HINT:
- Do not loosen the nut to reduce the preload.
 |
| 21. INSPECT TOTAL PRELOAD |
With the drive pinion contacting the tooth side of the ring gear, use a torque wrench to measure the total preload.
- Standard Total Preload (at Starting):
Bearing Specified Condition New 4.58 to 5.88 N*m (47 to 59 kgf*cm, 41 to 52 in.*lbf) Reused 3.47 to 4.58 N*m (36 to 46 kgf*cm, 31 to 40 in.*lbf)
|
| 22. STAKE FRONT DRIVE PINION COMPANION FLANGE FRONT NUT |
Using a chisel and hammer, stake the nut.
 |
| 23. INSTALL DIFFERENTIAL EXTENSION FLANGE TUBE |
Remove any old FIPG material and be careful not to drop oil on the contact surfaces of the differential tube and bearing retainer.
Wipe off any residual FIPG material on the contact surface using gasoline or alcohol.
Apply seal packing to the bearing retainer as shown in the illustration.
Text in Illustration *a Seal Packing - Seal packing:
- Toyota Genuine Seal Packing 1281, Three Bond 1281 or equivalent
- Seal Diameter (A):
- 2.0 to 3.0 mm (0.0788 to 0.118 in.)
- HINT:
- Install the differential tube within 10 minutes of applying seal packing.
 |
Install the differential tube to the bearing retainer.
Install 4 new bolts.
- Torque:
- 65 N*m{663 kgf*cm, 48 ft.*lbf}or less
- NOTICE:
- Do not add oil or drive the vehicle immediately after installing the cover, and leave it as is for at least an hour. Also, for 12 hours or less, avoid rapid acceleration/deceleration.
|
| 24. INSTALL FRONT DIFFERENTIAL CARRIER ASSEMBLY |
Install the front differential carrier (Click here).
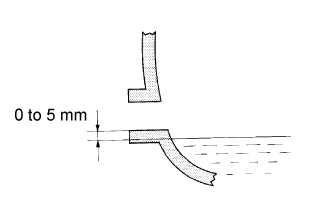
| 25. ADD DIFFERENTIAL OIL |
Add differential oil so that the oil level is between 0 to 5 mm (0 to 0.197 in.) from the bottom lip of the differential filler plug hole.
- NOTICE:
- Too much or too little oil will lead to differential problems.
- After changing the oil, drive the vehicle and then check the oil level again.
- Front differential oil type and viscosity:
- Toyota Genuine Differential gear oil LT 75W-85 GL-5 or equivalent
- Rear Differential Oil Type and Viscosity:
Item Oil Type and Viscosity w/o LSD Toyota Genuine Differential gear oil LT 75W-85 GL-5 or equivalent w/ LSD Toyota Genuine Differential gear oil LX 75W-85 GL-5 or equivalent
- Front differential capacity:
- 1.85 to 1.95 liters (1.96 to 2.06 US qts., 1.63 to 1.71 Imp. qts.)
- Rear Differential Capacity:
Item Specified Condition Standard 4.15 to 4.25 liters (4.39 to 4.49 US qts., 3.66 to 3.74 Imp. qts.) w/ LSD 4.10 to 4.20 liters (4.34 to 4.43 US qts., 3.60 to 3.69 Imp. qts.) w/ Differential lock
 |
for Front Differential:
Using a 10 mm hexagon wrench, install a new gasket and the filler plug.
- Torque:
- 39 N*m{400 kgf*cm, 29 ft.*lbf}
Install the engine under cover.
for Rear Differential:
Install a new gasket and the filler plug.
- Torque:
- 49 N*m{500 kgf*cm, 36 ft.*lbf}