Speed Sensor (For Input Revolution Sensor) -- Installation |
| 1. INSTALL TRANSMISSION REVOLUTION SENSOR (NT) |
Apply a light coat of ATF to the O-ring of the transmission revolution sensor (NT).
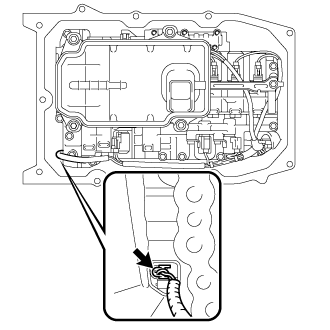
Attach the clamp to install the transmission revolution sensor (NT) to the clamp.
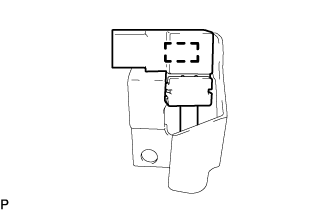 |
Using a T30 ''TORX'' socket wrench, install the transmission revolution sensor (NT) and clamp with the bolt.
- Torque:
- 6.8 N*m{69 kgf*cm, 60 in.*lbf}
- NOTICE:
- When reusing the transmission revolution sensor (NT), inspect the O-ring.
- Make sure that the O-ring is not cracked or jammed when installing the transmission revolution sensor (NT).
| 2. INSTALL OIL PUMP ASSEMBLY |
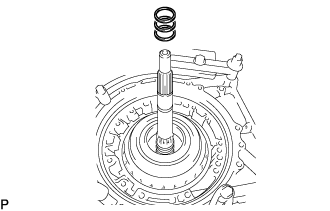
Coat 3 new oil seal rings with ATF, and install them to the input shaft.
- NOTICE:
- Do not expand the oil seal ring ends excessively.
 |
Coat 4 new clutch drum oil seal rings with ATF, and install them to the stator shaft groove.
- NOTICE:
- Do not expand the ring ends excessively.
- HINT:
- After installing the clutch drum oil seal rings, check that they rotate smoothly.
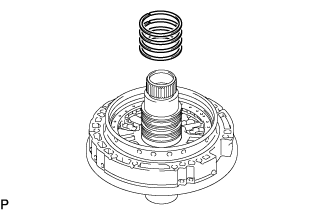 |
Coat a new oil pump O-ring with ATF, and install it to the oil pump assembly.
 |
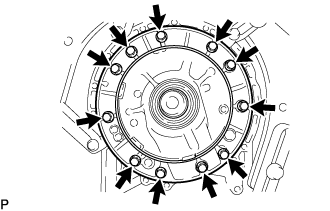
Clean and degrease the threads of the 11 bolts and the contact surfaces of the automatic transmission case sub-assembly and oil pump assembly with non-residue solvent.
- NOTICE:
- During installation, do not allow oil to contact the bolts or the surface of the oil pump body.
Place the oil pump assembly through the input shaft, and align the bolt holes of the oil pump assembly with the automatic transmission case sub-assembly.
Hold the input shaft, and lightly press the oil pump assembly to slide the oil seal rings into the front planetary gear assembly.
- NOTICE:
- Be careful not to damage the O-ring and oil seal rings.
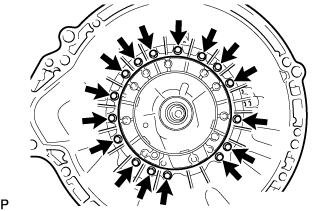
Install the 11 bolts.
- Torque:
- 25 N*m{250 kgf*cm, 18 ft.*lbf}
 |
Connect the connector to the transmission revolution sensor (NT).
 |
| 3. INSTALL AUTOMATIC TRANSMISSION OIL PAN SUB-ASSEMBLY |
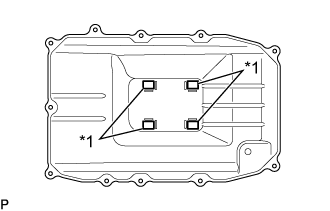
Install the 4 transmission oil cleaner magnets to the automatic transmission oil pan sub-assembly.
Text in Illustration *1 Transmission Oil Cleaner Magnet
 |
Install a new automatic transmission oil pan gasket and the automatic transmission oil pan sub-assembly to the automatic transmission case sub-assembly with the 11 bolts.
- Torque:
- 7.5 N*m{76 kgf*cm, 66 in.*lbf}
- NOTICE:

- Make sure that there is no oil or foreign matter on the gasket seal surface and automatic transmission oil pan sub-assembly contact surface.
- Install the gasket so that there is no slack in the gasket, and that the entire circumference of the seal surface is level.
- Make sure that the 11 gasket drop prevention protrusions are set on the automatic transmission oil pan sub-assembly.
- When tightening the automatic transmission oil pan sub-assembly, make sure that the gasket is not pinched between the sleeve of the gasket tightening area and the seal surface of the transmission.
Text in Illustration *1 Sleeve *2 Automatic Transmission Case Sub-assembly *a Correct *b Incorrect *c Protrusion
| 4. INSTALL AUTOMATIC TRANSMISSION HOUSING |
Remove the automatic transmission assembly from the overhaul attachment.
 |
Install the automatic transmission housing to the automatic transmission case sub-assembly with the 16 bolts.
- Torque:
- 25 N*m{250 kgf*cm, 18 ft.*lbf}
 |
| 5. INSTALL AUTOMATIC TRANSMISSION ASSEMBLY |