Automatic Transmission Fluid -- High Temperature Adjustment |
- CAUTION:
- Make sure not to touch the exhaust pipe.
- Be careful not to burn yourself when the automatic transmission fluid temperature is high.
- To prevent injury due to contact with an operating V-ribbed belt or cooling fan, keep your hands and clothing away from the V-ribbed belt and cooling fans when working in the engine compartment with the engine running or the engine switch on (IG).
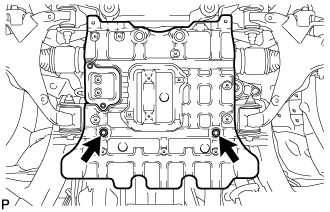
| 1. REMOVE NO. 2 ENGINE UNDER COVER |
Remove the 2 bolts and No. 2 engine under cover.
 |
| 2. REMOVE OIL PAN PROTECTOR ASSEMBLY |
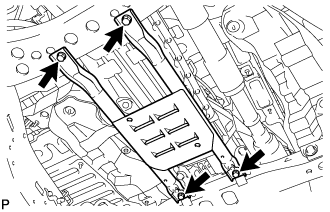 |
Remove the 4 bolts and oil pan protector assembly.
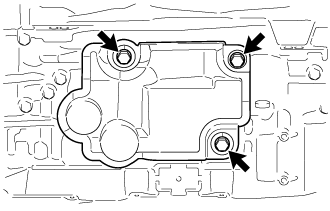
| 3. REMOVE TRANSMISSION CASE COVER (w/ Cover) |
Remove the 3 bolts and transmission case cover.
 |
| 4. ADJUST FLUID LEVEL AT HIGH TEMPERATURE |
Warm up and stop the engine. [*4]
Check the ATF temperature.
Connect the GTS to the DLC3 with the engine switch off.
Turn the engine switch on (IG) and turn the GTS on.
- NOTICE:
- To reduce load, make sure that all electrical systems, such as the air conditioning, lighting system, electric fan and audio system are off.
Enter the following menus: Powertrain / ECT / Data List / Engine Speed, A/T Oil Temperature 1.
- NOTICE:
- If the fluid temperature tends to decrease when the fluid temperature is between 85°C (185°F) and 90°C (194°F) with the engine idling, make sure that the fluid temperature is above 90°C (194°F) before starting work.
- If the fluid temperature tends to increase when the fluid temperature is between 85°C (185°F) and 90°C (194°F) with the engine idling, make sure that the fluid temperature is below 85°C (185°F) before starting work.
- If the fluid temperature tends to not change when the fluid temperature is between 85°C (185°F) and 90°C (194°F) with the engine idling, make sure that the fluid temperature is 88°C (190°F) before starting work.
Depress and hold the brake pedal.
Start the engine.
Slowly move the shift lever from P to D, then move the shift lever to P.
- HINT:
- Keep the shift lever in each position for approximately 3 seconds.
Lift the vehicle.
- NOTICE:
- Set the vehicle on a lift so that the vehicle is kept level when it is lifted up (make sure the tilt angle from the front to rear and side to side of the vehicle is within +/-1°).
Loosen the refill plug.
- CAUTION:
- When loosening the refill plug, make sure not to touch the exhaust pipe.
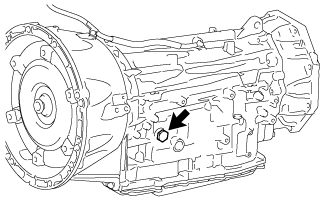 |
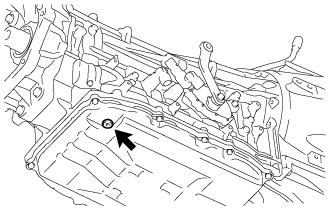
Using a 5 mm hexagon socket wrench, remove the overflow plug and gasket from the automatic transmission assembly. [*1]
- CAUTION:
- Be careful as the fluid coming out of the overflow plug hole is hot.
- NOTICE:
- Before removing the overflow plug, make sure that the fluid temperature and the engine idle speed is within the range specified in the tables provided in step *3.
- When adding fluid (step *3), add the specified amount in accordance with the fluid temperature and the engine idle speed.
- If fluid does not come out, add fluid to the refill hole until fluid comes out of the overflow hole, install the overflow plug, and perform the procedure from step *4 again.
 |
Make sure that the fluid temperature and engine speed remain within the appropriate range until the overflow plug is tightened in step *2.
Text in Illustration *a Automatic Transmission Fluid Temperature [°C] *b Engine Idle Speed [rpm] *c Overflow Plug Removed *d Overflow Plug Installed *e Time *f Example: When adjusting with the engine idle speed between 650 and 850 rpm
 |
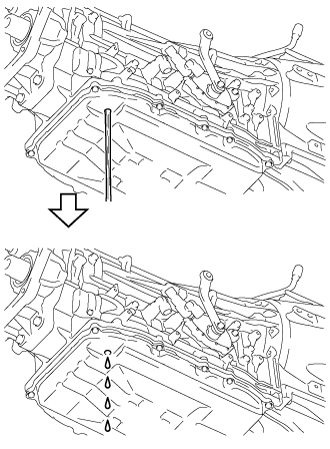
Wait until the fluid flow changes from a steady flow to a drip. As soon as the fluid begins to drip, make a note of the fluid temperature displayed on the GTS.
- NOTICE:
- Be sure to install the overflow plug with a new gasket immediately after the fluid begins to drip. If the overflow plug is not installed immediately after the fluid begins to drip, the transmission will have to be refilled and the procedure will have to be repeated from step *4.
- HINT:
- If the fluid temperature is increasing, the fluid flow will not completely stop because the fluid expands as its temperature increases.
- Be sure to make a note of the fluid temperature at the exact moment the fluid begins to drip as this temperature will be used in step *3.
 |
Using a 5 mm hexagon socket wrench, install a new gasket and overflow plug to the automatic transmission assembly. [*2]
- Torque:
- 16 N*m{163 kgf*cm, 12 ft.*lbf}
|
Lower the vehicle.
Turn the engine switch off.
Remove the refill plug and O-ring from the automatic transmission assembly.
- CAUTION:
- When removing the refill plug, make sure not to touch the exhaust pipe.
|
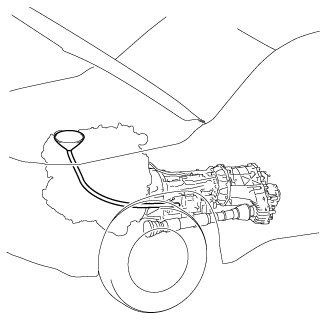
Install a hose and funnel to the refill hole as shown in the illustration.
- CAUTION:
- When installing the hose to the refill hole, make sure not to touch the exhaust pipe with the hose or your hand.
- NOTICE:
- When the fluid level is correct and the fluid temperature is approximately 43°C (109°F), the transmission is designed so that the fluid level is at the same height as the end of the overflow tube. When adjusting the fluid level with a fluid temperature of 85 to 90°C (185 to 194°F), drain the amount of fluid that has expanded due to heat (step *1). After the fluid has been drained, make sure to add the amount of fluid specified in the table below.
- Pay extra attention when adding fluid because adding an excessive or insufficient amount of fluid may cause a malfunction in the automatic transmission assembly.
- Do not insert the hose into the refill hole excessively.
- Be sure to use tape or equivalent to prevent the hose from sagging.
- When installing the hose, do not allow the hose to contact the exhaust pipe.
- HINT:
- Make sure to use a hose with a length of 1250 mm (4.10 ft.), an inner diameter of 13 mm (0.512 in.) and an outer diameter of 16 mm (0.630 in.).
- Shave off a small amount from the end of the hose to make it easier to insert into the refill hole.
 |
Add the specified amount of automatic transmission fluid to the refill hole. [*3]
If determining the specific amount of automatic transmission fluid to be added, refer to the table below.
- Specified Amount to be Added (Automatic Transmission Fluid Weight):
Specified Amount to be Added at Automatic Transmission Fluid Temperature of 85°C (185°F) to 90°C (194°F) Engine Idle Speed (rpm)
650 to 850607 g (21.4 oz.)
715 cc (43.6 cu. in.)
- NOTICE:
- If fluid remains inside the hose, the amount of fluid will be outside the specifications. Therefore, when adding fluid, make sure that no fluid remains inside the hose.
- The acceptable margin of error when adding automatic transmission fluid is +/-8.5 g (0.3 oz.) or +/-10 cc (0.6 cu. in.).
- Use Toyota Genuine ATF WS.
- HINT:
- The values in the table are reference values for when the temperature of the fluid to be added is between 10°C (50°F) and 30°C (86°F).
- If fluid comes out (the amount of fluid is not as specified), perform the procedure from step *4 again.
If determining the specified amount of automatic transmission fluid to be added by volume, calculate it based on weight and density at each temperature.
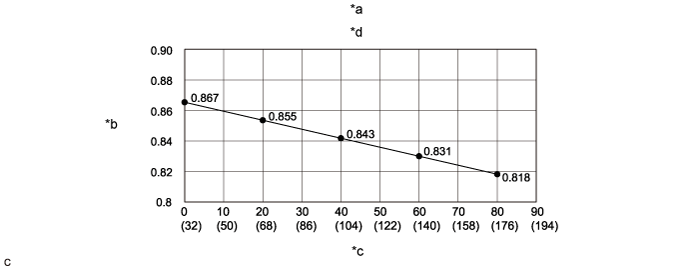
Text in Illustration *a This example shows the volume of automatic transmission fluid to be added when the temperature of the automatic transmission fluid to be added is 10°C (50°F) to 30°C (86°F). *b Density [g / cc] *c Temperature of automatic transmission fluid to be measured [°C (°F)] *d Relation between temperature and density of Toyota genuine ATF WS
Remove the hose and funnel.
- CAUTION:
- When removing the hose and funnel, make sure not to touch the exhaust pipe.
Install a new O-ring and refill plug to the automatic transmission assembly.
- Torque:
- 39 N*m{400 kgf*cm, 29 ft.*lbf}
- CAUTION:
- When removing the hose and funnel, make sure not to touch the exhaust pipe.
| 5. AFTER FILLING TRANSMISSION |
Lift the vehicle.
Clean each part.
Check for automatic transmission fluid leaks.
Lower the vehicle.
| 6. INSTALL TRANSMISSION CASE COVER (w/ Cover) |
Install the transmission case cover with the 3 bolts.
- Torque:
- 13 N*m{131 kgf*cm, 9 ft.*lbf}
| 7. INSTALL OIL PAN PROTECTOR ASSEMBLY |
Install the oil pan protector with the 4 bolts.
- Torque:
- 50 N*m{510 kgf*cm, 37 ft.*lbf}
|
| 8. INSTALL NO. 2 ENGINE UNDER COVER |
Install the No. 2 engine under cover with the 2 bolts.
- Torque:
- 29 N*m{296 kgf*cm, 21 ft.*lbf}