Fuel Lid Lock Control Cable Assembly (For Double Cab) -- Removal |
| 1. REMOVE FRONT SEAT ASSEMBLY LH |
for Manual Seat:
(HILUX_TGN26 RM000000Z8U08XX.html)
for Power Seat:
(HILUX_TGN26 RM000003NZX014X.html)
| 2. REMOVE FRONT SEAT ASSEMBLY RH |
for Manual Seat:
- HINT:
- Use the same procedure described for the LH side.
for Bench Seat Type:
(HILUX_TGN26 RM000000Z9000EX.html)
| 3. REMOVE REAR SEAT ASSEMBLY |
| 4. REMOVE CONSOLE BOX ASSEMBLY (w/ Console Box Lid) |
| 5. REMOVE UPPER BACK PANEL GARNISH |
 |
Detach the 4 claws and 5 clips and remove the upper back panel garnish.
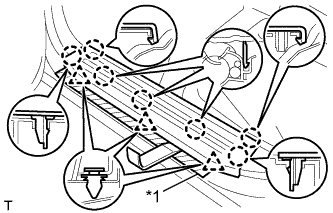
| 6. REMOVE FRONT DOOR SCUFF PLATE LH |
 |
Put protective tape around the front door scuff plate.
Text in Illustration *1 Protective Tape
Using a moulding remover, detach the 7 claws and 3 clips, and remove the front door scuff plate.
| 7. REMOVE COWL SIDE TRIM BOARD LH |
 |
Remove the part of the front door opening trim attached to the cowl side trim board.
Remove the clip.
Detach the 2 clips and remove the cowl side trim board.
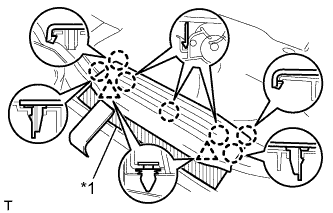
| 8. REMOVE REAR DOOR SCUFF PLATE LH |
 |
Put protective tape around the rear door scuff plate.
Text in Illustration *1 Protective Tape
Using a moulding remover, detach the 7 claws and 2 clips, and remove the rear door scuff plate.
| 9. REMOVE LOWER CENTER PILLAR GARNISH LH |
 |
Remove the bolt and disconnect the front seat outer belt floor anchor.
Remove the part of the front door opening trim and rear door opening trim attached to the lower center pillar garnish.
 |
Detach the 2 claws, 2 guides and 2 clips and remove the lower center pillar garnish.
| 10. REMOVE LOWER QUARTER TRIM PANEL LH |
 |
Remove the part of the rear door opening trim attached to the lower quarter trim panel.
Detach the claw and 3 clips and remove the lower quarter trim panel.
| 11. REMOVE FRONT FLOOR CARPET ASSEMBLY |
Partially remove the floor carpet.
- HINT:
- It is not necessary to fully remove the floor carpet. Partially remove it so that the lock control cable can be removed in a later step.
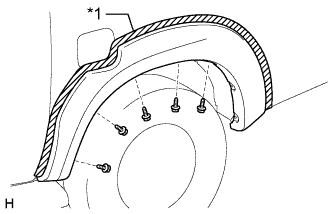
| 12. REMOVE REAR NO. 1 WHEEL OPENING EXTENSION SUB-ASSEMBLY LH (w/ Over Fender) |
Put protective tape around the rear No. 1 wheel opening extension.
Text in Illustration *1 Protective Tape
 |
Remove the 5 screws.
Detach the 11 clips and remove the No. 1 rear wheel opening extension.
 |
Remove the 11 clips from the vehicle body.
| 13. REMOVE REAR WHEEL HOUSE LINER LH |
Partially remove the liner.
- HINT:
- It is not necessary to fully remove the liner. Partially remove it so that the lock control cable can be removed in a later step.
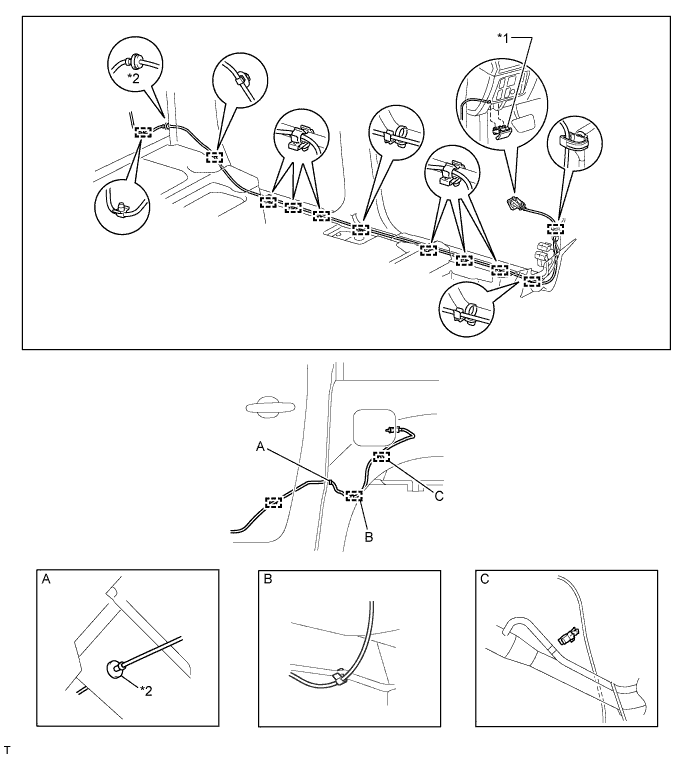
| 14. REMOVE FUEL LID LOCK CONTROL CABLE SUB-ASSEMBLY |
Remove the fuel lid lock open lever.
Remove the grommet from the vehicle body.
Detach the cable from the clamps shown in the illustration.

Text in Illustration *1 Fuel Lid Lock Open Lever *2 Grommet
Turn the fuel filler opening lid lock retainer counterclockwise and remove the fuel lid lock control cable from the fuel filler opening lid lock retainer.
 |
| 15. REMOVE FUEL FILLER OPENING LID LOCK RETAINER |
 |
Turn the fuel filler opening lid lock retainer clockwise and remove the fuel filler opening lid lock retainer as shown in the illustration.