INSTALL POWER WINDOW REGULATOR MOTOR ASSEMBLY LH (w/ Power Window)
INSTALL FRONT NO. 2 SPEAKER ASSEMBLY (w/ Front No. 2 Speaker)
INSTALL FRONT DOOR WINDOW REGULATOR HANDLE ASSEMBLY (w/o Power Window)
CONNECT CABLE TO NEGATIVE BATTERY TERMINAL (w/ Power Window)
INITIALIZE POWER WINDOW CONTROL SYSTEM (w/ Jam Protection Function)
Front Door -- Reassembly |
- HINT:
- Use the same procedure for the RH and LH sides.
- The procedure listed below is for the LH side.
- A bolt without a torque specification is shown in the standard bolt chart (HILUX_TGN26 RM00000118R007X.html).
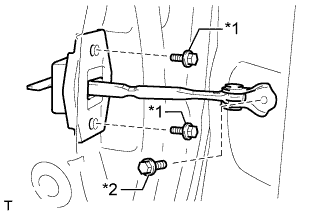
| 1. INSTALL FRONT DOOR CHECK ASSEMBLY LH |
Apply MP grease to the sliding areas of the front door check.
When reusing a bolt labeled B:
Clean the threads of the bolt labeled B with non-residue solvent.
Apply adhesive to the threads of the bolt labeled B.
- Adhesive:
- Toyota Genuine Adhesive 1324, Three Bond 1324 or equivalent.
Install the front door check with the 2 bolts labeled A and the bolt labeled B.
- Torque:
- Bolt A:
- 5.5 N*m{56 kgf*cm, 49 in.*lbf}
- Bolt B:
- 30 N*m{306 kgf*cm, 22 ft.*lbf}
Text in Illustration *1 Bolt A *2 Bolt B
 |
| 2. INSTALL FRONT DOOR WEATHERSTRIP LH |
- HINT:
- When installing the front door weatherstrip, heat the front door panel using a heat light.
- Standard:
Item Temperature Front Door Panel 40 to 60°C (104 to 140°F)
- NOTICE:
- Do not heat the front door panel excessively.
Clean the front door panel surface.
Using a heat light, heat the front door panel surface.
Remove the double-sided tape from the front door panel surface.
Wipe off any tape adhesive residue with cleaner.
Install a new front door weatherstrip.
for Double Cab:
- Remove the peeling paper from the face of the front door weatherstrip.
- HINT:
- After removing the peeling paper, keep the exposed adhesive free from foreign matter.
- Attach the 33 clips to install the front door weatherstrip.
- HINT:
- Press the front door weatherstrip firmly to install it.
- Install the clip.
- Remove the peeling paper from the face of the front door weatherstrip.
for Single Cab:
- Remove the peeling paper from the face of the front door weatherstrip.
- HINT:
- After removing the peeling paper, keep the exposed adhesive free from foreign matter.
- Attach the 34 clips to install the front door weatherstrip.
- HINT:
- Press the front door weatherstrip firmly to install it.
- Install the clip.
- Remove the peeling paper from the face of the front door weatherstrip.
| 3. INSTALL FRONT DOOR PANEL CUSHION |
Install a new front door panel cushion.
| 4. INSTALL FRONT DOOR REAR OUTSIDE HANDLE PAD |
Attach the 2 claws to install the front door rear outside handle pad.
| 5. INSTALL FRONT DOOR FRONT OUTSIDE HANDLE PAD |
Attach the 2 claws to install the front door front outside handle pad.
| 6. INSTALL FRONT DOOR LOCK OPEN ROD LH |
Install the front door lock open rod to the front door outside handle frame.
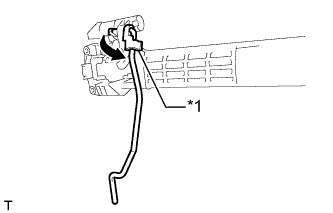 |
Rotate the snap in the direction indicated by the arrow in the illustration to attach the snap to the front door lock open rod.
Text in Illustration *1 Snap
| 7. INSTALL FRONT DOOR OUTSIDE HANDLE FRAME SUB-ASSEMBLY LH |
Apply MP grease to the sliding area of the front door outside handle frame.
Attach the claw to install the front door outside handle frame.
Using a T30 "TORX" socket wrench, install the screw.
- Torque:
- 4.0 N*m{41 kgf*cm, 36 in.*lbf}
| 8. INSTALL FRONT DOOR OUTSIDE HANDLE ASSEMBLY LH |
Install the front door outside handle by moving it in the direction indicated by the arrow shown in the illustration.
 |
| 9. INSTALL FRONT DOOR INSIDE LOCKING CABLE ASSEMBLY LH |
Install the front door inside locking cable.
Attach the 3 claws to close the cover.
| 10. INSTALL FRONT DOOR LOCK REMOTE CONTROL CABLE ASSEMBLY LH |
Install the front door lock remote control cable.
| 11. INSTALL FRONT DOOR LOCK ASSEMBLY LH |
w/ Power Door Lock:
(HILUX_TGN26 RM00000138T019X_01_0007.html)
w/o Power Door Lock:
Using a T30 "TORX" socket wrench, install the front door lock with the 3 screws.
- Torque:
- 5.0 N*m{51 kgf*cm, 44 in.*lbf}
Connect the front door inside locking cable and front door lock remote control cable to the clamps.
| 12. INSTALL FRONT DOOR OUTSIDE HANDLE COVER |
Attach the 2 claws to install the front door outside handle cover to the door key cylinder.
Using a T30 "TORX" socket wrench, install the front door outside handle cover together with the door key cylinder with the screw.
- Torque:
- 4.0 N*m{41 kgf*cm, 36 in.*lbf}
Install the hole plug.
| 13. INSTALL FRONT DOOR REAR LOWER FRAME SUB-ASSEMBLY LH |
Install the front door rear lower frame with the 2 nuts.
| 14. INSTALL POWER WINDOW REGULATOR MOTOR ASSEMBLY LH (w/ Power Window) |
Apply MP grease to the sliding and rotating areas of the regulator motor.
Using a T25 "TORX" socket wrench, install the power window regulator motor assembly LH with the 3 screws.
- Torque:
- 5.4 N*m{55 kgf*cm, 48 in.*lbf}
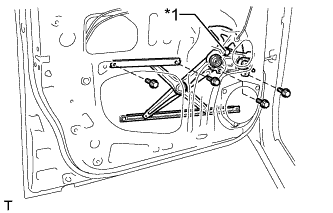
| 15. INSTALL FRONT DOOR WINDOW REGULATOR SUB-ASSEMBLY LH |
w/ Power Window:
Apply MP grease to the sliding and rotating areas of the front door window regulator.
Temporarily install the temporary bolt to the front door window regulator.
Install the front door window regulator with the 5 bolts, and then tighten the temporary bolt.
- Torque:
- 8.0 N*m{82 kgf*cm, 71 in.*lbf}
Text in Illustration *1 Temporary Bolt - NOTICE:
- Be careful not to drop the front door window regulator as it may become damaged.
Connect the connector.


w/o Power Window:
Apply MP grease to the sliding and rotating areas of the front door window regulator.
- NOTICE:
- Do not apply grease to the spring of the window regulator.
Temporarily install the temporary bolt to the front door window regulator.
Install the front door window regulator with the 4 bolts, and then tighten the temporary bolt.
- Torque:
- 8.0 N*m{82 kgf*cm, 71 in.*lbf}
Text in Illustration *1 Temporary Bolt - NOTICE:
- Be careful not to drop the front door window regulator as it may become damaged.

| 16. INSTALL FRONT DOOR GLASS RUN LH |
Install the front door glass run.
| 17. INSTALL FRONT DOOR OUTER GLASS WEATHERSTRIP ASSEMBLY LH |
Attach the 5 claws to install the front door outer glass weatherstrip.
| 18. INSTALL FRONT DOOR GLASS SUB-ASSEMBLY LH |
w/ Power Window:
Temporarily install the power window regulator master switch assembly with front door armrest base panel.
Connect the cable to the negative (-) battery terminal.
Operate the front door window regulator so that the front door glass can be installed.
Disconnect the cable from the negative (-) battery terminal.
- NOTICE:
- When disconnecting the cable, some systems need to be initialized after the cable is reconnected (HILUX_TGN26 RM000004QR3003X.html).
Remove the power window regulator master switch assembly with front door armrest base panel.
w/o Power Window:
Temporarily install the front door window regulator handle.
Operate the front door window regulator so that the front door glass can be installed.
Remove the front door window regulator handle.
Insert the front door glass into the front door panel along the front door glass run as indicated by the arrows in the order shown in the illustration.
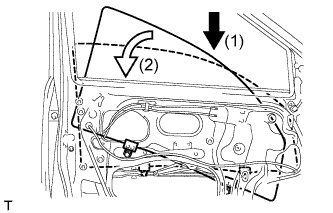 |
Install the front door glass with the 2 bolts.
- Torque:
- 8.0 N*m{82 kgf*cm, 71 in.*lbf}
| 19. INSTALL FRONT DOOR SERVICE HOLE COVER LH |
Apply new butyl tape to the front door panel.
Pass the front door inside locking cable, front door lock remote control cable and wire harness through a new front door service hole cover, and then install the front door service hole cover using the reference points on the front door panel.
Text in Illustration *a Reference Point
 |
| 20. INSTALL FRONT DOOR NO. 1 TRIM BRACKET |
Install the front door No. 1 trim bracket with the 2 screws.
| 21. INSTALL FRONT DOOR INSIDE HANDLE SUB-ASSEMBLY LH |
Connect the front door inside locking cable and front door lock remote control cable to the front door inside handle.
Attach the 2 guides as indicated by the arrow in the illustration, and then attach the claw to install the front door inside handle.
 |
| 22. INSTALL OUTER REAR VIEW MIRROR ASSEMBLY LH |
 |
Attach the claw and install the outer rear view mirror assembly LH with the 3 nuts.
- Torque:
- 8.0 N*m{82 kgf*cm, 71 ft.*lbf}
w/ Power Mirror Control System:
Connect the connector.
| 23. INSTALL FRONT NO. 1 SPEAKER ASSEMBLY |
Install a nose piece to an air riveter or hand riveter. Then insert the mandrel part of a new φ4 mm waterproof rivet into the nose piece.
Using an air riveter or hand riveter, install the front No. 1 speaker assembly with 3 new rivets.
- NOTICE:
Do not pry the rivet with the riveter, as this will cause damage to the riveter and mandrel.
Text in Illustration *a INCORRECT *b CORRECT *1 Mandrel *2 Riveter
Confirm that the rivets are seated properly against the speaker.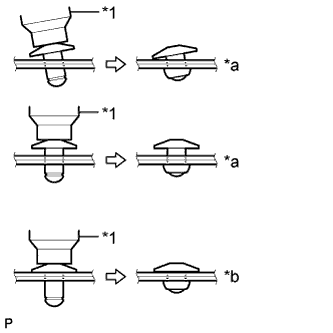
Text in Illustration *a INCORRECT *b CORRECT *1 Riveter - Do not tilt the riveter when installing the rivet to the speaker.
- Do not leave any space between the rivet head and speaker.
Do not leave any space between the speaker and door. Firmly hold together the 2 items while installing the rivet.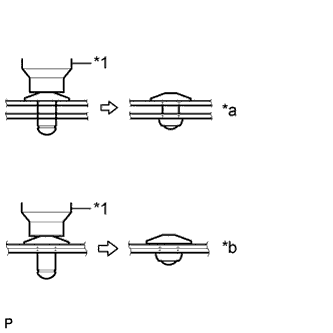
Text in Illustration *a INCORRECT *b CORRECT *1 Riveter
 |
Connect the connector.
| 24. INSTALL FRONT NO. 2 SPEAKER ASSEMBLY (w/ Front No. 2 Speaker) |
Install the front No. 2 speaker assembly with the screw.
Connect the connector.
| 25. INSTALL FRONT DOOR INNER GLASS WEATHERSTRIP LH |
for Double Cab:
Install the front door inner glass weatherstrip to the front door trim board and fold down the 7 claws in the directions indicated by the arrows in the illustration.
 |
for Single Cab:
Install the front door inner glass weatherstrip to the front door trim board and fold down the 8 claws in the directions indicated by the arrows in the illustration.
 |
| 26. INSTALL FRONT DOOR TRIM BOARD SUB-ASSEMBLY LH |
for Double Cab:
Attach the 8 clips to install the front door trim board.
Install the screw and clip.
for Single Cab:
Attach the 9 clips to install the front door trim board.
Install the screw and clip.
| 27. INSTALL DOOR PULL HANDLE |
Install the door pull handle with the screw.
| 28. INSTALL FRONT DOOR LOWER FRAME BRACKET GARNISH LH |
Attach the 2 clips to install the front door lower frame bracket garnish.
| 29. INSTALL POWER WINDOW REGULATOR MASTER SWITCH ASSEMBLY WITH FRONT DOOR ARMREST BASE PANEL (w/ Power Window) |
Connect the connector.
Attach the 4 claws and 2 clips to install the power window regulator switch assembly with front door armrest base panel.
| 30. INSTALL POWER WINDOW REGULATOR SWITCH ASSEMBLY WITH FRONT DOOR ARMREST BASE PANEL (w/ Power Window, for Passenger Side) |
Connect the connector.
Attach the 4 claws and 2 clips to install the power window regulator master switch assembly with front door armrest base panel.
| 31. INSTALL FRONT DOOR WINDOW REGULATOR HANDLE ASSEMBLY (w/o Power Window) |
Temporarily install the front door window regulator handle, fully close the window, and then remove the front door window regulator handle.
Install the plate and snap ring to the front door window regulator handle.
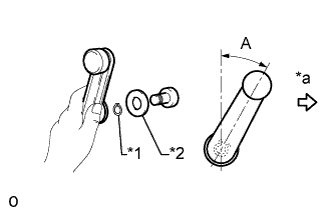 |
Install the front door window regulator handle to the front door window regulator as shown in the illustration.
Text in Illustration *1 Snap Ring *2 Plate *a Front Side - Standard:
Area Specified Condition A 18 to 42°
| 32. CONNECT CABLE TO NEGATIVE BATTERY TERMINAL (w/ Power Window) |
- NOTICE:
- When disconnecting the cable, some systems need to be initialized after the cable is reconnected (HILUX_TGN26 RM000004QR3003X.html).
| 33. INITIALIZE POWER WINDOW CONTROL SYSTEM (w/ Jam Protection Function) |