Air Conditioning Pressure Sensor -- Removal |
| 1. RECOVER REFRIGERANT FROM REFRIGERATION SYSTEM |
Start the engine.
Operate the cooler compressor under the conditions shown below:
This causes most of the compressor oil from the various components of the A/C system to collect in the A/C compressor.Item Condition Engine Speed Idling Operating Time 3 minutes or more A/C Switch Status On Blower Switch Status HI Set Temperature MAX COOL - NOTICE:
- It is not necessary to operate the cooler compressor if the A/C does not operate because of compressor lock, etc.
Stop the engine.
Recover the refrigerant from the A/C system using a refrigerant recovery unit.
- HINT:
- Use the refrigerant recovery unit in accordance with the manufacturer's instruction manual.
| 2. REMOVE RADIATOR GRILLE |
Put protective tape around the radiator grille.
Text in Illustration *1 Protective Tape
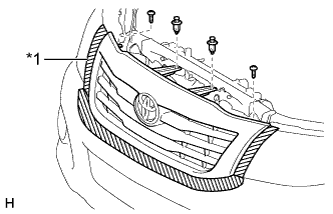 |
Remove the 2 clips and 2 screws.
Detach the 6 claws and remove the radiator grille.
 |
| 3. REMOVE FRONT BUMPER COVER |
Remove the 3 clips and 6 screws.
 |
Put protective tape around the front bumper cover.
Text in Illustration *1 Protective Tape
 |
Remove the 2 bolts, 2 screws and 5 clips.
Detach the 6 claws and remove the front bumper cover.
 |
w/ Fog Light:
Disconnect the 2 fog light connectors.
| 4. REMOVE ENGINE SIDE COVER SUB-ASSEMBLY LH |
Remove the 2 clips, 3 bolts and engine side cover.
 |
| 5. REMOVE ENGINE SIDE COVER SUB-ASSEMBLY RH |
- HINT:
- Use the same procedure described for the LH side.
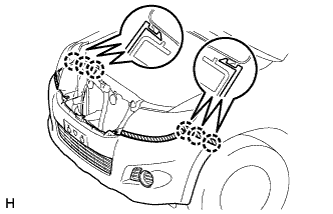
| 6. REMOVE FRONT BUMPER REINFORCEMENT EXTENSION LH |
Detach the 2 claws and remove the front bumper reinforcement extension.
 |
| 7. REMOVE FRONT BUMPER REINFORCEMENT EXTENSION RH |
- HINT:
- Use the same procedure described for the LH side.
| 8. REMOVE FRONT BUMPER REINFORCEMENT SUB-ASSEMBLY |
Remove the 4 nuts and front bumper reinforcement.
 |
| 9. REMOVE RADIATOR SIDE DEFLECTOR RH |
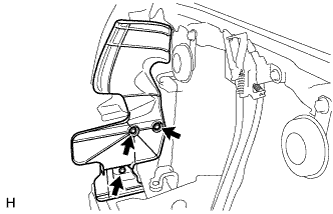 |
Remove the 3 clips and radiator side deflector RH.
| 10. REMOVE AIR CLEANER ASSEMBLY (for 1KD-FTV, 2KD-FTV) |
Disconnect the mass air flow meter connector.
Loosen the hose clamp.
Remove the 2 bolts and air cleaner.
| 11. REMOVE INTAKE AIR CONNECTOR AND AIR CLEANER ASSEMBLY (for TR Series Engine) |
 |
Disconnect the vacuum hose.
Disconnect the No. 2 PCV hose.
Disconnect the mass air flow meter connector and detach the wire harness clamps.
Loosen the hose clamp and remove the 4 bolts, air cleaner and intake air connector assembly.
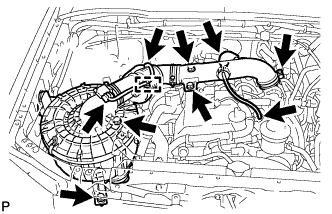
| 12. REMOVE AIR CONDITIONING TUBE AND ACCESSORY ASSEMBLY |
Disconnect the connector.
Remove the 3 bolts and air conditioning tube and accessory assembly (air conditioning pressure sensor).

Remove the O-rings from the air conditioning tube and accessory assembly (air conditioning pressure sensor).
- NOTICE:
- Seal the openings of the disconnected parts using vinyl tape to prevent moisture and foreign matter from entering them.