Generator (For Bosch Made) -- Reassembly |
| 1. INSTALL GENERATOR DRIVE END FRAME BEARING |
Using SST and a press, press in a new bearing.
- SST
- 09950-60010(09951-00520)
09950-70010(09951-07100)
 |
Install the retainer plate with the 4 screws.
- Torque:
- 3.1 N*m{35 kgf*cm, 30 in.*lbf}
| 2. INSTALL GENERATOR ROTOR ASSEMBLY |
- NOTICE:
- Do not drop the generator rotor assembly.
Set the spacer ring, drive end frame, generator rotor and SST1 to SST2 as shown in the illustration.
- SST
- 09285-76010
09630-00014(09631-00061)
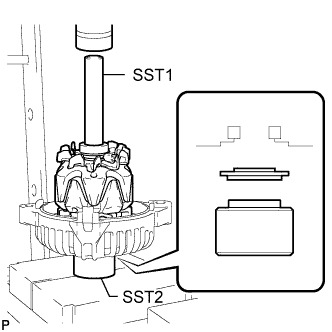 |
Using SST1, SST2 and a press, slowly press the generator rotor into the drive end frame and spacer ring.
Temporarily install the generator pulley with clutch to the rotor shaft by hand.
| 3. INSTALL FITTING RING |
Align the 3 protrusions of the fitting ring with the 3 cutouts of the generator stator with rectifier and install the fitting ring.
 |
| 4. INSTALL GENERATOR STATOR SUB-ASSEMBLY WITH RECTIFIER |
Align the key of the drive end frame with the keyway of the generator stator.
Install the stator with the 4 bolts.
- Torque:
- 4.3 N*m{44 kgf*cm, 38 in.*lbf}
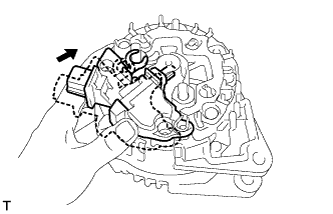
| 5. INSTALL VOLTAGE REGULATOR ASSEMBLY WITH BRUSH |
Push in the regulator by hand as shown in the illustration.
 |
Install the regulator with the 3 screws.

Text in Illustration *1 Screw A *2 Screw B - Torque:
- 2.5 N*m{25 kgf*cm, 22 in.*lbf}for screw A
- 1.2 N*m{12 kgf*cm, 11 in.*lbf}for screw B
- HINT:
- Install screw B to the position shown in the illustration.
Install the protective tower.
| 6. INSTALL GENERATOR REAR END COVER |
Install the rear end cover with the 2 nuts and screw.
- Torque:
- 19 N*m{194 kgf*cm, 14 ft.*lbf}for nut A
- 12 N*m{122 kgf*cm, 9 ft.*lbf}for nut B
- 2.8 N*m{29 kgf*cm, 25 in.*lbf}for screw
Text in Illustration *1 Nut A *2 Nut B *3 Screw - NOTICE:
- The protective tower must be attached to the end cover.
 |
Install the 2 terminal covers by turning them clockwise.
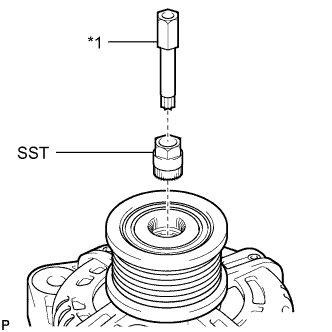
| 7. TIGHTEN GENERATOR PULLEY WITH CLUTCH |
Mount the generator in a vise between aluminum plates.
Set SST and an 8 mm bi-hexagon wrench to the pulley as shown in the illustration.
- SST
- 09820-30010
Text in Illustration *1 8 mm Bi-hexagon Wrench
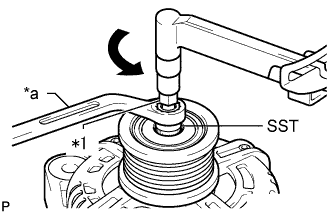
 |
Hold SST in place, rotate the 8 mm bi-hexagon wrench counterclockwise, and tighten the generator pulley with clutch.
- Torque:
- 80 N*m{816 kgf*cm, 59 ft.*lbf}
Text in Illustration *1 8 mm Bi-hexagon Wrench *a Hold 
Turn
 |
| 8. INSTALL GENERATOR PULLEY CAP |
Install a new generator pulley cap.
Text in Illustration *1 Cap Guide - NOTICE:
- Align the cap guide of the generator pulley cap with the hole of the generator pulley and push it in by hand.
- Do not push in the generator pulley cap at an angle.
 |