Quarter Trim Speaker Installation
INSTALL REAR SPEAKER ASSEMBLY
INSTALL QUARTER INSIDE TRIM BOARD LH
INSTALL FRONT DOOR OPENING TRIM LH
INSTALL FRONT DOOR SCUFF PLATE LH
INSTALL REAR SEATBACK ASSEMBLY
INSTALL LOWER BACK PANEL GARNISH
INSTALL REAR SEAT CUSHION ASSEMBLY LH (w/ Seat Cushion)
INSTALL REAR SEAT CUSHION ASSEMBLY RH (w/ Seat Cushion)
INSTALL UPPER BACK PANEL GARNISH
CONNECT CABLE TO NEGATIVE BATTERY TERMINAL
Quarter Trim Speaker -- Installation |
- HINT:
- Use the same procedures for the RH side and LH side.
- The procedures listed below are for the LH side.
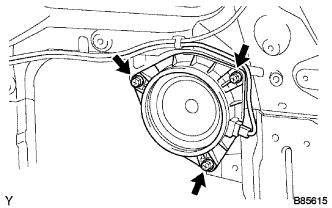
| 1. INSTALL REAR SPEAKER ASSEMBLY |
Hold the speaker to the panel.
Install the speaker with the 3 screws.
Connect the connector.
| 2. INSTALL QUARTER INSIDE TRIM BOARD LH |
Attach the 7 clips, 3 guides and 4 claws to install the quarter inside trim board.
Connect the front seat outer belt floor anchor with the bolt.
- Torque:
- 42 N*m{428 kgf*cm, 31 ft.*lbf}
| 3. INSTALL FRONT DOOR OPENING TRIM LH |
Align the paint mark on the front door opening trim with the mark position on the vehicle and install the front door opening trim as shown in the illustration.
Text in Illustration*1
| Paint Mark
|
*2
| Mark Position
|
| 4. INSTALL FRONT DOOR SCUFF PLATE LH |
Attach the 4 clips and 8 claws to install the front door scuff plate.
| 5. INSTALL REAR SEATBACK ASSEMBLY |
Place the rear seatback assembly in the cabin.
- NOTICE:
- Be careful not to damage the vehicle body.
Attach the 2 hooks to the vehicle body.
Install the rear seatback assembly with the 2 bolts.
- Torque:
- 39 N*m{398 kgf*cm, 29 in.*lbf}
| 6. INSTALL LOWER BACK PANEL GARNISH |
Attach the 5 clips, 2 guides and 6 claws to install the lower back panel garnish.
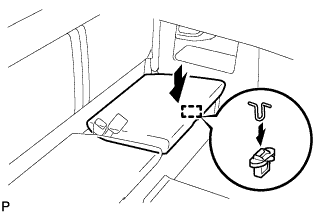
| 7. INSTALL REAR SEAT CUSHION ASSEMBLY LH (w/ Seat Cushion) |
Attach the 2 hooks.
Attach the hook to install the rear seat cushion assembly LH.
| 8. INSTALL REAR SEAT CUSHION ASSEMBLY RH (w/ Seat Cushion) |
- HINT:
- Use the same procedures described for the LH side.
| 9. INSTALL UPPER BACK PANEL GARNISH |
Attach the 5 clips and 4 claws to install the upper back panel garnish.
| 10. CONNECT CABLE TO NEGATIVE BATTERY TERMINAL |
- NOTICE:
- When disconnecting the cable, some systems need to be initialized after the cable is reconnected (HILUX_TGN26 RM000004QR300CX.html).


