Steering Column Assembly Installation
Steering. Hilux. Tgn26, 36 Kun25, 26, 35, 36 Ggn25
INSTALL STEERING COLUMN ASSEMBLY
INSTALL STEERING COLUMN HOLE COVER SUB-ASSEMBLY
CONNECT CONNECTOR
CONNECT STEERING SLIDING YOKE
INSTALL LOWER INSTRUMENT PANEL FINISH PANEL SUB-ASSEMBLY
INSTALL COMBINATION SWITCH ASSEMBLY WITH SPIRAL CABLE SUB-ASSEMBLY (w/ Airbag System)
INSTALL COMBINATION SWITCH ASSEMBLY (w/o Airbag System)
INSTALL STEERING COLUMN UPPER COVER
INSTALL STEERING COLUMN LOWER COVER
INSTALL STEERING WHEEL ASSEMBLY
PLACE FRONT WHEELS FACING STRAIGHT AHEAD
CONNECT CABLE TO NEGATIVE BATTERY TERMINAL
CHECK SRS WARNING LIGHT (w/ Airbag System)
Steering Column Assembly -- Installation |
| 1. INSTALL STEERING COLUMN ASSEMBLY |
Install the steering column with the 3 bolts.
- Torque:
- 21 N*m{214 kgf*cm, 15 ft.*lbf}
| 2. INSTALL STEERING COLUMN HOLE COVER SUB-ASSEMBLY |
Install the cover with the 3 bolts.
- Torque:
- 5.0 N*m{51 kgf*cm, 44 in.*lbf}
Connect the connectors and attach the wire harness clamps.
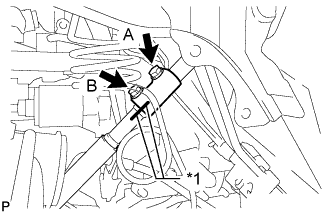
| 4. CONNECT STEERING SLIDING YOKE |
Align the matchmarks on the steering sliding yoke and steering intermediate shaft, and connect the steering sliding yoke to the steering intermediate shaft.
Text in Illustration*1
| Matchmark
|
Install the bolt labeled B.
- Torque:
- 35 N*m{357 kgf*cm, 26 ft.*lbf}
Tighten the bolt labeled A.
- Torque:
- 35 N*m{357 kgf*cm, 26 ft.*lbf}
| 5. INSTALL LOWER INSTRUMENT PANEL FINISH PANEL SUB-ASSEMBLY |
Attach the 3 guides, 2 claws and 3 clips to install the lower instrument panel finish panel.
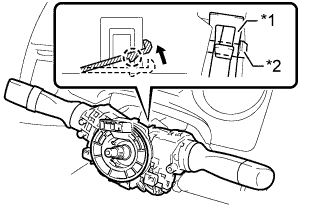
| 6. INSTALL COMBINATION SWITCH ASSEMBLY WITH SPIRAL CABLE SUB-ASSEMBLY (w/ Airbag System) |
Using pliers, pinch the clamp and attach the claw to install the combination switch assembly with spiral cable sub-assembly to the steering column assembly.
Text in Illustration*1
| Clamp
|
*2
| Claw
|
Connect the connectors to the combination switch assembly with spiral cable sub-assembly.
| 7. INSTALL COMBINATION SWITCH ASSEMBLY (w/o Airbag System) |
- HINT:
- Refer to the step "INSTALL COMBINATION SWITCH ASSEMBLY WITH SPIRAL CABLE SUB-ASSEMBLY".
Attach the 3 claws install the horn contact plate to the combination switch assembly.
| 8. INSTALL STEERING COLUMN UPPER COVER |
Attach the claw to install the upper cover.
| 9. INSTALL STEERING COLUMN LOWER COVER |
Install the lower cover with the 3 screws.
| 10. INSTALL STEERING WHEEL ASSEMBLY |
(HILUX_TGN26 RM0000033RR0ALX.html)
| 11. PLACE FRONT WHEELS FACING STRAIGHT AHEAD |
| 12. CONNECT CABLE TO NEGATIVE BATTERY TERMINAL |
- NOTICE:
- When disconnecting the cable, some systems need to be initialized after the cable is reconnected (HILUX_TGN26 RM000004QR300CX.html).
| 13. CHECK SRS WARNING LIGHT (w/ Airbag System) |
(HILUX_TGN26 RM000000XFD0IBX.html)