Front Brake (For 4Wd And Pre-Runner) -- Installation |
- HINT:
- Use the same procedure for the RH and LH sides.
- The procedure listed below is for the LH side.
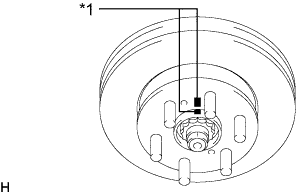
| 1. INSTALL FRONT DISC |
Align the matchmarks and install the disc.
Text in Illustration *1 Matchmark - HINT:
- When replacing the disc with a new one, select the installation position where the disc has the smallest runout.
 |
| 2. INSTALL DISC BRAKE CYLINDER ASSEMBLY LH |
Install the cylinder with the 2 bolts.
- Torque:
- 122 N*m{1244 kgf*cm, 90 ft.*lbf}
| 3. CONNECT FRONT NO. 1 WHEEL CYLINDER TUBE LH |
Using a union nut wrench, connect the tube to the cylinder.
- Torque:
- 15 N*m{155 kgf*cm, 11 ft.*lbf}
- NOTICE:
- Use the formula to calculate special torque values for situations where a union nut wrench is combined with a torque wrench (HILUX_TGN26 RM000004QR1006X.html).
| 4. INSTALL FRONT ANTI-SQUEAL SHIM KIT |
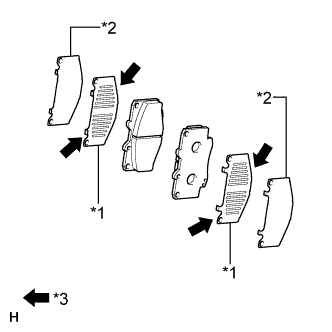 |
| *1 | No. 1 Anti-squeal Shim |
| *2 | No. 2 Anti-squeal Shim |
| *3 | Disc brake grease |
Apply disc brake grease to both sides of each No. 1 shim.
Install the No. 1 and No. 2 shims to each pad.
- NOTICE:
- When replacing worn pads, the shims must be replaced together with the pads.
- Install the shims in the correct position and direction.
| 5. INSTALL FRONT DISC BRAKE PAD |
Install the 2 disc brake pads to the cylinder.
- NOTICE:
- There should be no oil or grease on the friction surface of the pads and disc.
| 6. INSTALL FRONT DISC BRAKE ANTI-RATTLE SPRING |
for 15 inch Front Disc Brake:
Install the anti-rattle spring.
Hold down the spring and insert the 2 pins.
Install the clip.
for 16 inch Front Disc Brake:
Install the 2 pins and anti-rattle spring.
- HINT:
- Install the spring together with the pin on the bottom side.
Install the 2 clips.
- NOTICE:
- When installing the clip, be sure to install the clip with the handle facing the center of the vehicle.
| 7. BLEED BRAKE LINE (w/ VSC) |
Remove the brake master cylinder reservoir filler cap assembly.
Add brake fluid to keep the level between the MIN and MAX lines of the reservoir while bleeding the brakes.
- Fluid:
- SAE J1703 or FMVSS No. 116 DOT 3
Remove the bleeder plug cap.
Connect a vinyl tube to the bleeder plug.
Depress the brake pedal several times, and then loosen the bleeder plug with the pedal depressed.*1
When fluid stops coming out, tighten the bleeder plug, and then release the brake pedal.*2
Repeat *1 and *2 until all air in the fluid is completely bled out.
Tighten the bleeder plug completely.
- Torque:
- for Front Brake:
- 11 N*m{110 kgf*cm, 8 ft.*lbf}
- for Rear Brake:
- 10 N*m{102 kgf*cm, 7 ft.*lbf}
Install the bleeder plug cap.
Repeat the above procedure for each wheel to bleed the brake line.
Check for brake fluid leaks.
Check the brake fluid level in the reservoir (HILUX_TGN26 RM0000010K400UX_01_0001.html).
Check and clear DTCs (HILUX_TGN26 RM000000XHV0CGX.html).
| 8. BLEED BRAKE LINE (for TASA Made) |
Remove the brake master cylinder reservoir filler cap assembly.
Add brake fluid to keep the level between the MIN and MAX lines of the reservoir while bleeding the brakes.
- Fluid:
- SAE J1703 or FMVSS No. 116 DOT 3
Remove the bleeder plug cap.
Connect a vinyl tube to the bleeder plug.
Depress the brake pedal several times, and then loosen the bleeder plug with the pedal depressed.*1
When fluid stops coming out, tighten the bleeder plug, and then release the brake pedal.*2
Repeat *1 and *2 until all air in the fluid is completely bled out.
Tighten the bleeder plug completely.
- Torque:
- for Front Brake:
- 11 N*m{110 kgf*cm, 8 ft.*lbf}
- for Rear Brake:
- 10 N*m{102 kgf*cm, 7 ft.*lbf}
Install the bleeder plug cap.
Repeat the above procedure for each wheel to bleed the brake line.
Check for brake fluid leaks.
Check the brake fluid level in the reservoir (HILUX_TGN26 RM0000010K4010X_01_0001.html).
| 9. BLEED BRAKE LINE (for TMT Made) |
Remove the brake master cylinder reservoir filler cap assembly.
Add brake fluid to keep the level between the MIN and MAX lines of the reservoir while bleeding the brakes.
- Fluid:
- SAE J1703 or FMVSS No. 116 DOT 3
Remove the bleeder plug cap.
Connect a vinyl tube to the bleeder plug.
Depress the brake pedal several times, and then loosen the bleeder plug with the pedal depressed.*1
When fluid stops coming out, tighten the bleeder plug, and then release the brake pedal.*2
Repeat *1 and *2 until all air in the fluid is completely bled out.
Tighten the bleeder plug completely.
- Torque:
- for Front Brake:
- 11 N*m{110 kgf*cm, 8 ft.*lbf}
- for Rear Brake:
- 10 N*m{102 kgf*cm, 7 ft.*lbf}
Install the bleeder plug cap.
Repeat the above procedure for each wheel to bleed the brake line.
Check for brake fluid leaks.
Check the brake fluid level in the reservoir (HILUX_TGN26 RM0000010K400VX.html).
| 10. BLEED CLUTCH LINE (for Manual Transmission) |
Remove the bleeder plug cap of the release cylinder.
Connect a vinyl tube to the bleeder plug.
Depress the clutch pedal several times, and then loosen the bleeder plug while the pedal is depressed.
When fluid no longer comes out, tighten the bleeder plug, and then release the clutch pedal.
Repeat the previous 2 steps until all the air in the fluid is completely bled.
Tighten the bleeder plug.
- Torque:
- 11 N*m{110 kgf*cm, 8 ft.*lbf}
Install the bleeder plug cap.
Check that all the air has been bled from the clutch line.
| 11. INSTALL FRONT WHEEL |
Install the front wheel.
- Torque:
- 105 N*m{1071 kgf*cm, 77 ft.*lbf}