Front Drive Shaft Assembly -- Installation |
- HINT:
- Use the same procedure for the RH and LH sides.
- The procedure listed below is for the LH side.
| 1. INSTALL FRONT DRIVE SHAFT HOLE SNAP RING |
Install a new hole snap ring.
| 2. INSTALL FRONT DRIVE SHAFT ASSEMBLY LH |
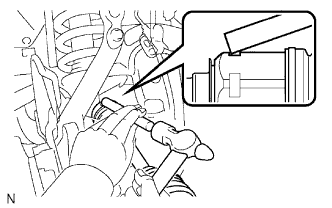 |
Coat the splines of the inboard joint with differential oil.
Align the splines and tap in the drive shaft with a brass bar and hammer.
- HINT:
- Whether or not the inboard joint shaft is in contact with the pinion shaft can be determined from the sound and feeling when tapping in the shaft.
- NOTICE:
- Make sure that the snap ring opening is facing downwards when installing the drive shaft.
- Be careful not to damage the oil seal, boot or dust cover.
| 3. CONNECT FRONT SPEED SENSOR (w/ ABS) |
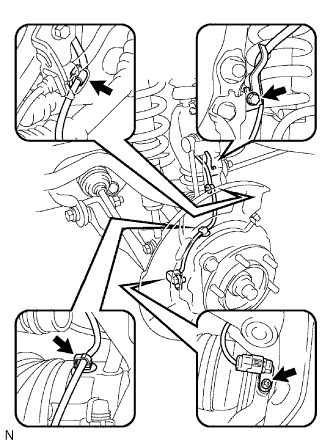 |
Install the speed sensor with the bolt.
- Torque:
- 8.5 N*m{87 kgf*cm, 75 in.*lbf}
Connect the 2 clamps.
Install the speed sensor wire harness to the steering knuckle with the bolt.
- Torque:
- 32 N*m{326 kgf*cm, 24 ft.*lbf}
| 4. CONNECT FRONT LOWER SUSPENSION ARM ASSEMBLY LH |
 |
Connect the suspension arm with the 2 bolts.
- Torque:
- 160 N*m{1632 kgf*cm, 118 ft.*lbf}
| 5. CONNECT TIE ROD END SUB-ASSEMBLY LH |
Connect the tie rod end to the steering knuckle arm with the nut.
- Torque:
- 91 N*m{928 kgf*cm, 67 ft.*lbf}
Install a new cotter pin.
- NOTICE:
- If the holes for the cotter pin are not aligned, tighten the nut an additional 60°.
| 6. INSTALL FRONT AXLE SHAFT NUT |
 |
Clean the threaded parts on the drive shaft and axle shaft nut using a non-residue solvent.
Install the shaft nut.
- Torque:
- 235 N*m{2396 kgf*cm, 173 ft.*lbf}
Install the adjusting cap and a new cotter pin.
- NOTICE:
- If the holes for the cotter pin are not aligned, tighten the nut an additional 60°.
| 7. INSTALL FRONT AXLE HUB GREASE CAP |
Install a new grease cap to the axle hub.
| 8. INSTALL FRONT WHEEL |
- Torque:
- 105 N*m{1071 kgf*cm, 77 ft.*lbf}
| 9. ADD DIFFERENTIAL OIL |
Add differential oil so that the oil level is within 5 mm (0 to 0.196 in.) from the bottom lip of the differential filler plug hole.
Text in Illustration *a 0 to 5 mm (0 to 0.196 in.) - NOTICE:
- After changing the oil, drive the vehicle, and then check the oil level again.
- Too much or too little oil will lead to differential problems.
- Recommended Viscosity:
Item Temperature Viscosity Front Differential (w/ A.D.D.) SAE 75W-90 Front Differential (w/o A.D.D.)
Rear DifferentialAbove -18°C (0°F) SAE 90 Below -18°C (0°F) SAE 80W-90 or SAE 80W
- Differential Oil Type:
Item Oil type Front Differential
Rear DifferentialHypoid gear oil API GL-5 or equivalent Rear Differential (for LSD) Hypoid gear oil LSD API GL-5 or equivalent
- Standard Front Differential Oil Capacity:
Item Capacity w/o A.D.D. 1.40 to 1.50 liters (1.48 to 1.58 US qts., 1.23 to 1.32 Imp. qts.) w/ A.D.D. 1.60 to 1.70 liters (1.69 to 1.79 US qts., 1.41 to 1.49 Imp. qts.)
- Standard Rear Differential Oil Capacity:
Item Capacity for LSD
4WD and Pre-runner
for DANA Made3.30 to 3.40 liters (3.49 to 3.59 US qts., 2.91 to 2.99 Imp. qts.)
 |
Check for oil leakage when the oil level is low.
Install a new gasket and the differential filler plug.
- Torque:
- for front differential:
- 39 N*m{400 kgf*cm, 29 ft.*lbf}
- for rear differential:
- 49 N*m{500 kgf*cm, 36 ft.*lbf}
| 10. INSTALL NO. 2 ENGINE UNDER COVER |
- Torque:
- 28 N*m{286 kgf*cm, 21 ft.*lbf}
| 11. INSTALL NO. 1 ENGINE UNDER COVER |
- Torque:
- 28 N*m{286 kgf*cm, 21 ft.*lbf}
| 12. CHECK ABS SPEED SENSOR SIGNAL (w/ ABS) |
w/ VSC:
(HILUX_TGN26 RM000000XHT091X.html)
w/o VSC:
(HILUX_TGN26 RM000000XHT0BEX.html)