Intake Manifold -- Removal |
| 1. PRECAUTION |
- NOTICE:
- After turning the ignition switch off, waiting time may be required before disconnecting the cable from the battery terminal. Therefore, make sure to read the disconnecting the cable from the battery terminal notice before proceeding with work (HILUX_TGN26 RM000004QR1006X.html).
| 2. DISCONNECT CABLE FROM NEGATIVE BATTERY TERMINAL |
- NOTICE:
- When disconnecting the cable, some systems need to be initialized after the cable is reconnected (HILUX_TGN26 RM000004QR3008X.html).
| 3. REMOVE STARTER ASSEMBLY |
| 4. REMOVE THROTTLE BODY WITH MOTOR ASSEMBLY |
| 5. REMOVE FRONT UPPER FENDER APRON SEAL |
Remove the 5 clips and front upper fender apron seal.
| 6. REMOVE PURGE VSV |
Disconnect the purge VSV connector.
 |
Disconnect the 2 purge line hoses from the purge VSV.
Remove the bolt and purge VSV together with the bracket.
Remove the bolt and bracket.
| 7. REMOVE INTAKE MANIFOLD |
Detach the 3 wire harness clamps from the 2 wire harness clamp brackets.
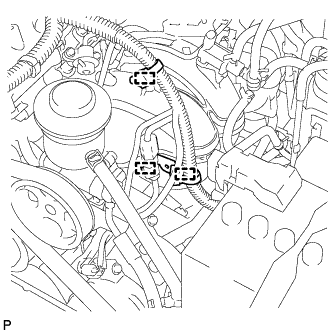 |
Remove the clamp.
 |
Detach the No. 1 fuel hose from the intake manifold.
Detach the No. 2 water by-pass hose.
 |
Disconnect the No. 3 PCV hose and vacuum hose from the intake manifold.
Remove the 5 bolts, 2 nuts and intake manifold.
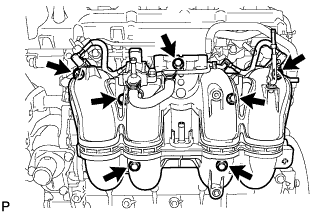 |
Remove the gasket from the intake manifold.
Remove the 4 bolts then disconnect the 4 clamps and remove the No. 1 fuel pipe sub-assembly.
 |
Remove the 4 O-rings from No. 1 fuel pipe sub-assembly.
Remove the 2 bolts and 2 wire harness clamp brackets from the intake manifold.
 |
Remove the purge line hose from the intake manifold.
| 8. REMOVE STUD BOLT |
- NOTICE:
- If a stud bolt is deformed or its threads are damaged, replace it.
Using an E6 "TORX" socket wrench, remove the 2 stud bolts from the intake manifold.