Exhaust Manifold W/ Turbocharger (W/O Egr Cooler) Removal
PRECAUTION
DISCONNECT CABLE FROM NEGATIVE BATTERY TERMINAL
REMOVE NO. 1 ENGINE UNDER COVER
REMOVE NO. 2 ENGINE UNDER COVER
REMOVE FRONT WHEEL RH
REMOVE FRONT EXHAUST PIPE ASSEMBLY
REMOVE FRONT FENDER APRON SEAL UPPER
REMOVE FRONT FENDER SEAL
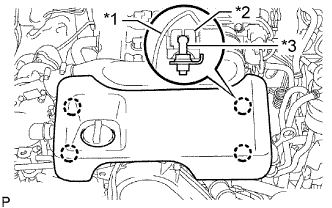
REMOVE NO. 1 ENGINE COVER SUB-ASSEMBLY (w/ No. 1 Engine Cover)
REMOVE VENTILATION HOSE HEAT INSULATOR
REMOVE AIR CLEANER ASSEMBLY
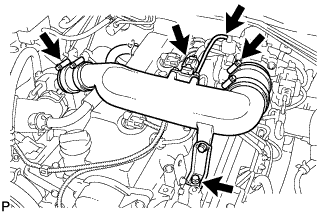
REMOVE NO. 2 AIR CLEANER PIPE SUB-ASSEMBLY
REMOVE TURBINE OUTLET ELBOW
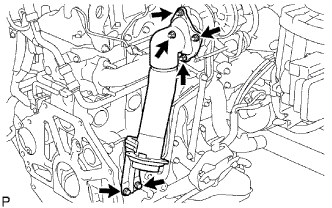
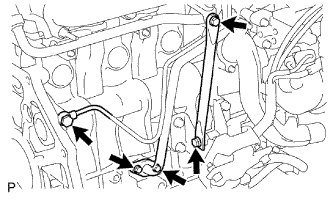
REMOVE TURBOCHARGER SUB-ASSEMBLY
REMOVE EXHAUST MANIFOLD
Exhaust Manifold W/ Turbocharger (W/O Egr Cooler) -- Removal |
- NOTICE:
- After turning the ignition switch off, waiting time may be required before disconnecting the cable from the battery terminal. Therefore, make sure to read the disconnecting the cable from the battery terminal notice before proceeding with work (HILUX_TGN26 RM000004QR1003X.html).
| 2. DISCONNECT CABLE FROM NEGATIVE BATTERY TERMINAL |
- NOTICE:
- When disconnecting the cable, some systems need to be initialized after the cable is reconnected (HILUX_TGN26 RM000004QR3003X.html).
| 3. REMOVE NO. 1 ENGINE UNDER COVER |
| 4. REMOVE NO. 2 ENGINE UNDER COVER |
| 6. REMOVE FRONT EXHAUST PIPE ASSEMBLY |
Remove the 2 bolts and 2 compression springs.
Disconnect the front exhaust pipe from the turbine outlet elbow and remove the gasket.
Remove the front exhaust pipe from the exhaust pipe support.
| 7. REMOVE FRONT FENDER APRON SEAL UPPER |
Remove the 5 clips and front fender apron seal upper.
| 8. REMOVE FRONT FENDER SEAL |
Remove the 5 clips and front fender seal.
| 9. REMOVE NO. 1 ENGINE COVER SUB-ASSEMBLY (w/ No. 1 Engine Cover) |
Detach the 4 claws from the pins of the cover bracket and remove the No. 1 engine cover.
Text in Illustration*1
| Engine Cover
|
*2
| Claw
|
*3
| Pin
|
| 10. REMOVE VENTILATION HOSE HEAT INSULATOR |
Remove the 2 bolts and ventilation hose heat insulator.
| 11. REMOVE AIR CLEANER ASSEMBLY |
w/ Mass Air Flow Meter:
Disconnect the mass air flow meter connector and detach the wire harness clamp.
w/o Mass Air Flow Meter:
Detach the clamp and disconnect the intake air temperature sensor connector.
Loosen the hose clamp, and then remove the air cleaner hose from the turbocharger.
Disconnect the ventilation hose and remove the 2 bolts and air cleaner.
| 12. REMOVE NO. 2 AIR CLEANER PIPE SUB-ASSEMBLY |
Disconnect the manifold absolute pressure sensor connector.
Disconnect the vacuum hose from the gas filter.
Loosen the 2 clamps.
Remove the bolt and disconnect the No. 2 air cleaner pipe together with the 2 air hoses.
| 13. REMOVE TURBINE OUTLET ELBOW |
Remove the 2 bolts, 4 nuts, turbine outlet elbow (with turbocharger stay) and gasket from the turbocharger.
Remove the 2 bolts and turbocharger stay from the turbine outlet elbow.
| 14. REMOVE TURBOCHARGER SUB-ASSEMBLY |
Remove the 2 bolts and manifold stay.
Remove the 2 bolts, union bolt and 2 gaskets.
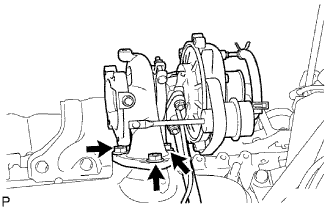
Remove the 3 nuts, turbocharger (with turbo oil pipe) and gasket.
Remove the 2 nuts, turbo oil pipe and gasket from the turbocharger.
| 15. REMOVE EXHAUST MANIFOLD |
Remove the 8 nuts, 8 plate washers and exhaust manifold as shown in the illustration.
