Fuel Injector -- Installation |
| 1. INSTALL FUEL INJECTOR ASSEMBLY |
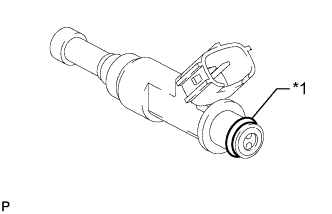
Apply a light coat of gasoline or spindle oil to new O-rings, and then install one to each fuel injector.
Text in Illustration *1 O-Ring
 |
Apply a light coat of gasoline or spindle oil to the contact surfaces of the fuel delivery pipe and the O-ring of the fuel injector.
Apply a light coat of gasoline or spindle oil to the O-ring again, and then install the fuel injector to the fuel delivery pipe by turning it right and left.
Text in Illustration 
Turn 
Push - NOTICE:
- Make sure that the O-ring is not cracked or jammed when installing it.
 |
Check that the fuel injector rotates smoothly.
If the fuel injector does not rotate, replace the O-ring.
| 2. INSTALL FUEL DELIVERY PIPE WITH FUEL INJECTOR |
Apply a light coat of gasoline or spindle oil to new O-rings, and then install one to each spacer.
Text in Illustration *1 New O-Ring *2 Spacer
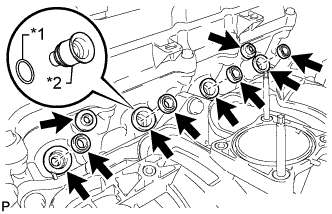 |
Install the 4 spacers to the cylinder head.
Install 4 new injector vibration insulators to the cylinder head.
Install the 2 No. 1 delivery pipe spacers to the cylinder head.
Install the fuel delivery pipe together with the 4 fuel injectors, and then temporarily install the fuel delivery pipe with the 2 bolts.
- NOTICE:
- Do not drop the fuel injectors when installing the fuel delivery pipe.
Check that the fuel injectors rotate smoothly.
If any fuel injector does not rotate, replace its O-ring.
Tighten the 2 bolts.
- Torque:
- 12 N*m{122 kgf*cm, 9 ft.*lbf}
Install the vacuum hose.
Connect the purge VSV connector.
Connect the 4 injector connectors.
Connect the 4 wire harness clamps.
| 3. INSTALL FUEL PRESSURE PULSATION DAMPER ASSEMBLY |
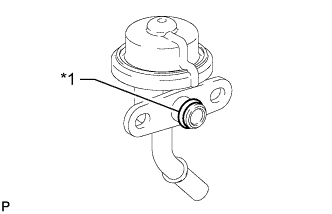
Apply a light coat of gasoline or spindle oil to the O-ring.
Text in Illustration *1 O-Ring
 |
Install the fuel pressure pulsation damper with the 2 bolts.
- Torque:
- 8.5 N*m{87 kgf*cm, 75 in.*lbf}
| 4. CONNECT NO. 2 FUEL HOSE |
Connect the No. 2 fuel hose.
| 5. CONNECT NO. 1 FUEL HOSE |
Connect the No. 1 fuel hose (HILUX_TGN26 RM000000YL4021X.html).
| 6. INSTALL THROTTLE BODY WITH MOTOR ASSEMBLY |
| 7. CONNECT CABLE TO NEGATIVE BATTERY TERMINAL |
- NOTICE:
- When disconnecting the cable, some systems need to be initialized after the cable is reconnected (HILUX_TGN26 RM000004QR300CX.html).
| 8. INSPECT FOR FUEL LEAK |
Make sure that there are no fuel leaks after performing maintenance on the fuel system.
Connect the intelligent tester to the DLC3.
Turn the ignition switch to ON and turn the intelligent tester on.
- NOTICE:
- Do not start the engine.
Enter the following menus: Powertrain / Engine and ECT / Active Test / Control the Fuel Pump / Speed.
Check that there are no leaks from the fuel system.
If there are fuel leaks, repair or replace parts as necessary.Turn the ignition switch off.
Disconnect the intelligent tester from the DLC3.