REMOVE REAR SEAT ASSEMBLY (for 60/40 Split Seat Type LH Side)
REMOVE REAR SEAT ASSEMBLY (for 60/40 Split Seat Type RH Side)
Fuel Lid Lock Control Cable Assembly (For Hatchback 3 Door) -- Removal |
| 1. REMOVE DECK BOARD ASSEMBLY |
Remove the deck board.
 |
| 2. REMOVE FRONT SEAT ASSEMBLY (for Driver Side) |
| 3. REMOVE FRONT SEAT ASSEMBLY (for Front Passenger Side) |
| 4. REMOVE REAR SEAT ASSEMBLY (for 60/40 Split Seat Type LH Side) |
| 5. REMOVE REAR SEAT ASSEMBLY (for 60/40 Split Seat Type RH Side) |
| 6. REMOVE REAR SEAT ASSEMBLY (for Fold Down Seat Type) |
| 7. REMOVE REAR CONSOLE BOX |
| 8. REMOVE FRONT DOOR SCUFF PLATE RH |
Disengage the 8 claws and remove the front door scuff plate.
 |
| 9. REMOVE FRONT DOOR SCUFF PLATE LH |
- HINT:
- Use the same procedure as for the RH side.
| 10. REMOVE COWL SIDE TRIM BOARD RH |
Remove the clip.
 |
Disengage the clip and remove the cowl side trim board.
| 11. REMOVE COWL SIDE TRIM BOARD LH |
- HINT:
- Use the same procedure as for the RH side.
| 12. SEPARATE FRONT DOOR OPENING TRIM WEATHERSTRIP RH |
Separate the front door opening trim weatherstrip.
| 13. SEPARATE FRONT DOOR OPENING TRIM WEATHERSTRIP LH |
Separate the front door opening trim weatherstrip.
| 14. SEPARATE FRONT SEAT OUTER BELT ASSEMBLY RH |
Disengage the 2 claws and remove the anchor cover.
 |
Remove the bolt and separate the front seat outer belt.
 |
| 15. SEPARATE FRONT SEAT OUTER BELT ASSEMBLY LH |
- HINT:
- Use the same procedure as for the RH side.
| 16. REMOVE FRONT QUARTER TRIM PANEL ASSEMBLY RH |
Disengage the 8 clips and 10 claws.
 |
Disengage the 3 guides and remove the quarter trim panel.
| 17. REMOVE FRONT QUARTER TRIM PANEL ASSEMBLY LH |
- HINT:
- Use the same procedure as for the RH side.
| 18. REMOVE REAR FLOOR FINISH PLATE |
Disengage the 4 claws and 4 guides and remove the rear floor finish plate.
 |
| 19. SEPARATE REAR SEAT 3 POINT TYPE OUTER BELT ASSEMBLY RH |
Remove the bolt.
 |
Disengage the 2 claws and separate the rear seat 3 point type outer belt.
| 20. SEPARATE REAR SEAT 3 POINT TYPE OUTER BELT ASSEMBLY LH |
- HINT:
- Use the same procedure as for the RH side.
| 21. REMOVE NO. 2 ROOM LIGHT ASSEMBLY |
Using a screwdriver with its tip wrapped in protective tape, disengage the claw.
Text in Illustration *1 Protective Tape
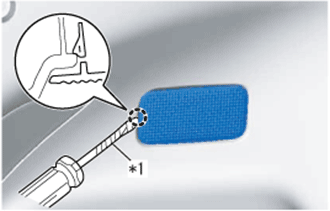 |
Disconnect the connector and remove the No. 2 room light assembly.
| 22. REMOVE DECK TRIM SIDE PANEL ASSEMBLY LH |
- HINT:
- Use the same procedure as for the RH side (YARIS_NCP93 RM0000036M5010X_01_0021.html).
| 23. REMOVE JACK COVER |
| 24. REMOVE JACK ASSEMBLY |
| 25. REMOVE FRONT FLOOR CARPET ASSEMBLY |
Disengage the 6 clamps.
Remove the clip and front floor carpet.
| 26. REMOVE FUEL LID LOCK OPEN LEVER SUB-ASSEMBLY |
Remove the bolt.
 |
Slide the fuel lid lock open lever as indicated by the arrow as shown in the illustration.
Disengage the guide and separate the fuel lid lock control cable.
 |
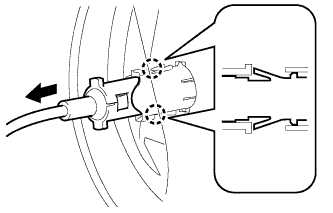
| 27. REMOVE FUEL LID LOCK CONTROL CABLE SUB-ASSEMBLY |
Disengage the 2 claws and separate the fuel lid lock control cable.
 |
Disengage the 4 clamps and remove the fuel lid lock control cable as shown in the illustration.
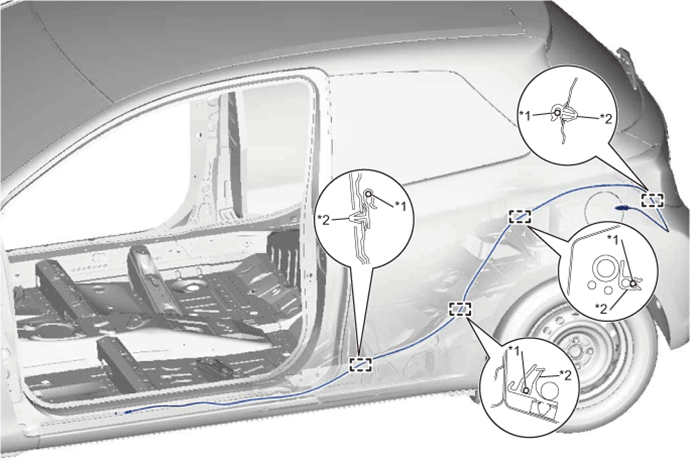
Text in Illustration *1 Fuel Lid Lock Control Cable Sub-assembly *2 Wire Harness Clamp
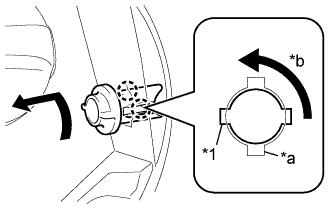
| 28. REMOVE FUEL FILLER OPENING LID LOCK RETAINER |
Rotate the fuel filler opening lid lock retainer by 90° and disengage the 2 claws A from the 2 slits as shown in the illustration.
Text in Illustration *1 Claw A *a Slit *b Rotate
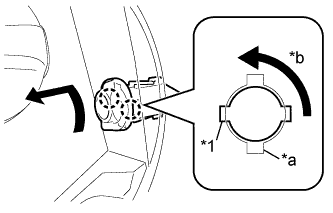 |
Rotate the fuel filler opening lid lock retainer by another 90° and remove it by disengaging the 2 claws B from the 2 slits as shown in the illustration.
Text in Illustration *1 Claw B *a Slit *b Rotate
 |