Fuel Lid Lock Control Cable Assembly (For Sedan) Installation
INSTALL FUEL LID LOCK CONTROL CABLE SUB-ASSEMBLY
INSTALL FUEL LID LOCK OPEN LEVER SUB-ASSEMBLY
INSTALL REAR SEAT SIDE COVER LH
INSTALL CENTER PILLAR LOWER GARNISH LH
INSTALL FRONT SEAT OUTER BELT ASSEMBLY LH
INSTALL LAP BELT OUTER ANCHOR COVER
INSTALL REAR DOOR OPENING TRIM WEATHERSTRIP LH
INSTALL REAR DOOR SCUFF PLATE LH
INSTALL FRONT DOOR OPENING TRIM WEATHERSTRIP LH
INSTALL COWL SIDE TRIM BOARD LH
INSTALL INSTRUMENT PANEL UNDER COVER SUB-ASSEMBLY LH
INSTALL FRONT DOOR SCUFF PLATE LH
INSTALL LUGGAGE COMPARTMENT TRIM INNER COVER LH
INSTALL REAR FLOOR FINISH PLATE
INSTALL DECK FLOOR BOX LH (w/ Grand Spare Tire)
INSTALL LUGGAGE COMPARTMENT TRIM INNER PAD
INSTALL SPARE WHEEL COVER ASSEMBLY
INSTALL LUGGAGE COMPARTMENT FLOOR MAT
INSTALL REAR SEATBACK ASSEMBLY LH (for 60/40 Split Seat Type)
INSTALL REAR SEATBACK ASSEMBLY (for Fixed Seat Type)
INSTALL REAR SEAT CUSHION COVER PAD SUB-ASSEMBLY (for 60/40 Split Seat Type)
INSTALL REAR SEAT CUSHION COVER PAD SUB-ASSEMBLY (for Fixed Seat Type)
INSTALL FRONT SEAT ASSEMBLY
CONNECT CABLE TO NEGATIVE BATTERY TERMINAL
INSPECT SRS WARNING LIGHT
Fuel Lid Lock Control Cable Assembly (For Sedan) -- Installation |
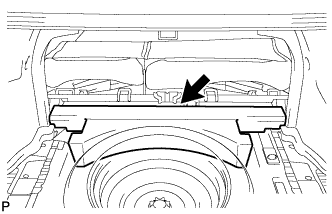
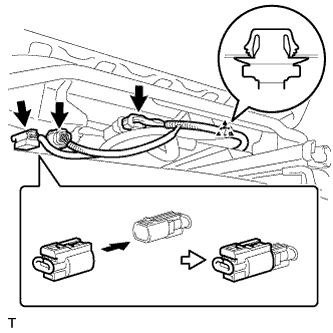
| 1. INSTALL FUEL LID LOCK CONTROL CABLE SUB-ASSEMBLY |
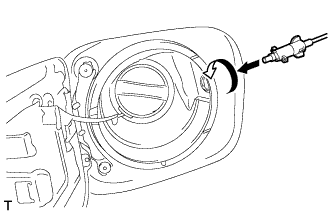
Install the fuel lid lock control cable sub-assembly by inserting it and turning it clockwise, as shown in the illustration.
Engage the 5 clamps and install the fuel lid lock control cable sub-assembly.
Connect the fuel lid lock control cable sub-assembly.
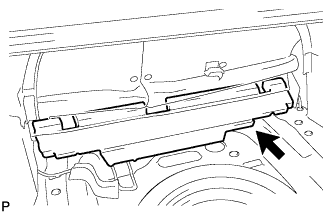
| 2. INSTALL FUEL LID LOCK OPEN LEVER SUB-ASSEMBLY |
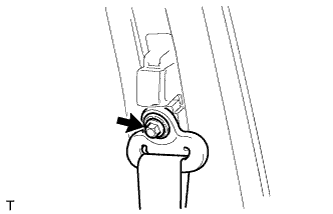
Engage the claw as shown in the illustration.
Install the luggage door lock open lever sub-assembly with the screw.
| 3. INSTALL REAR SEAT SIDE COVER LH |
- HINT:
- Use the same procedure as for the RH side (YARIS_NCP93 RM00000189G063X_04_0125.html).
| 4. INSTALL CENTER PILLAR LOWER GARNISH LH |
- HINT:
- Use the same procedure as for the RH side (YARIS_NCP93 RM00000189G063X_04_0121.html).
| 5. INSTALL FRONT SEAT OUTER BELT ASSEMBLY LH |
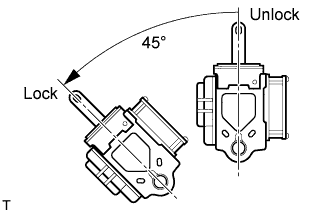
Check the angle of inclination required to lock the retractor.
Gently incline the retractor from its initial position. Check that the belt does not lock when the retractor is inclined 15 ° or less in any direction. Also, check that the belt locks when the inclination of the retractor is 45 ° or more.
- NOTICE:
- Do not disassemble the retractor.
If the operation is not as specified, replace the front seat outer belt.
Hook the lower stay of the retractor onto the 2 body hooks and provisionally install the retractor with the 2 bolts.
Tighten bolt A and then bolt B.
- Torque:
- 4.9 N*m{50 kgf*cm, 43 in.*lbf}for bolt A
- 42 N*m{430 kgf*cm, 31 ft.*lbf}for bolt B
Connect the pretensioner connector.
Connect the pretensioner connector.
Lock the locking button.
- NOTICE:
- Securely lock the locking button.
Install the shoulder anchor with the bolt.
- Torque:
- 42 N*m{430 kgf*cm, 31 ft.*lbf}
Install the anchor plate with the bolt.
- Torque:
- 42 N*m{430 kgf*cm, 31 ft.*lbf}
Check that the ELR locks.
- NOTICE:
- The check should be performed with the front seat outer belt installed.
- Do not allow the anchor part of the front seat outer belt and the protruding parts of the floor panel to overlap.
With the belt installed, check that the belt locks when it is pulled out quickly.
If the operation is not as specified, replace the front seat outer belt.
| 6. INSTALL LAP BELT OUTER ANCHOR COVER |
Engage the 3 claws and install the lap belt outer anchor cover.
| 7. INSTALL REAR DOOR OPENING TRIM WEATHERSTRIP LH |
- HINT:
- Use the same procedure as for the RH side (YARIS_NCP93 RM00000189G063X_04_0127.html).
| 8. INSTALL REAR DOOR SCUFF PLATE LH |
- HINT:
- Use the same procedure as for the RH side (YARIS_NCP93 RM00000189G063X_04_0129.html).
| 9. INSTALL FRONT DOOR OPENING TRIM WEATHERSTRIP LH |
- HINT:
- Use the same procedure as for the RH side (YARIS_NCP93 RM00000189G063X_04_0131.html).
| 10. INSTALL COWL SIDE TRIM BOARD LH |
- HINT:
- Use the same procedure as for the RH side (YARIS_NCP93 RM00000189G063X_04_0133.html).
| 11. INSTALL INSTRUMENT PANEL UNDER COVER SUB-ASSEMBLY LH |
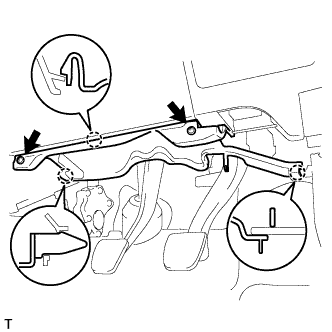
Engage the 3 claws and install the instrument panel under cover.
Tighten the 2 screws.
| 12. INSTALL FRONT DOOR SCUFF PLATE LH |
- HINT:
- Use the same procedure as for the RH side (YARIS_NCP93 RM00000189G063X_04_0135.html).
| 13. INSTALL LUGGAGE COMPARTMENT TRIM INNER COVER LH |
- HINT:
- Use the same procedure as for the RH side (YARIS_NCP93 RM00000293900JX_01_0003.html).
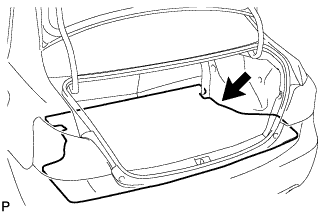
| 14. INSTALL REAR FLOOR FINISH PLATE |
Engage the 8 claws and 2 clips and install the rear floor finish plate.
| 15. INSTALL DECK FLOOR BOX LH (w/ Grand Spare Tire) |
- HINT:
- Use the same procedure as for the RH side (YARIS_NCP93 RM00000293900JX_01_0008.html).
| 16. INSTALL LUGGAGE COMPARTMENT TRIM INNER PAD |
w/ Grand Spare Tire:
Install the luggage compartment trim inner pad.
w/o Grand Spare Tire:
Install the luggage compartment trim inner pad.
| 17. INSTALL SPARE WHEEL COVER ASSEMBLY |
Install the spare wheel cover.
| 18. INSTALL LUGGAGE COMPARTMENT FLOOR MAT |
Install the luggage compartment floor mat.
| 19. INSTALL REAR SEATBACK ASSEMBLY LH (for 60/40 Split Seat Type) |
Insert the 2 hooks into the rear seatback frame hole and install the rear seatback, tightening the 2 bolts in the sequence shown in the illustration.
- Torque:
- 37 N*m{375 kgf*cm, 27 ft.*lbf}
Install the rear seatback cover with the 2 clips.
Pull up the rear seatback.
Install the rear seat outer belt into the rear seat shoulder belt guide.
| 20. INSTALL REAR SEATBACK ASSEMBLY (for Fixed Seat Type) |
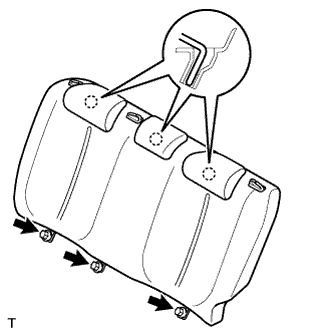
Engage the 3 hooks and install the rear seatback.
Tighten the 3 bolts.
- Torque:
- 7.9 N*m{80 kgf*cm, 70 in.*lbf}
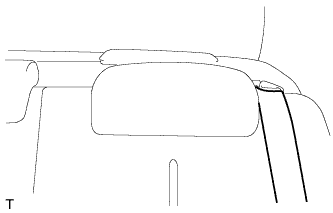
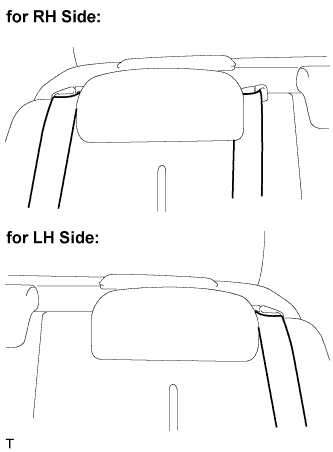
Install the rear seat outer belt into the rear seat shoulder belt guide.
- HINT:
- Use the same procedure for both sides.
Install the rear center seat outer belt into the rear center seat shoulder belt guide.
| 21. INSTALL REAR SEAT CUSHION COVER PAD SUB-ASSEMBLY (for 60/40 Split Seat Type) |
Pass the rear seat inner belt through the rear seat cushion cover pad slit.
Engage the 3 hooks and install the rear seat cushion cover pad.
- NOTICE:
- Make sure that the 2 rear seat cushion lock hooks and the rear seat cushion frame are securely engaged.
| 22. INSTALL REAR SEAT CUSHION COVER PAD SUB-ASSEMBLY (for Fixed Seat Type) |
Pass the rear seat inner belt through the rear seat cushion cover pad slit.
Engage the 3 hooks and install the rear seat cushion cover pad.
- NOTICE:
- Make sure that the 2 rear seat cushion lock hooks and the rear seat cushion frame are securely engaged.
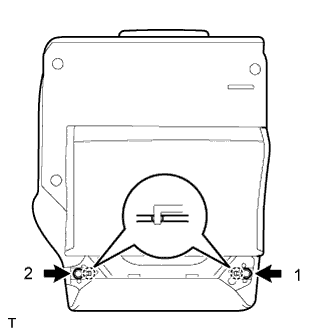
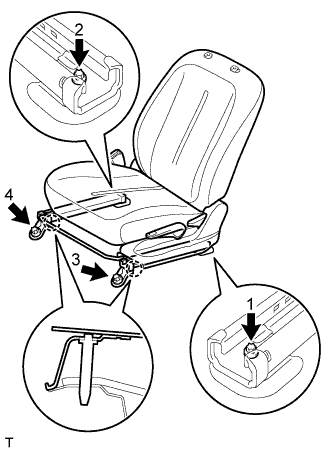
| 23. INSTALL FRONT SEAT ASSEMBLY |
- NOTICE:
- Follow the procedure described below in order to prevent the seat tracks from locking separately.
Insert the 2 locating pins through the 2 body holes, place the front seat in the most forward position, and then make sure that the inner and outer seat tracks are locked securely.
Using "TORX" socket wrench E10, tighten bolt 1 and then bolt 2 on the rear side.
- Torque:
- 37 N*m{375 kgf*cm, 27 ft.*lbf}
Move the front seat to the most rearward position, and then make sure that the inner and outer seat tracks are locked securely.
Using "TORX" socket wrench E10, tighten bolt 3 and then bolt 4 on the front side.
- Torque:
- 37 N*m{375 kgf*cm, 27 ft.*lbf}
- HINT:
- If the inner and outer seat tracks do not lock simultaneously, loosen the bolts and adjust the seat tracks.
w/ Front passenger airbag:
Connect the airbag connector.
Connect the buckle switch connector.
Install the clamp.
w/o Front passenger airbag:
Connect the buckle switch connector.
| 24. CONNECT CABLE TO NEGATIVE BATTERY TERMINAL |
- Torque:
- 5.4 N*m{55 kgf*cm, 48 in.*lbf}
| 25. INSPECT SRS WARNING LIGHT |