REMOVE BACK DOOR LOCK CYLINDER ASSEMBLY (w/ Power Door Lock)
REMOVE BACK DOOR LOCK CYLINDER ASSEMBLY (w/o Power Door Lock)
REMOVE BACK DOOR LOCK CONTROL ASSEMBLY (w/o Power Door Lock)
REMOVE BACK DOOR OUTSIDE GARNISH SUB-ASSEMBLY (w/ Power Door Lock)
REMOVE BACK DOOR OUTSIDE GARNISH SUB-ASSEMBLY (w/o Power Door Lock)
REMOVE BACK DOOR OPENER SWITCH ASSEMBLY (w/ Power Door Lock)
REMOVE BACK DOOR OUTSIDE HANDLE SUB-ASSEMBLY (w/o Power Door Lock)
Back Door (For Hatchback) -- Disassembly |
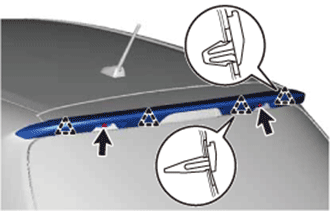
| 1. REMOVE REAR SPOILER COVER LH (w/ Rear Spoiler) |
Using a moulding remover, disengage the 2 claws and remove the rear spoiler cover.
Text in Illustration *1 Moulding Remover
 |
| 2. REMOVE REAR SPOILER COVER RH (w/ Rear Spoiler) |
- HINT:
- Use the same procedure as for the LH side.
| 3. REMOVE REAR SPOILER SUB-ASSEMBLY (w/ Rear Spoiler) |
Remove the 2 screws.
 |
Using an infrared light, heat the rear spoiler.
Item Temperature Vehicle Body and Rear Spoiler 40 to 60°C (104 to 140°F) - CAUTION:
- Do not burn yourself on the hot body panel or with the infrared light.
- HINT:
- Do not heat the vehicle body excessively.
While pulling the rear spoiler towards the back of the vehicle, disengage the 4 clips and pin while peeling off the double-sided tape. Then remove the rear spoiler.
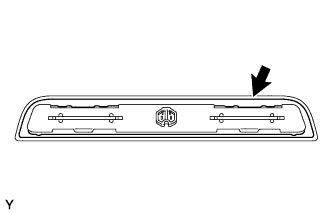
| 4. REMOVE BACK DOOR TRIM BOARD |
Disengage the 11 clips and remove the back door trim board.
 |
| 5. REMOVE REAR WIPER ARM HEAD CAP (w/ Rear Wiper) |
Disengage the 2 claws and the 2 hinges, and remove the rear wiper arm head cap.
 |
| 6. REMOVE REAR WIPER ARM AND BLADE ASSEMBLY (w/ Rear Wiper) |
Remove the nut and the rear wiper arm and blade assembly.
 |
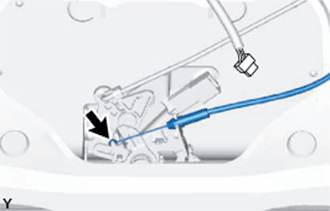
| 7. REMOVE REAR WIPER MOTOR ASSEMBLY (w/ Rear Wiper) |
Disconnect the connector.
 |
Loosen the 3 bolts and remove the rear wiper motor assembly.
| 8. REMOVE REAR WIPER MOTOR GROMMET (w/ Rear Wiper) |
Remove the rear wiper motor grommet.
 |
| 9. REMOVE BACK DOOR LOCK ASSEMBLY (w/ Power Door Lock) |
Disconnect the connector.
 |
Remove the 2 bolts and the back door lock assembly.
| 10. REMOVE BACK DOOR LOCK ASSEMBLY (w/o Power Door Lock) |
Disconnect the connector.
 |
Disconnect the back door outside handle cable.
 |
Disconnect the back door lock control rod.
 |
Remove the 2 bolts and the back door lock assembly.
 |
| 11. REMOVE DOOR PULL HANDLE |
Using a moulding remover, disengage the 4 claws and remove the door pull handle.
Text in Illustration *1 Moulding Remover
 |
| 12. REMOVE BACK DOOR LOCK CONTROL ROD (w/o Power Door Lock) |
Remove the back door lock control rod.
 |
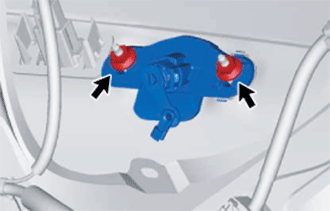
| 13. REMOVE BACK DOOR LOCK CYLINDER ASSEMBLY (w/ Power Door Lock) |
Disconnect the connector.
 |
Remove the 2 nuts and back door lock cylinder.
Disengage the 2 claws and remove the door unlock switch.
 |
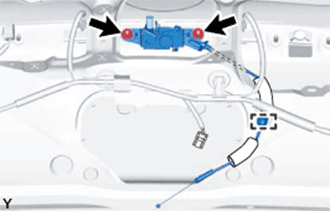
| 14. REMOVE BACK DOOR LOCK CYLINDER ASSEMBLY (w/o Power Door Lock) |
Remove the 2 nuts and the back door lock cylinder.
 |
| 15. REMOVE BACK DOOR GARNISH NO. 2 RETAINER (w/ Cover) |
Remove the 2 nuts and back door garnish No. 2 retainer.
 |
| 16. REMOVE BACK DOOR LOCK CONTROL ASSEMBLY (w/o Power Door Lock) |
Disengage the clamp.
 |
Remove the 2 nuts and back door lock control.
| 17. REMOVE BACK DOOR OUTSIDE GARNISH SUB-ASSEMBLY (w/ Power Door Lock) |
Disconnect the connectors.
Remove the 3 nuts.
 |
Disengage the 2 clips and remove the back door outside garnish.
 |
| 18. REMOVE BACK DOOR OUTSIDE GARNISH SUB-ASSEMBLY (w/o Power Door Lock) |
Remove the nut.
 |
Disengage the 2 clips and remove the back door outside garnish.
|
| 19. REMOVE BACK DOOR OPENER SWITCH ASSEMBLY (w/ Power Door Lock) |
Remove the back door opener switch.
 |
| 20. REMOVE BACK DOOR OUTSIDE HANDLE SUB-ASSEMBLY (w/o Power Door Lock) |
Remove the back door outside handle.
 |
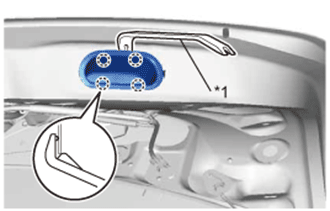
| 21. REMOVE REAR LIGHT COVER |
Disengage the 6 claws and remove the rear lamp cover.
 |
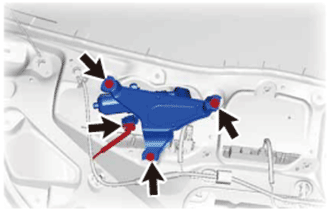
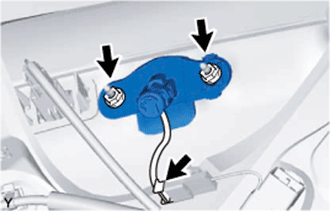
| 22. REMOVE CENTER STOP LIGHT ASSEMBLY |
Press up and disengage the 2 claws that are on the side of the clips that is facing towards you.
- CAUTION:
- Make sure not to cut your fingers or hands on the edge of the back door panel.
 |
For the clip on the LH side press up and disengage the claw on the side that is facing away from you.
- CAUTION:
- Make sure not to cut your fingers or hands on the edge of the back door panel.
 |
For the clip on the RH side press up and disengage the claw on the side that is facing away from you.
- CAUTION:
- Make sure not to cut your fingers or hands on the edge of the back door panel.
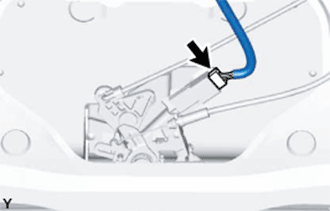
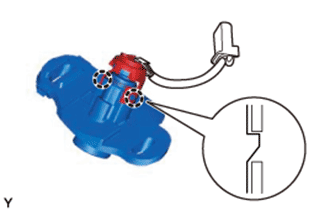
Disconnect the connector to remove the center stop light assembly.
Using a screwdriver with its tip wrapped in protective tape, disengage the 4 claws to remove the clip.
Text in Illustration *1 Protective Tape - HINT:
- Use the same procedure as for the opposite side.
 |
Remove the packing.
 |
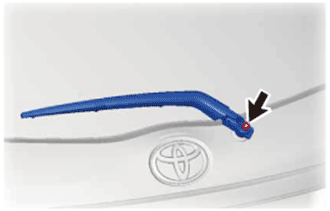
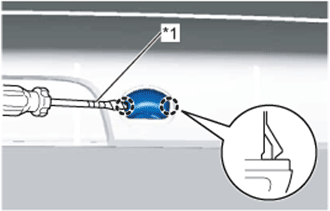
| 23. REMOVE REAR WASHER NOZZLE (w/ Rear Wiper) |
Using a screwdriver with its tip wrapped in protective tape, disengage the 2 claws and disconnect the rear washer nozzle.
Text in Illustration *1 Protective Tape - NOTICE:
- Be careful not to damage the windshield.
 |
Remove the rear washer nozzle from the washer hose.
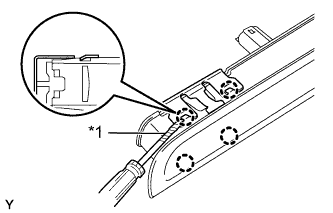
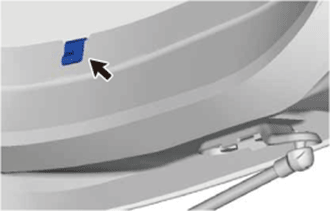
| 24. REMOVE BACK DOOR PANEL NO. 2 PROTECTOR |
Remove the 2 clips.
Text in Illustration *1 Double-sided Tape
 |
While peeling off the double-sided tape, remove the back door panel protector.
| 25. REMOVE BACK DOOR PANEL NO. 1 PROTECTOR |
- HINT:
- Use the same procedure as for the No. 2.
| 26. REMOVE BACK DOOR PANEL CUSHION |
- HINT:
- Use the same procedure as for the opposite side.
Remove the back door panel cushion.
 |
| 27. REMOVE LICENSE PLATE LIGHT ASSEMBLY |
Disconnect the connector.
 |
Disengage the 2 claws to remove the license plate light assembly.
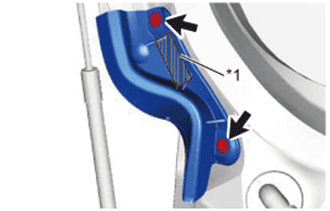
| 28. REMOVE REAR WINDOW NO. 1 WIRE (w/ Rear Window Defogger) |
Remove the bolt and disengage the hook.
Text in Illustration *1 Hook *2 Clamp
 |
Disengage the clamp and remove the wire harness.
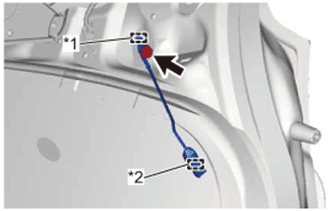
| 29. REMOVE BACK DOOR NO. 2 WIRE |
Remove the bolt and disengage the hook.
Text in Illustration *1 Hook *2 Clamp
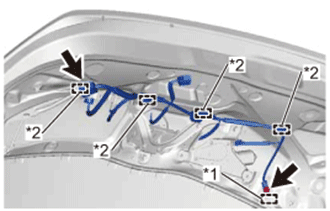 |
Disconnect the connector.
Disengage the 4 clamps and remove the wire harness.
| 30. REMOVE PACKAGE TRAY TRIM HANGER |
- HINT:
- Use the same procedure as for the opposite side.
Remove the package tray trim hanger.
 |
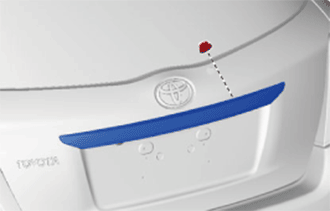
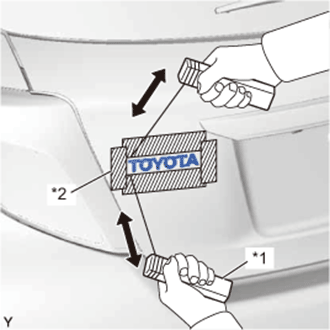
| 31. REMOVE SYMBOL EMBLEM |
Apply protective tape to the back door panel in the area around the symbol emblem.
Text in Illustration *1 Wooden Blocks *2 Protective Tape *3 Location Pin
 |
Pass a piano wire between the vehicle body and symbol emblem.
Tie objects that can serve as handles (for example, wooden blocks) to both wire ends.
Pull the piano wire and scrape off the double-sided tape that holds the symbol emblem to the vehicle body.
- NOTICE:
- Be careful not to damage the vehicle body.
Remove the symbol emblem.
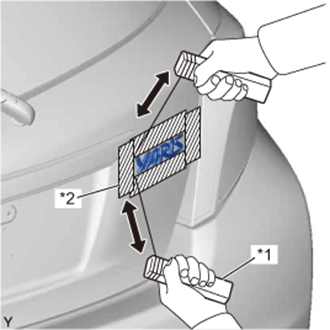
| 32. REMOVE NO. 6 BACK DOOR NAME PLATE |
Apply protective tape to the back door panel in the area around the No. 6 back door name plate.
Text in Illustration *1 Wooden Blocks *2 Protective Tape
 |
Pass a piano wire between the vehicle body and No. 6 back door name plate.
Tie objects that can serve as handles (for example, wooden blocks) to both wire ends.
Pull the piano wire and scrape off the double-sided tape that holds the No. 6 back door name plate to the vehicle body.
- NOTICE:
- Be careful not to damage the vehicle body.
Remove the No. 6 back door name plate.
| 33. REMOVE NO. 2 LUGGAGE COMPARTMENT DOOR NAME PLATE |
Apply protective tape to the back door panel in the area around the No. 2 luggage compartment door name plate.
Text in Illustration *1 Wooden Blocks *2 Protective Tape
 |
Pass a piano wire between the vehicle body and No. 2 luggage compartment door name plate.
Tie objects that can serve as handles (for example, wooden blocks) to both wire ends.
Pull the piano wire and scrape off the double-sided tape that holds the No. 2 luggage compartment door name plate to the vehicle body.
- NOTICE:
- Be careful not to damage the vehicle body.
Remove the No. 2 luggage compartment door name plate.