Luggage Compartment Door (For Sedan) -- Installation |
| 1. INSTALL LUGGAGE COMPARTMENT DOOR WEATHERSTRIP |
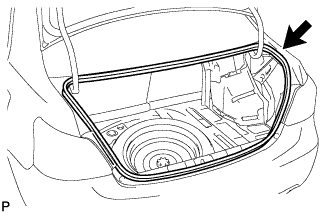 |
Install the luggage compartment door weatherstrip.
| 2. INSTALL LUGGAGE COMPARTMENT TRIM INNER PAD |
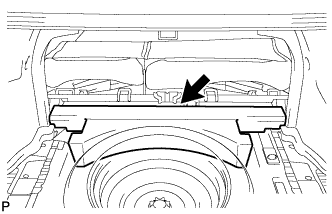 |
w/ Grand Spare Tire:
Install the luggage compartment trim inner pad.
w/o Grand Spare Tire:
Install the luggage compartment trim inner pad.
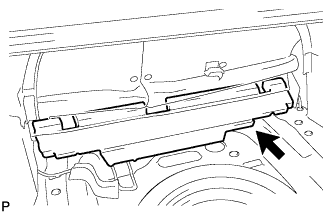 |
| 3. INSTALL LUGGAGE COMPARTMENT TRIM COVER INNER RH |
 |
Engage the 5 clips and install the luggage compartment trim cover inner RH.
| 4. INSTALL LUGGAGE COMPARTMENT TRIM COVER INNER LH |
- HINT:
- Use the same procedure as described for the RH side.
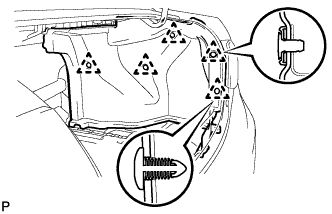
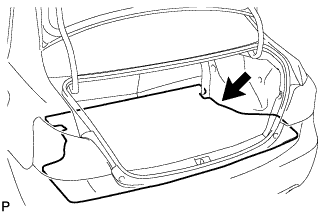
| 5. INSTALL REAR FLOOR FINISH PLATE |
 |
Engage the 8 claws and 2 clips and install the rear floor finish plate.
| 6. INSTALL DECK FLOOR BOX RH (w/ Grand Spare Tire) |
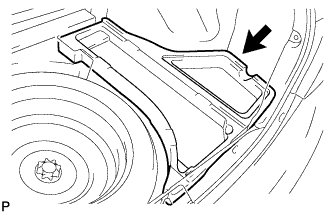 |
Install the deck floor box RH.
| 7. INSTALL DECK FLOOR BOX LH (w/ Grand Spare Tire) |
- HINT:
- Use the same procedure as described for the RH side.
| 8. INSTALL DECK SIDE BOX DOOR RH (w/ Grand Spare Tire) |
 |
Install the deck floor box RH.
| 9. INSTALL DECK SIDE BOX DOOR LH (w/ Grand Spare Tire) |
- HINT:
- Use the same procedure as described for the RH side.
| 10. INSTALL SPARE WHEEL COVER ASSEMBLY |
 |
Install the spare wheel cover.
| 11. INSTALL LUGGAGE COMPARTMENT FLOOR MAT |
 |
Install the luggage compartment floor mat.
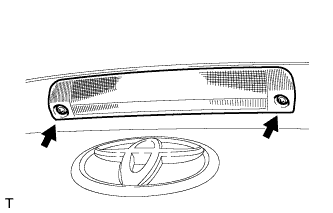
| 12. INSTALL SYMBOL EMBLEM |
Clean the attachment surface.
Using an infrared light, heat the double-sided adhesive tape remaining on the luggage compartment door panel.
- HINT:
- Heat at 40 to 60°C (104 to 140°F) for 1 to 2 minutes.
Using a shop rag or piece of cloth, rub the remaining double-sided adhesive tape off the back door panel while it is hot from the infrared light.
- NOTICE:
- Installing the symbol while any double-sided adhesive tape remains on the luggage compartment door panel may cause adhesion failure. Therefore, completely remove the double-sided adhesive tape.
Using a non-residue solvent, clean the attachment surface.
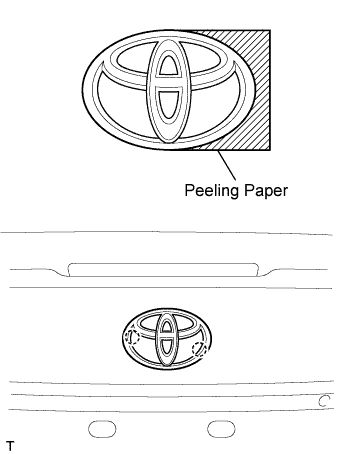 |
Align the 2 pins and install a new symbol emblem.
- NOTICE:
- Install the symbol emblem in an environment where the ambient temperature is over 20°C (68°F). If it is below 20°C (68°F), using an infrared light, heat the luggage compartment door panel and the symbol emblem up to 20 to 30°C (68 to 86°F) and install the symbol emblem.
| 13. INSTALL NO. 2 LUGGAGE COMPARTMENT DOOR NAME PLATE |
Clean the attachment surface.
Using an infrared light, heat the double-sided adhesive tape remaining on the luggage compartment door panel.
- HINT:
- Heat at 40 to 60°C (104 to 140°F) for 1 to 2 minutes.
Using a shop rag or piece of cloth, rub the remaining double-sided adhesive tape off the luggage compartment door panel while it is hot from the infrared light.
- NOTICE:
- Installing the No. 2 luggage compartment door name plate while any double-sided adhesive tape remains on the luggage compartment door panel may cause adhesion failure. Therefore, completely remove the double-sided adhesive tape.
Using a non-residue solvent, clean the attachment surface.
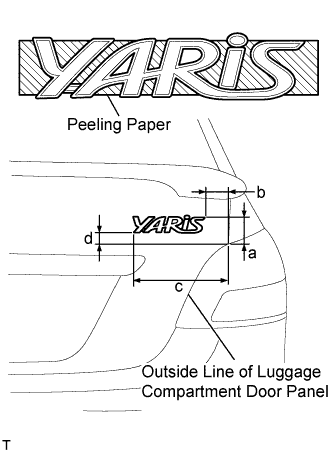 |
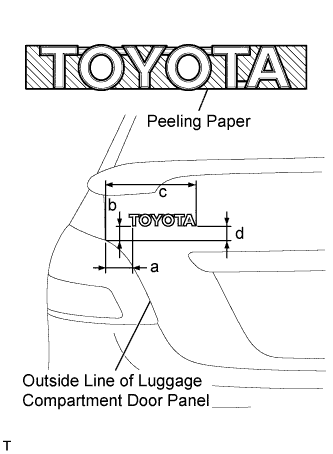
Install a new No. 2 luggage compartment door name plate as shown in the illustration.
- Installation position:
Mark Measurement (along surface) a 39.4 mm (1.551 in.) b 44.7 mm (1.760 in.) c 162.4 mm (6.394 in.) d 17.8 mm (0.701 in.)
- NOTICE:
- Install the No. 2 luggage compartment door name plate in an environment where the ambient temperature is over 20°C (68°F). If it is below 20°C (68°F), using an infrared light, heat the luggage compartment door panel and the No. 2 luggage compartment door name plate up to 20 to 30°C (68 to 86°F) and install the No. 2 luggage compartment door name plate.
| 14. INSTALL NO. 6 LUGGAGE COMPARTMENT DOOR NAME PLATE |
Clean the attachment surface.
Using an infrared light, heat the double-sided adhesive tape remaining on the luggage compartment door panel.
- HINT:
- Heat at 40 to 60°C (104 to 140°F) for 1 to 2 minutes.
Using a shop rag or piece of cloth, rub the remaining double-sided adhesive tape off the luggage compartment door panel while it is hot from the infrared light.
- NOTICE:
- Installing the No. 6 luggage compartment door name plate while any double-sided adhesive tape remains on the luggage compartment door panel may cause adhesion failure. Therefore, completely remove the double-sided adhesive tape.
Using a non-residue solvent, clean the attachment surface.
 |
Install a new No. 6 luggage compartment door name plate as shown in the illustration.
- Installation position:
Mark Measurement (along surface) a 52.8 mm (2.079 in.) b 17.1 mm (0.673 in.) c 162.3 mm (0.390 in.) d 20 mm (0.787 in.)
- NOTICE:
- Install the No. 6 luggage compartment door name plate in an environment where the ambient temperature is over 20°C (68°F). If it is below 20°C (68°F), using an infrared light, heat the luggage compartment door panel and the No. 6 luggage compartment door name plate up to 20 to 30°C (68 to 86°F) and install the No. 6 luggage compartment door name plate.
| 15. INSTALL LICENSE PLATE LIGHT ASSEMBLY |
 |
Install the license plate light bulb into the light socket.
Turn the license plate light bulb socket and bulb, in the directions indicated by the arrow in the illustration, to install them.
Engage claw A and claw B, and install the license plate light assembly.
 |
| 16. INSTALL BACK DOOR OUTSIDE GARNISH SUB-ASSEMBLY |
Engage the 3 clips and install the luggage compartment door outside garnish.
 |
Tighten the 2 nuts.
| 17. INSTALL DOOR UNLOCK SWITCH (w/ Theft Deterrent System) |
Engage the 2 claws and install the door unlock switch.
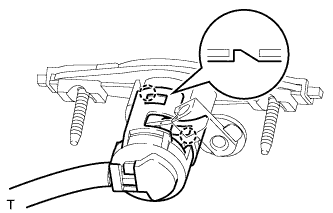 |
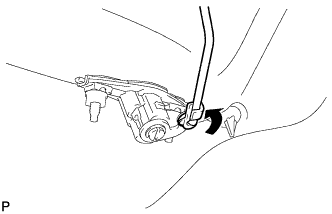
| 18. INSTALL LUGGAGE COMPARTMENT LOCK CYLINDER |
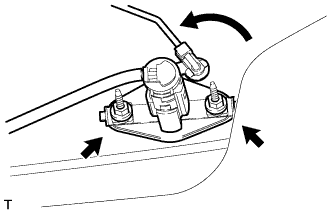 |
w/ Theft deterrent system:
Install the luggage compartment lock cylinder with the 2 nuts.- Torque:
- 4.9 N*m{50 kgf*cm, 43 in.*lbf}
Connect the luggage compartment door lock link and connector.
w/o Theft deterrent system:
Install the luggage compartment lock cylinder with the 2 nuts.- Torque:
- 4.9 N*m{50 kgf*cm, 43 in.*lbf}
 |
Connect the luggage compartment door lock link.
| 19. INSTALL LUGGAGE COMPARTMENT DOOR LOCK ASSEMBLY |
Install the luggage door lock control cable.
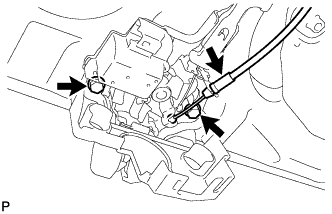 |
Install the luggage compartment door lock assembly with the 2 bolts.
- Torque:
- 5.5 N*m{56 kgf*cm, 48 in.*lbf}
Connect the connector.
 |
Engage the claw and install the protector lid.
Install the luggage compartment door lock link.
 |
| 20. INSTALL HIGH MOUNTED STOP LIGHT (w/ Rear Spoiler) |
 |
Connect the connector.
Install the high mounted stop light with the 2 bolts.
- Torque:
- 1.3 N*m{13 kgf*cm, 11 in.*lbf}
| 21. INSTALL REAR SPOILER PROTECTOR SIDE LH (w/ Rear Spoiler) |
 |
- NOTICE:
- Follow these procedures only when replacing the protector.
Apply a new rear spoiler protector to the rear spoiler installation surface as shown in the illustration.
| 22. INSTALL REAR SPOILER PROTECTOR SIDE RH (w/ Rear Spoiler) |
- HINT:
- Use the same procedure as for the LH side.
| 23. INSTALL REAR SPOILER SUB-ASSEMBLY (w/ Rear Spoiler) |
Clean the rear spoiler (When reusing the rear spoiler).
Using an infrared light, heat the double-sided adhesive tape remaining on the luggage compartment door panel.
- HINT:
- Heat at 40 to 60°C (104 to 140°F) for 1 to 2 minutes.
Using a shop rag or piece of cloth, rub the remaining double-sided adhesive tape off the rear spoiler while it is hot from the infrared light.
- NOTICE:
- Installing the rear spoiler while any double-sided adhesive tape remains on the luggage compartment door panel may cause adhesion failure. Therefore, completely remove the double-sided adhesive tape.
Using non-residue solvent, clean the rear spoiler.
Apply new double-sided adhesive tape to the rear spoiler installation surface as shown in the illustration.

Clean the attachment surface.
Using an infrared light, heat the double-sided adhesive tape remaining on the luggage compartment door panel.
- HINT:
- Heat at 40 to 60°C (104 to 140°F) for 1 to 2 minutes.
Using a shop rag or piece of cloth, rub the remaining double-sided adhesive tape off the luggage compartment door panel while it is hot from the infrared light.
- NOTICE:
- Installing the rear spoiler while any double-sided adhesive tape remains on the luggage compartment door panel may cause adhesion failure. Therefore, completely remove the double-sided adhesive tape.
Using non-residue solvent, clean the attachment surface.
Install the wire harness into the luggage compartment door panel hole.
 |
Engage the 2 clips and install the rear spoiler.
Remove the protective tape.
Tighten the 2 bolts.
 |
Connect the center stop light connector.
| 24. INSTALL LUGGAGE COMPARTMENT DOOR COVER (for Cold Area Specification Vehicles) |
 |
Engage the 5 clips and install the luggage compartment door cover.
| 25. CONNECT CABLE TO NEGATIVE BATTERY TERMINAL |
- Torque:
- 5.4 N*m{55 kgf*cm, 48 in.*lbf}