Luggage Compartment Door (For Sedan) Disassembly
DISCONNECT CABLE FROM NEGATIVE BATTERY TERMINAL
REMOVE LUGGAGE COMPARTMENT DOOR COVER (for Cold Area Specification Vehicles)
REMOVE REAR SPOILER SUB-ASSEMBLY (w/ Rear Spoiler)
REMOVE HIGH MOUNTED STOP LIGHT (w/ Rear Spoiler)
REMOVE LUGGAGE COMPARTMENT DOOR LOCK ASSEMBLY
REMOVE LUGGAGE COMPARTMENT LOCK CYLINDER
REMOVE DOOR UNLOCK SWITCH (w/ Theft Deterrent System)
REMOVE BACK DOOR OUTSIDE GARNISH SUB-ASSEMBLY
REMOVE LICENSE PLATE LIGHT ASSEMBLY
REMOVE NO. 6 LUGGAGE COMPARTMENT DOOR NAME PLATE
REMOVE NO. 2 LUGGAGE COMPARTMENT DOOR NAME PLATE
REMOVE SYMBOL EMBLEM
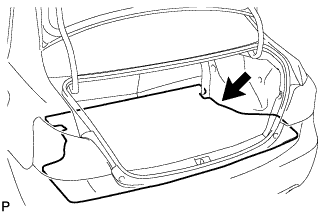
REMOVE LUGGAGE COMPARTMENT FLOOR MAT
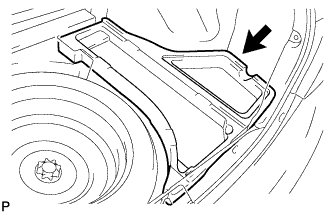
REMOVE SPARE WHEEL COVER ASSEMBLY
REMOVE DECK SIDE BOX DOOR RH (w/ Grand Spare Tire)
REMOVE DECK SIDE BOX DOOR LH (w/ Grand Spare Tire)
REMOVE DECK FLOOR BOX RH (w/ Grand Spare Tire)
REMOVE DECK FLOOR BOX LH (w/ Grand Spare Tire)
REMOVE REAR FLOOR FINISH PLATE
REMOVE LUGGAGE COMPARTMENT TRIM COVER INNER RH
REMOVE LUGGAGE COMPARTMENT TRIM COVER INNER LH
REMOVE LUGGAGE COMPARTMENT TRIM INNER PAD
REMOVE LUGGAGE COMPARTMENT DOOR WEATHERSTRIP
Luggage Compartment Door (For Sedan) -- Disassembly |
| 1. DISCONNECT CABLE FROM NEGATIVE BATTERY TERMINAL |
| 2. REMOVE LUGGAGE COMPARTMENT DOOR COVER (for Cold Area Specification Vehicles) |
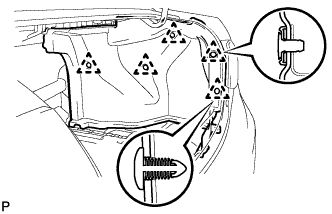
Disengage the 5 clips and remove the luggage compartment door cover.
| 3. REMOVE REAR SPOILER SUB-ASSEMBLY (w/ Rear Spoiler) |
Disconnect the center stop light connector.
Remove the 2 bolts.
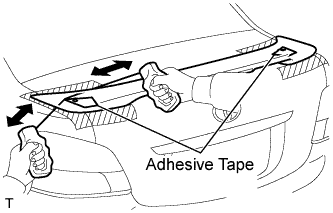
Apply protective tape to the luggage compartment door panel in the periphery of the rear spoiler.
Using an infrared light, heat the adhesive tape remaining on the rear spoiler.
- HINT:
- Heat at 40 to 60°C (104 to 140°F) for 1 to 2 minutes.
Tie both piano wire ends to wooden blocks or similar objects.
Cut the adhesive tape by pulling the piano wire alternatively toward you.
When reusing the rear spoiler, set the wooden blocks or similar objects along the body to avoid damaging the rear spoiler end portion.
Disengage the 2 clips and remove the rear spoiler.
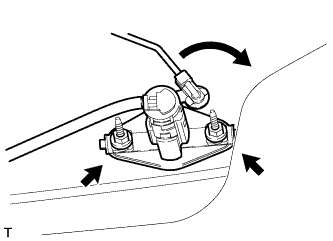
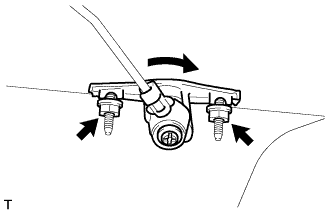
| 4. REMOVE HIGH MOUNTED STOP LIGHT (w/ Rear Spoiler) |
Remove the 2 bolts and the high mounted stop light.
Disconnect the connector.
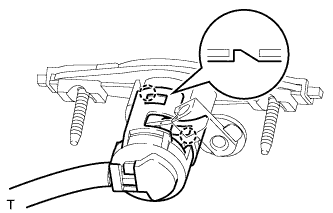
| 5. REMOVE LUGGAGE COMPARTMENT DOOR LOCK ASSEMBLY |
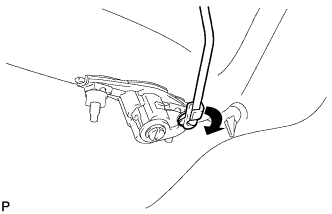
Remove the snap ring in the direction indicated by the arrow and remove the luggage compartment door lock link.
Disconnect the connector.
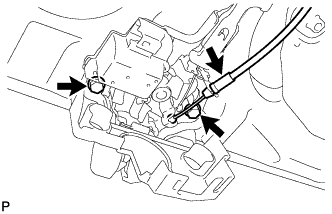
Disengage the claw and pull up the protector lid in the direction indicated by the arrow.
Remove the luggage door lock control cable.
Remove the 2 bolts and the luggage compartment door lock assembly.
| 6. REMOVE LUGGAGE COMPARTMENT LOCK CYLINDER |
w/ Theft deterrent system:
Disconnect the connector.
Disconnect the luggage compartment door lock link, then remove the 2 nuts and the luggage compartment lock cylinder.
w/o Theft deterrent system:
Disconnect the luggage compartment door lock link, then remove the 2 nuts and the luggage compartment lock cylinder.
| 7. REMOVE DOOR UNLOCK SWITCH (w/ Theft Deterrent System) |
Disengage the 2 claws and remove the door unlock switch.
| 8. REMOVE BACK DOOR OUTSIDE GARNISH SUB-ASSEMBLY |
Remove the 2 nuts.
Disengage the 3 clips and remove the luggage compartment door outside garnish.
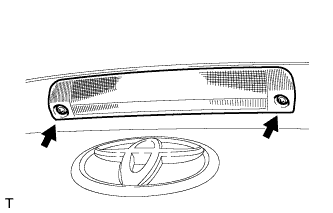
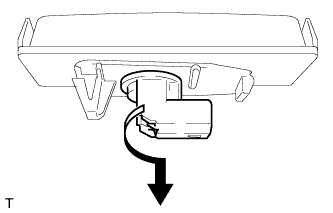
| 9. REMOVE LICENSE PLATE LIGHT ASSEMBLY |
Pull the license plate light assembly in the direction indicated by arrow 1, shown in the illustration. Disengage claw B by pulling claw A toward you while flexing it and remove the license plate light assembly.
Turn the license plate light socket and bulb, in the directions indicated by the arrow in the illustration, to remove them.
Remove the license plate light bulb from the light socket.
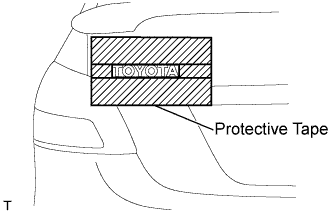
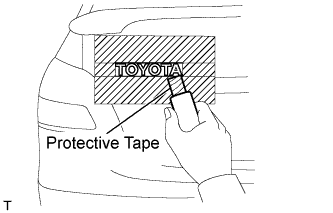
| 10. REMOVE NO. 6 LUGGAGE COMPARTMENT DOOR NAME PLATE |
Apply protective tape, as shown in the illustration.
Using an infrared light, heat the No. 6 luggage compartment door name plate.
- CAUTION:
- Do not burn yourself with the heated luggage compartment door panel or infrared light.
- HINT:
- Heat at 40 to 60°C (104 to 140°F) for 1 to 2 minutes.
Using a gasket scraper with its tip wrapped in protective tape, gradually peel the adhesive surface and remove the No. 6 luggage compartment door name plate.
Remove the protective tape.
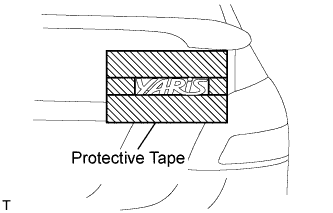
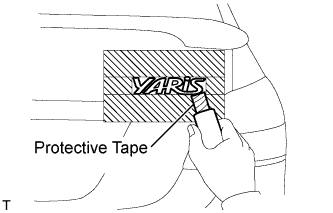
| 11. REMOVE NO. 2 LUGGAGE COMPARTMENT DOOR NAME PLATE |
Apply protective tape, as shown in the illustration.
Using an infrared light, heat the No. 2 luggage compartment door name plate.
- CAUTION:
- Do not burn yourself with the heated luggage compartment door panel or infrared light.
- HINT:
- Heat at 40 to 60°C (104 to 140°F) for 1 to 2 minutes.
Using a gasket scraper with its tip wrapped in protective tape, gradually peel the adhesive surface and remove the No. 2 luggage compartment door name plate.
Remove the protective tape.
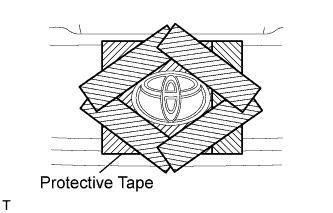
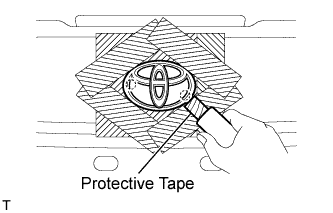
Apply protective tape, as shown in the illustration.
Using an infrared light, heat the symbol emblem.
- CAUTION:
- Do not burn yourself with the heated luggage compartment door panel or infrared light.
- HINT:
- Heat at 40 to 60°C (104 to 140°F) for 1 to 2 minutes.
Using a gasket scraper with its tip wrapped in protective tape, gradually peel the adhesive surface and remove the symbol emblem.
Remove the protective tape.
| 13. REMOVE LUGGAGE COMPARTMENT FLOOR MAT |
Remove the luggage compartment floor mat.
| 14. REMOVE SPARE WHEEL COVER ASSEMBLY |
Remove the spare wheel cover.
| 15. REMOVE DECK SIDE BOX DOOR RH (w/ Grand Spare Tire) |
Remove the deck side box door RH.
| 16. REMOVE DECK SIDE BOX DOOR LH (w/ Grand Spare Tire) |
- HINT:
- Use the same procedure as described for the RH side.
| 17. REMOVE DECK FLOOR BOX RH (w/ Grand Spare Tire) |
Remove the deck floor box RH.
| 18. REMOVE DECK FLOOR BOX LH (w/ Grand Spare Tire) |
- HINT:
- Use the same procedure as described for the RH side.
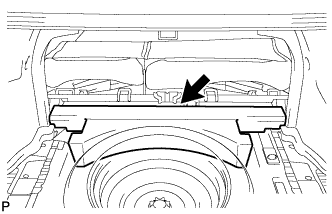
| 19. REMOVE REAR FLOOR FINISH PLATE |
Disengage the 8 claws and 2 clips and remove the rear floor finish plate.
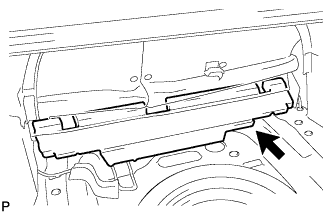
| 20. REMOVE LUGGAGE COMPARTMENT TRIM COVER INNER RH |
Disengage the 5 clips and remove the luggage compartment trim cover inner RH.
| 21. REMOVE LUGGAGE COMPARTMENT TRIM COVER INNER LH |
- HINT:
- Use the same procedure as described for the RH side.
| 22. REMOVE LUGGAGE COMPARTMENT TRIM INNER PAD |
w/ Grand Spare Tire:
Remove the luggage compartment trim inner pad.
w/o Grand Spare Tire:
Remove the luggage compartment trim inner pad.
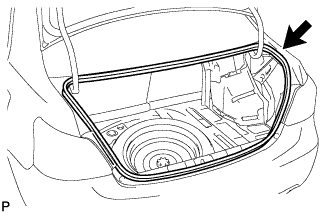
| 23. REMOVE LUGGAGE COMPARTMENT DOOR WEATHERSTRIP |
Remove the luggage compartment door weatherstrip.