Back Door Glass (For Hatchback) -- Installation |
| 1. CLEAN BACK DOOR GLASS |
Using a scraper, remove the adhesive sticking to the back door glass.
- NOTICE:
- Be careful not to damage the back door glass.
 |
Clean the outer edge of the back door glass with a non-residue solvent.
- NOTICE:
- Do not touch the glass surface after cleaning it.
- Even if using a new glass, clean the glass with non-residue solvent.
| 2. INSTALL BACK WINDOW GLASS CLIP RH |
Apply Primer G to the installation part of the back window glass clip.
- NOTICE:
- Do not apply too much primer.
- Allow the primer coating to dry for 3 minutes or more.
- Throw away any leftover primer.
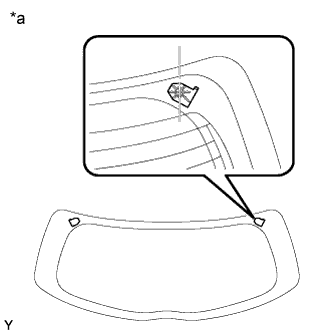
Install a new clip onto the glass, as shown in the illustration.
Text in Illustration *a Back Side
 |
| 3. INSTALL BACK WINDOW GLASS CLIP LH |
Apply Primer G to the installation part of the back window glass clip.
- NOTICE:
- Do not apply too much primer.
- Allow the primer coating to dry for 3 minutes or more.
- Throw away any leftover primer.
Install a new clip onto the glass, as shown in the illustration.
Text in Illustration *a Back Side
 |
| 4. INSTALL BACK WINDOW GLASS ADHESIVE DAM |
Using a brush or sponge, coat the application area of adhesive dam with Primer G.
- NOTICE:
- Do not apply too much primer.
- Allow the primer coating to dry for 3 minutes or more.
- Throw away any leftover primer.
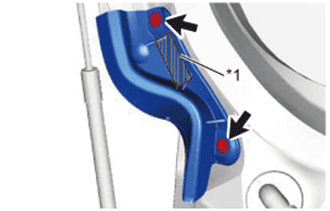
Install a new adhesive dam onto the back door glass, as shown in the illustration.
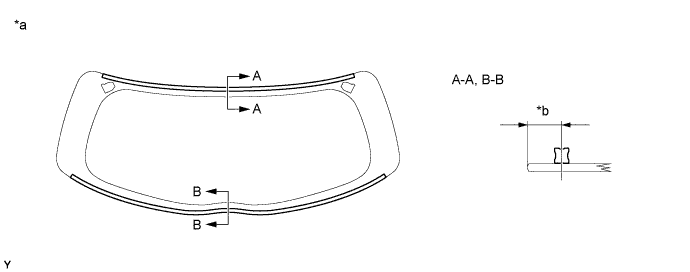
Text in Illustration *a Back Side *b 6.9 mm (0.273 in.)
| 5. INSTALL BACK DOOR GLASS |
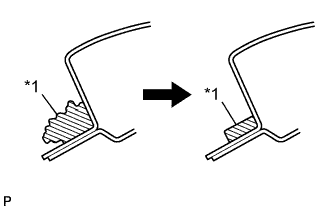
Clean and shape the contact surface of the vehicle body.
Text in Illustration *1 Adhesive Using a knife, cut away any rough adhesive on the contact surface of the vehicle body to ensure the appropriate surface shape.
- HINT:
- Leave as much adhesive on the vehicle body as possible.
Clean the contact surface of the vehicle body with a piece of cloth saturated with cleaner.
 |
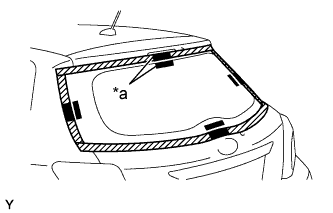
Position the back door glass.
Text in Illustration *a Mark Using suction cups, place the back door glass in the correct position.
Align the matchmarks on the back door glass and vehicle body.
Remove the back door glass.
 |
Using a brush, coat the installation surface on the vehicle body with Primer M.
Text in Illustration *1 Primer M *2 Adhesive *a Correct *b Incorrect - NOTICE:
- Do not coat the adhesive with Primer M.
- Do not apply too much primer.
- Allow the primer coating to dry for 3 minutes or more.
- Do not keep any of the opened Primer M for later use.
 |
Using a brush or sponge, coat the application areas that still have adhesive attached with Primer G.
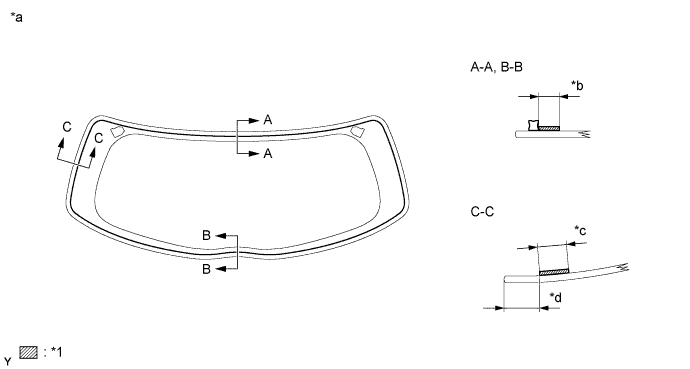
Text in Illustration *1 Primer G - - *a Back Side *b 14.0 mm (0.551 in.) *c 22.0 mm (0.866 in.) *d 45.3 mm (1.783 in.) - NOTICE:
- Do not apply too much primer.
- Allow the primer coating to dry for 3 minutes or more.
- Throw away any leftover primer.
Apply adhesive to the glass.
- Adhesive:
- Toyota Genuine Windshield Glass Adhesive or equivalent
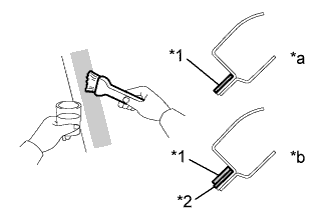
Cut off the tip of the cartridge nozzle, as shown in the illustration.
Text in Illustration *a 8.0 mm (0.315 in.) *b 12.0 mm (0.472 in.) - HINT:
- After cutting off the tip, use all adhesive within the time limit described in the table below.
- Usage Time Frame:
Temperature Tack-free Time 35°C (95°F) 15 minutes 20°C (68°F) 1 hour and 40 minutes 5°C (41°F) 8 hours
Load the sealer gun with a cartridge.

Apply adhesive to the back door glass, as shown in the illustration.
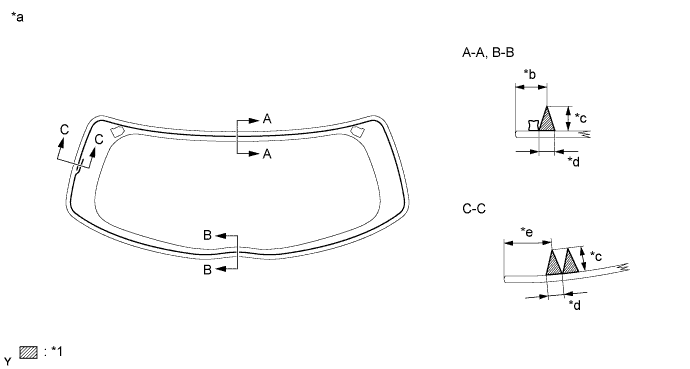
Text in Illustration *1 Adhesive - - *a Back Side *b 14.5 mm (0.571 in.) *c 12.0 mm (0.472 in.) *d 8.0 mm (0.315 in.) *e 52.3 mm (2.059 in.) - -
Install the back door glass.
Using suction cups, position the back door glass so that the matchmarks are aligned, and press it in gently along the rim.
Text in Illustration *a Mark Lightly press the front surface of the back door glass to ensure a close fit.
- HINT:
- Press the glass with force of 98 N (10 kgf, 22 lb) or more.
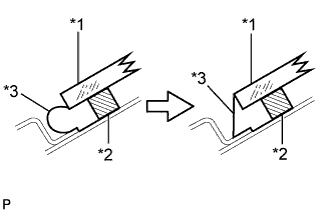
If necessary, use a scraper to correct the level or position of adhesive that has been applied.
Text in Illustration *1 Back Door Glass *2 Dam *3 Adhesive - HINT:
- Apply adhesive onto the windshield glass rim.
Hold the back door glass using protective tape until applied adhesive hardens.
- NOTICE:
- Do not drive the vehicle within the time limits described in the table below.
- Minimum time:
Temperature Minimum Time Prior to Driving Vehicle 35°C (95°F) 1 hour and 30 minutes 20°C (68°F) 5 hours 5°C (41°F) 24 hours
Connect the 2 connectors.
- HINT:
- If the vehicle is equipped with rear window defogger, connect the connector.
| 6. INSPECT FOR LEAK AND REPAIR |
After the adhesive has hardened, apply water from the outside of the vehicle. Check that no water leaks into the cabin.
If water leaks into the cabin, allow the water to dry and add adhesive.
Remove the protective tape.
| 7. INSTALL BACK DOOR PANEL NO. 2 PROTECTOR |
Using a piece of cloth or similar material, rub off any double-sided tape remaining on the back door panel.
Text in Illustration *1 Double-sided Tape - NOTICE:
- Installing the back door panel protector with any double-sided tape remaining on the back door panel may cause adhesion failure. Therefore, completely remove the double-sided tape.
 |
Using a non-residue solvent, clean the attachment surface.
Remove the double-sided tape backing of the new back door panel protector.
Install the back door panel protector with 2 clips.
- NOTICE:
- Thoroughly press the back door panel protector to ensure that it adheres.
| 8. INSTALL BACK DOOR PANEL NO. 1 PROTECTOR |
- HINT:
- Use the same procedure as for the No. 2 side.
| 9. INSTALL REAR WIPER MOTOR GROMMET (w/ Rear Wiper) |
Apply MP grease to the entire surface of the rear wiper motor grommet lip.
- HINT:
- Make sure that the hole does not get clogged with MP grease and the grooves on the lip are filled with MP grease.
Text in Illustration 
Lip of Rear Wiper Motor Grommet
 |
| 10. INSTALL REAR WIPER MOTOR ASSEMBLY (w/ Rear Wiper) |
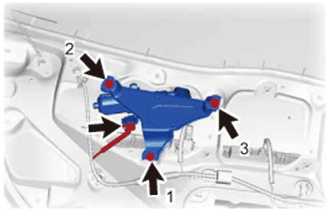
Install the rear wiper motor with the 3 bolts in the order shown in the illustration.
- Torque:
- 5.5 N*m{56 kgf*cm, 49 in.*lbf}
 |
Connect the connector.
| 11. INSTALL REAR WIPER ARM AND BLADE ASSEMBLY (w/ Rear Wiper) |
Operate the wiper and stop the rear wiper motor at the automatic stop position.
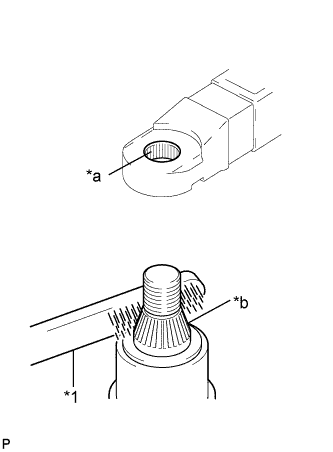 |
Scrape any metal powder off the serrated part of the wiper arm with a round file or the equivalent (when reinstalling).
Clean the wiper pivot serrations with a wire brush.
Text in Illustration *1 Wire Brush *a Wiper Arm Serration *b Wiper Pivot Serration
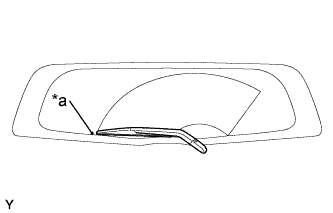
Install the rear wiper arm and blade with the nut to the position as shown in the illustration.
- Torque:
- 5.5 N*m{56 kgf*cm, 49 in.*lbf}
- HINT:
- Hold the arm hinge by hand while tightening the nut.
Text in Illustration *a Mark for Blade Position
 |
Operate the rear wiper while spraying washer fluid on the glass. Make sure that the rear wiper functions properly and there is no interference with the vehicle body.
| 12. INSTALL REAR WIPER ARM HEAD CAP (w/ Rear Wiper) |
Engage the 2 claws and 2 hinges, and install the rear wiper arm head cap.
- HINT:
- Push down on the cap until a click sound can be heard.
| 13. INSTALL BACK DOOR TRIM BOARD |
Engage the 11 clips and install the back door trim board.
 |
| 14. INSTALL REAR SPOILER SUB-ASSEMBLY (w/ Rear Spoiler) |