Condenser (For Sedan) -- Removal |
| 1. DISCHARGE REFRIGERANT FROM REFRIGERATION SYSTEM |
Start up the engine.
Switch A/C ON.
Turn the blower switch to ON.
Operate the cooler compressor with an engine speed of approximately 1,000 rpm for 5 to 6 minutes to circulate the refrigerant and collect the remaining compressor oil from each component, in the cooler compressor.
Stop the engine.
Remove the caps from the service valves on the refrigerant line.
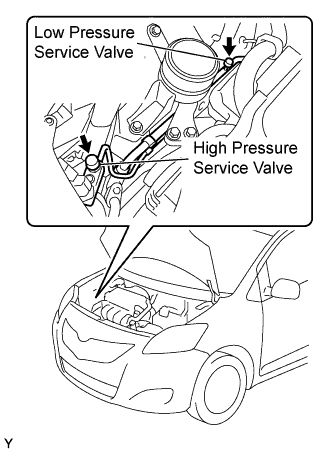 |
Connect the refrigerant recovery unit.
Recover the refrigerant from the air conditioning system using a refrigerant recovery unit.
- NOTICE:
- Use the refrigerant recovery unit in accordance with the manufacturer's instruction manual.
| 2. DISCONNECT CABLE FROM NEGATIVE BATTERY TERMINAL |
| 3. REMOVE FRONT SPOILER COVER |
Remove the 2 screws, the 10 bolts and the front spoiler cover.
 |
| 4. REMOVE FRONT BUMPER COVER |
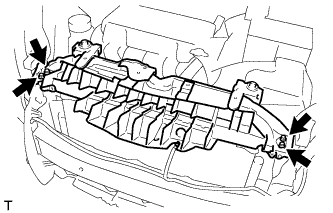
Apply protective tape, as shown in the illustration.
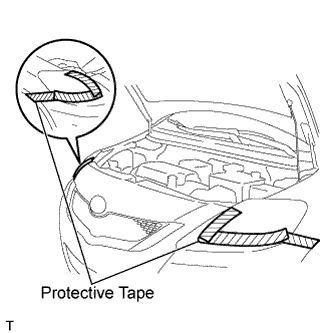 |
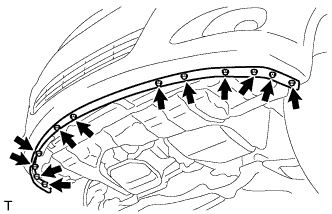
Remove the 9 bolts and the 7 screws.
 |
Remove the 2 screw grommets.
Remove the 6 clips.
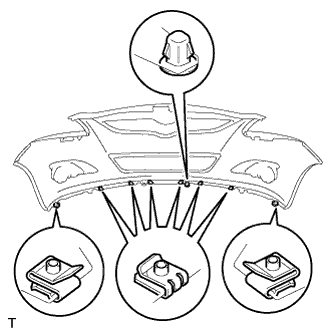
Disengage the 6 claws and remove the front bumper cover.
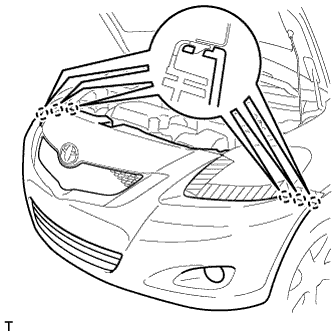 |
Disconnect the connectors.
- HINT:
- If the vehicle is equipped with fog lights, disconnect the connector.
Remove the 2 clips, the screw grommet and the 6 spring nuts.
 |
| 5. REMOVE NO. 1 COOLER COVER |
 |
Remove the 2 clips and No. 1 cooler cover.
| 6. SEPARATE HOOD LOCK ASSEMBLY (w/ Theft Deterrent System) |
 |
Separate the hood lock control cable assembly from the 2 clamps.
Separate the engine hood courtesy switch connector.
 |
Remove the 3 bolts and remove the hood lock assembly.
| 7. SEPARATE HOOD LOCK ASSEMBLY (w/o Theft Deterrent System) |
|
Separate the hood lock control cable assembly from the 2 clamps.
Remove the 3 bolts and remove the hood lock assembly.
 |
| 8. REMOVE RADIATOR SUPPORT SUB-ASSEMBLY UPPER |
 |
Separate the horn assembly connector.
Remove the 4 bolts and remove the radiator support sub-assembly upper.
| 9. DISCONNECT NO. 1 COOLER REFRIGERANT DISCHARGE HOSE |
 |
Remove the bolt and disconnect the discharge hose from the cooler condenser.
Remove the O-ring from the discharge hose.
- NOTICE:
- Seal the openings of the disconnected parts using vinyl tape to prevent moisture and foreign matter from entering.
| 10. DISCONNECT LIQUID TUBE SUB-ASSEMBLY A |
 |
Remove the bolt and disconnect the liquid tube from the cooler condenser.
Remove the O-ring from the liquid tube.
- NOTICE:
- Seal the openings of the disconnected parts using vinyl tape to prevent moisture and foreign matter from entering.
| 11. REMOVE CONDENSER |
 |
Disengage the 2 claws and remove the condenser from the vehicle.
- NOTICE:
- Do not damage the condenser or radiator when removing the condenser.