INSTALL LUGGAGE COMPARTMENT TRIM INNER PAD (for 60/40 Split Seat Type)
INSTALL SPARE WHEEL COVER ASSEMBLY (for 60/40 Split Seat Type)
INSTALL LUGGAGE COMPARTMENT FLOOR MAT (for 60/40 Split Seat Type)
INSTALL REAR SEATBACK ASSEMBLY RH (for 60/40 Split Seat Type)
INSTALL REAR SEATBACK ASSEMBLY LH (for 60/40 Split Seat Type)
CONNECT CABLE TO NEGATIVE BATTERY TERMINAL (w/o Rear Spoiler)
Rear Center Seat Outer Belt Assembly (For Sedan) -- Installation |
| 1. INSTALL REAR CENTER SEAT OUTER BELT ASSEMBLY |
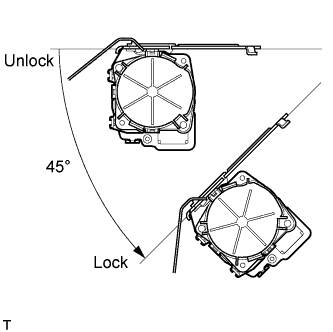
Check the angle of inclination required to lock the retractor.
Gently incline the retractor from its initial position. Check that the belt does not lock when the retractor is inclined 15° or less in any direction. Also, check that the belt locks when the inclination of the retractor is 45° or more.
- NOTICE:
- Do not disassemble the retractor.
 |
Insert the hook into the body hole and install the retractor with the bolt.
 |
for Fixed Seat Type:
Install the anchor plate with the bolt.
- Torque:
- 42 N*m{430 kgf*cm, 31 ft.*lbf}
- NOTICE:
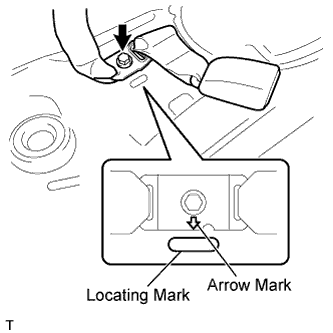
- Install the anchor plate with the arrow mark facing forward.
- Do not place the anchor plate over the locating mark area of the floor panel.
 |
Check that the ELR locks.
- NOTICE:
- The check should be performed with the rear seat outer belt installed.
- Do not allow the anchor part of the rear seat outer belt and the protruding parts of the floor panel to overlap.
With the belt installed, check that the belt locks when it is pulled out quickly.
If the operation is not as specified, replace the rear center seat outer belt.
| 2. INSTALL PACKAGE TRAY TRIM PANEL ASSEMBLY |
Engage the 5 claws and install the package tray trim.
 |
Install the 4 clips.
| 3. INSTALL HIGH MOUNTED STOP LIGHT ASSEMBLY (w/o Rear Spoiler) |
Connect the connector.
 |
Engage the 4 claws and install the high mounted stop light assembly.
| 4. INSTALL ROOF SIDE INNER GARNISH RH |
w/ Curtain Shield Airbag:
Install a new special clip and the clip onto the roof side inner garnish.
Engage the 4 clips and the claw and install the roof side inner garnish.
 |
w/o Curtain Shield Airbag:
Engage the 4 clips and the claw and install the roof side inner garnish.
 |
| 5. INSTALL ROOF SIDE INNER GARNISH LH |
- HINT:
- Use the same procedure as for the RH side.
| 6. INSTALL REAR SEAT SIDE COVER RH |
Engage the 2 clips and the 4 claws and install the rear seat side cover.
 |
| 7. INSTALL REAR SEAT SIDE COVER LH |
- HINT:
- Use the same procedure as for the RH side.
| 8. INSTALL REAR DOOR OPENING TRIM WEATHERSTRIP RH |
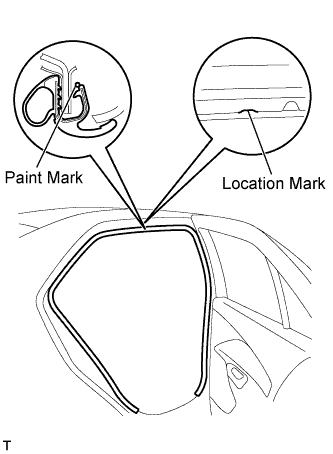
Align the location mark with the paint mark first, and install the rear door opening trim weatherstrip, as shown in the illustration.
- Paint mark:
Area Color RH side Green LH side Red
 |
| 9. INSTALL REAR DOOR OPENING TRIM WEATHERSTRIP LH |
- HINT:
- Use the same procedure as for the RH side.
| 10. INSTALL REAR DOOR SCUFF PLATE RH |
Engage the 7 claws and install the rear door scuff plate.
 |
| 11. INSTALL REAR DOOR SCUFF PLATE LH |
- HINT:
- Use the same procedure as for the RH side.
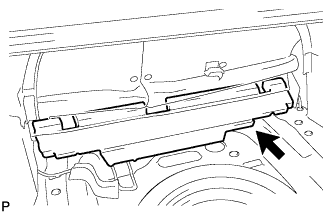
| 12. INSTALL LUGGAGE COMPARTMENT TRIM INNER PAD (for 60/40 Split Seat Type) |
 |
w/ Grand Spare Tire:
Install the luggage compartment trim inner pad.
w/o Grand Spare Tire:
Install the luggage compartment trim inner pad.
 |
| 13. INSTALL SPARE WHEEL COVER ASSEMBLY (for 60/40 Split Seat Type) |
 |
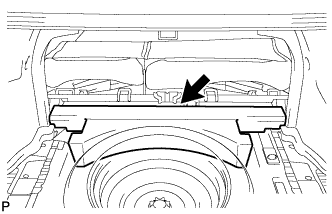
Install the spare wheel cover.
| 14. INSTALL LUGGAGE COMPARTMENT FLOOR MAT (for 60/40 Split Seat Type) |
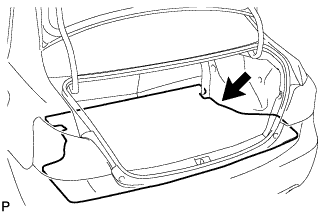 |
Install the luggage compartment floor mat.
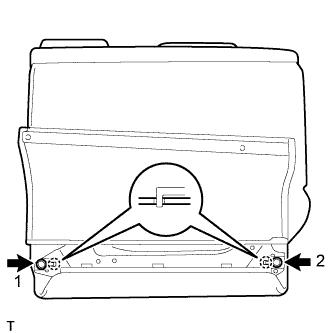
| 15. INSTALL REAR SEATBACK ASSEMBLY RH (for 60/40 Split Seat Type) |
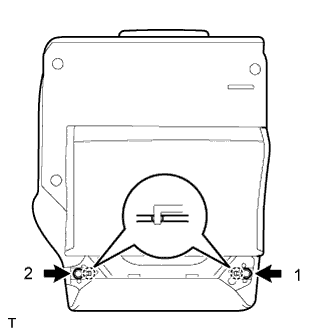
Insert the 2 hooks into the rear seatback frame hole and install the rear seatback, tightening the 2 bolts in the sequence shown in the illustration.
- Torque:
- 37 N*m{375 kgf*cm, 27 ft.*lbf}
 |
Install the rear seatback cover with the 2 clips.
 |
Pull up the rear seatback.
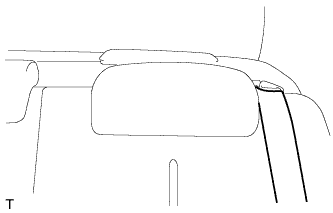
Install the rear seat outer belt into the rear seat shoulder belt guide.
 |
Install the rear center seat outer belt into the rear center seat shoulder belt guide.
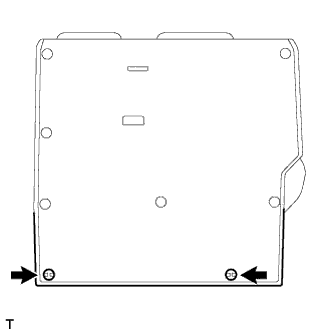
| 16. INSTALL REAR SEATBACK ASSEMBLY LH (for 60/40 Split Seat Type) |
Insert the 2 hooks into the rear seatback frame hole and install the rear seatback, tightening the 2 bolts in the sequence shown in the illustration.
- Torque:
- 37 N*m{375 kgf*cm, 27 ft.*lbf}
 |
Install the rear seatback cover with the 2 clips.
 |
Pull up the rear seatback.
Install the rear seat outer belt into the rear seat shoulder belt guide.
 |
| 17. INSTALL REAR SEATBACK ASSEMBLY (for Fixed Seat Type) |
Engage the 3 hooks and install the rear seatback.
 |
Tighten the 3 bolts.
- Torque:
- 7.9 N*m{80 kgf*cm, 70 in.*lbf}
Install the rear seat outer belt into the rear seat shoulder belt guide.
- HINT:
- Use the same procedure for both sides.
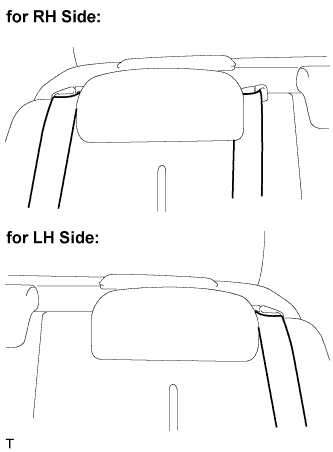 |
Install the rear center seat outer belt into the rear center seat shoulder belt guide.
| 18. INSTALL REAR SEAT CUSHION COVER PAD SUB-ASSEMBLY |
for 60/40 Split Seat Type:
Install the rear seat cushion cover pad (YARIS_NCP93 RM0000026GB00WX_01_0003.html).
for Fixed Seat Type:
Install the rear seat cushion cover pad (YARIS_NCP93 RM000001GLY00YX_02_0014.html).
| 19. CONNECT CABLE TO NEGATIVE BATTERY TERMINAL (w/o Rear Spoiler) |
- Torque:
- 5.4 N*m{55 kgf*cm, 48 in.*lbf}