Radiator (For Hatchback) Removal
DRAIN COOLANT
REMOVE HEADLIGHT ASSEMBLY
SEPARATE HOOD LOCK CONTROL CABLE ASSEMBLY
REMOVE UPPER RADIATOR SUPPORT SUB-ASSEMBLY
DISCONNECT RADIATOR RESERVOIR TANK HOSE
REMOVE NO. 3 RADIATOR HOSE
DISCONNECT NO. 2 RADIATOR HOSE
REMOVE INLET OIL COOLER HOSE (for Automatic Transaxle)
REMOVE OUTLET OIL COOLER HOSE (for Automatic Transaxle)
REMOVE AIR CLEANER ASSEMBLY
REMOVE RADIATOR ASSEMBLY
REMOVE NO. 2 RADIATOR HOSE
REMOVE FAN SHROUD
REMOVE RADIATOR SUPPORT CUSHION
REMOVE GROMMET
REMOVE RADIATOR DRAIN COCK
Radiator (For Hatchback) -- Removal |
- CAUTION:
- Be sure that the ignition is off if you work near the electric cooling fans or radiator grille. With the ignition on, the electric cooling fans may automatically start to run if the engine coolant temperature is high and/or the air conditioning is on.
- NOTICE:
- To avoid the danger of being burned, do not remove the water filler cap sub-assembly while the engine and radiator assembly are still hot. Thermal expansion will cause hot coolant and steam to blow out from the radiator assembly.
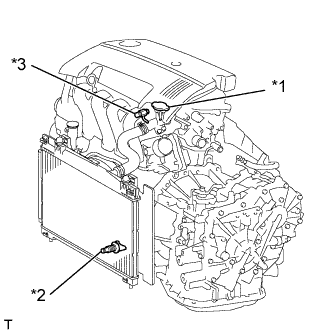
Text in Illustration*1
| Water Filler Cap Sub-assembly
|
*2
| Radiator Drain Cock Plug
|
*3
| Cylinder Block Drain Cock Plug
|
Loosen the radiator drain cock plug.
Remove the water filler cap sub-assembly.
Loosen the cylinder block drain cock plug, then drain the coolant.
| 2. REMOVE HEADLIGHT ASSEMBLY |
(YARIS_NCP93 RM000002PER00NX.html)
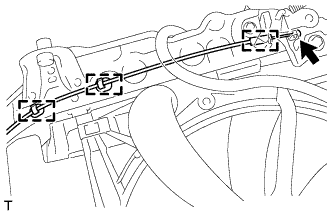
| 3. SEPARATE HOOD LOCK CONTROL CABLE ASSEMBLY |
Disengage the 2 clamps and separate the hood lock cable assembly.
Separate the hood lock control cable assembly from the hood lock.
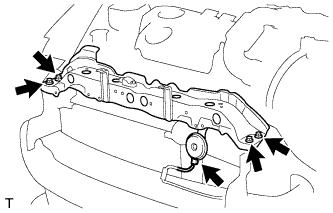
| 4. REMOVE UPPER RADIATOR SUPPORT SUB-ASSEMBLY |
Disconnect the hood lock courtesy switch connector and disengage the wire harness clamp.
Separate the horn assembly connector.
Remove the 4 bolts and the upper radiator support sub-assembly.
| 5. DISCONNECT RADIATOR RESERVOIR TANK HOSE |
Disconnect the radiator reservoir tank hose from the water filler.
| 6. REMOVE NO. 3 RADIATOR HOSE |
Loosen the 2 clips and remove No. 3 radiator hose.
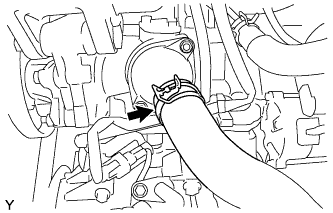
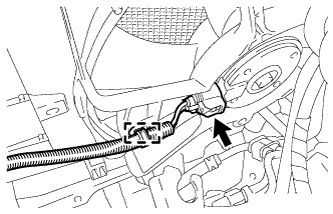
| 7. DISCONNECT NO. 2 RADIATOR HOSE |
Loosen the clip and disconnect No. 2 radiator hose.
| 8. REMOVE INLET OIL COOLER HOSE (for Automatic Transaxle) |
| 9. REMOVE OUTLET OIL COOLER HOSE (for Automatic Transaxle) |
| 10. REMOVE AIR CLEANER ASSEMBLY |
Disengage the clamp and disconnect the fuel vapor feed hose assembly from the No. 1 air cleaner hose.
Loosen the 2 hose clamps and disconnect the fuel vapor feed hose assembly from the No. 1 air cleaner hose and vacuum switching valve assembly.
Disconnect the No. 2 fuel vapor feed hose from the intake manifold.
Disengage the 2 clamps and disconnect the wire harness from the air cleaner cap sub-assembly and vacuum switching valve assembly.
Disconnect the mass air flow meter connector.
Disconnect the vacuum switching valve connector.
Loosen the hose clamp and disconnect the No. 1 air cleaner hose from the throttle with motor body assembly.
Disengage the 2 clamps and remove the air cleaner cap sub-assembly with No. 1 air cleaner hose.
Remove the air cleaner element.
Disengage the clamp and disconnect the wire harness from the air cleaner case.
Remove the 2 bolts and the air cleaner case from the air cleaner bracket.
| 11. REMOVE RADIATOR ASSEMBLY |
Separate the cooling fan motor connector and wire harness clamp.
Disengage the 2 claws and remove the radiator assembly from the vehicle.
- NOTICE:
- Do not apply excessive force to the cooler condenser assembly or piping when removing the radiator assembly.
| 12. REMOVE NO. 2 RADIATOR HOSE |
Loosen the clip and remove the No. 2 radiator hose.
Disengage the 2 claws and remove the fan shroud.
| 14. REMOVE RADIATOR SUPPORT CUSHION |
Remove the 2 radiator support cushions from the radiator assembly.
Remove the 2 grommets from the radiator assembly.
| 16. REMOVE RADIATOR DRAIN COCK |
Remove the radiator drain cock from the radiator assembly.