Exhaust Pipe (For Hatchback) Installation
INSTALL TAIL EXHAUST PIPE BAFFLE SUB-ASSEMBLY (w/ Side Mudguard)
INSTALL EXHAUST PIPE GASKET
INSTALL FRONT EXHAUST PIPE ASSEMBLY
INSTALL NO. 2 EXHAUST PIPE GASKET
INSTALL TAIL EXHAUST PIPE ASSEMBLY
INSTALL FRONT FLOOR CENTER BRACE
INSTALL HEATED OXYGEN SENSOR
INSPECT FOR EXHAUST GAS LEAK
Exhaust Pipe (For Hatchback) -- Installation |
| 1. INSTALL TAIL EXHAUST PIPE BAFFLE SUB-ASSEMBLY (w/ Side Mudguard) |
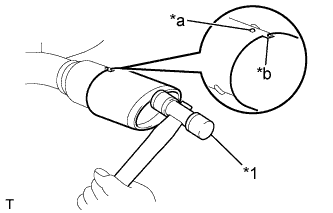
Align the keyway on a new tail exhaust pipe baffle sub-assembly with the protruding part of the exhaust tail pipe as shown in the illustration.
Text in Illustration*1
| Plastic Hammer
|
*a
| Protruding Part
|
*b
| Keyway
|
Using a plastic hammer, uniformly tap in the tail exhaust pipe baffle sub-assembly.
| 2. INSTALL EXHAUST PIPE GASKET |
Using a plastic hammer and a wooden block, tap in a new exhaust pipe gasket until its surface is flush with the exhaust manifold.
Text in Illustration*1
| Exhaust Pipe Gasket
|
*2
| Wooden Block
|
*3
| Plastic Hammer
|
*4
| Exhaust Manifold
|
- NOTICE:
- Install the gasket in the correct direction.
- Do not reuse the gasket.
- Do not damage the gasket by dropping it, etc.
- Do not damage the outer surface of the gasket.
- Do not push in the gasket with the exhaust pipe when connecting it.
| 3. INSTALL FRONT EXHAUST PIPE ASSEMBLY |
Using a vernier caliper, measure the free length of the compression spring.
- Minimum length:
- 41.5 mm (1.634 in.)
- HINT:
- If the length is not as specified, replace the compression spring.
Hang the front exhaust pipe assembly with the 3 exhaust pipe supports.
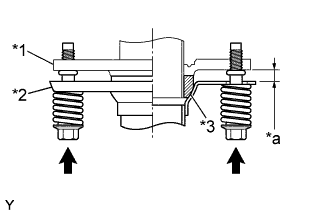
Install the front exhaust pipe assembly onto the exhaust manifold with the 2 compression springs and 2 bolts.
Text in Illustration*1
| Exhaust Manifold
|
*2
| Front Exhaust Pipe Assembly
|
*3
| Exhaust Pipe Gasket
|
*a
| Space between flanges: 8.5 mm (0.335 in.)
|
- Torque:
- 43 N*m{438 kgf*cm, 32 ft.*lbf}
- HINT:
- After the installation, check that the gaps between the flanges of the exhaust manifold and front exhaust pipe assembly are consistent front-to-rear and left-to-right.
| 4. INSTALL NO. 2 EXHAUST PIPE GASKET |
Using a plastic hammer and a wooden block, tap in a new No. 2 exhaust pipe gasket until its surface is flush with the front exhaust pipe assembly.
Text in Illustration*1
| No. 2 Exhaust Pipe Gasket
|
*2
| Wooden Block
|
*3
| Plastic Hammer
|
*4
| Exhaust Manifold
|
- NOTICE:
- Install the gasket in the correct direction.
- Do not reuse the gasket.
- Do not damage the gasket by dropping it, etc.
- Do not damage the outer surface of the gasket.
- Do not push in the gasket with the exhaust pipe when connecting it.
| 5. INSTALL TAIL EXHAUST PIPE ASSEMBLY |
Using a vernier caliper, measure the free length of the compression springs.
- Minimum length:
- 38.5 mm (1.516 in.)
- HINT:
- If the length is not as specified, replace the compression spring.
Hang the front exhaust pipe assembly with the 2 exhaust pipe supports.
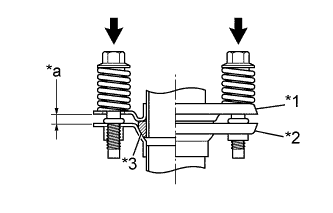
Install the tail exhaust pipe assembly onto the front exhaust pipe assembly with the 2 compression springs and 2 bolts.
Text in Illustration*1
| Front Exhaust pipe Assembly
|
*2
| Tail Exhaust Pipe Assembly
|
*3
| No. 2 Exhaust Pipe Gasket
|
*a
| Space between flanges: 6.5 mm (0.256 in.)
|
- Torque:
- 43 N*m{438 kgf*cm, 32 ft.*lbf}
- HINT:
- After the installation, check that the gaps between the flanges of the front exhaust pipe assembly and tail exhaust pipe assembly are consistent front-to-rear and left-to-right.
| 6. INSTALL FRONT FLOOR CENTER BRACE |
Install the front floor center brace onto the body with the 2 bolts.
- Torque:
- 30 N*m{307 kgf*cm, 22 ft.*lbf}
| 7. INSTALL HEATED OXYGEN SENSOR |
(YARIS_NCP93 RM000003VIM00KX.html)
| 8. INSPECT FOR EXHAUST GAS LEAK |
- HINT:
- Perform "Inspection After Repairs" after repairing or replacing the exhaust system (YARIS_NCP93 RM000004NJD006X.html).


