Fuel Pump (For Sedan) Installation
INSTALL FUEL SUCTION WITH PUMP AND GAUGE TUBE ASSEMBLY
INSTALL FUEL PUMP GAUGE RETAINER
CONNECT FUEL TANK VENT HOSE SUB-ASSEMBLY
CONNECT FUEL TANK MAIN TUBE SUB-ASSEMBLY
INSTALL REAR FLOOR SERVICE HOLE COVER
INSTALL REAR SEAT CUSHION COVER PAD (for 60/40 Split Seat Type)
INSTALL REAR SEAT CUSHION COVER PAD (for Fixed Seat Type)
CONNECT CABLE TO NEGATIVE BATTERY TERMINAL
CHECK FOR FUEL LEAKAGE
Fuel Pump (For Sedan) -- Installation |
| 1. INSTALL FUEL SUCTION WITH PUMP AND GAUGE TUBE ASSEMBLY |
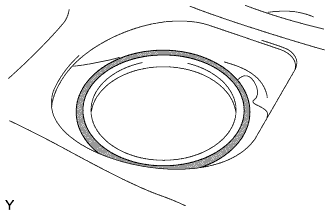
Install a new fuel suction tube gasket onto the fuel tank.
Align the protrusion of the fuel pump with the cutout of the fuel tank and install the fuel suction with pump and gauge tube assembly.
- NOTICE:
- The arm of the sender gauge should not be bent.
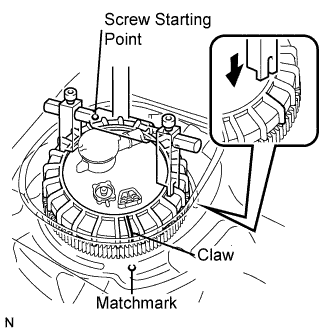
| 2. INSTALL FUEL PUMP GAUGE RETAINER |
Using SST, turn the retainer 540° clockwise from the screw starting point and align the claw of the retainer with the matchmark on the fuel tank.
- SST
- 09808-14020(09808-01410,09808-01420,09808-01430)
- NOTICE:
- Replace the fuel pump gauge retainer with a new one if not installed properly.
- Part No. 77144-52040
- HINT:
- Align the claws of the fuel pump gauge retainer with the tips of SST.
- At the point where the retainer is turned 90° from the start of the thread, push the retainer in from the opposite side to the start of the thread. Check that the thread of the retainer is properly engaged with that on the tank.
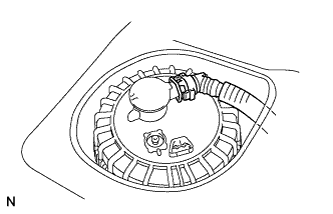
| 3. CONNECT FUEL TANK VENT HOSE SUB-ASSEMBLY |
Connect the fuel tank vent hose.
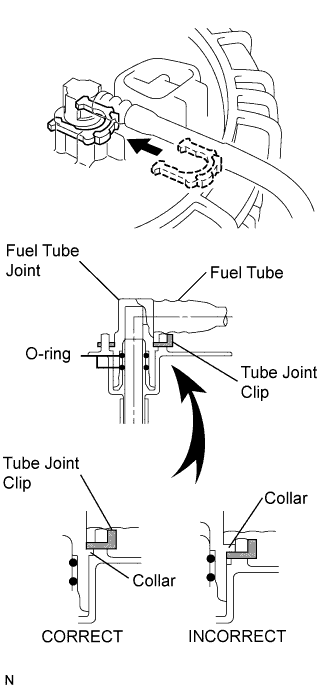
| 4. CONNECT FUEL TANK MAIN TUBE SUB-ASSEMBLY |
Insert the fuel tank main tube.
Install the tube joint clip.
- NOTICE:
- Check that there are no scratches or foreign matter on the connecting parts.
- Check that the fuel tube joint is inserted securely.
- After installing the tube joint clip, check that the fuel tube joint has not been pulled off.
- Do not damage any clips. If a clip is damaged, replace it.
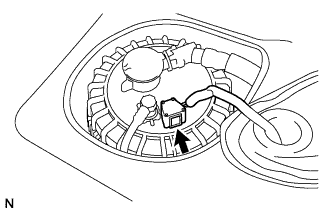
| 5. INSTALL REAR FLOOR SERVICE HOLE COVER |
Connect the fuel pump connector.
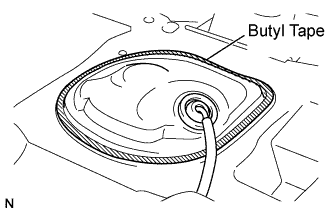
Install the rear service hole cover with new butyl tape.
| 6. INSTALL REAR SEAT CUSHION COVER PAD (for 60/40 Split Seat Type) |
Pass the rear seat inner belt through the rear seat cushion cover pad slit.
Engage the 3 hooks and install the rear seat cushion cover pad.
- NOTICE:
- Make sure that the 2 rear seat cushion lock hooks and the rear seat cushion frame are securely engaged.
| 7. INSTALL REAR SEAT CUSHION COVER PAD (for Fixed Seat Type) |
Pass the rear seat inner belt through the rear seat cushion cover pad slit.
Engage the 3 hooks and install the rear seat cushion cover pad.
- NOTICE:
- Make sure that the 2 rear seat cushion lock hooks and the rear seat cushion frame are securely engaged.
| 8. CONNECT CABLE TO NEGATIVE BATTERY TERMINAL |
- Torque:
- 5.4 N*m{55 kgf*cm, 48 in.*lbf}
| 9. CHECK FOR FUEL LEAKAGE |
When using the Techstream.
Connect the Techstream to the DLC3.
Turn the ignition switch to ON and turn the tester ON.
- NOTICE:
- Do not start the engine.
Select the following menu items: Powertrain / Engine and ECT / Active Test / Control the Fuel Pump / Speed.
- HINT:
- Refer to the Techstream operator's manual for further details.
Check that there is no fuel leakage anywhere on the fuel system after doing maintenance.