INSTALL RADIO RECEIVER ASSEMBLY (for Radio Receiver Type without USB Audio System)
INSTALL NO. 1 RADIO BRACKET (for Radio Receiver Type without USB Audio System)
INSTALL NO. 2 RADIO BRACKET (for Radio Receiver Type without USB Audio System)
INSTALL RADIO RECEIVER ASSEMBLY (for Radio Receiver Type with USB Audio System)
INSTALL NO. 1 RADIO BRACKET (for Radio Receiver Type with USB Audio System)
INSTALL NO. 2 RADIO BRACKET (for Radio Receiver Type with USB Audio System)
INSTALL RADIO AND DISPLAY RECEIVER ASSEMBLY (for Radio and Display Type)
INSTALL NAVIGATION RECEIVER ASSEMBLY (for Navigation Receiver Type)
INSTALL RADIO RECEIVER WITH BRACKET (for Radio Receiver Type without USB Audio System)
INSTALL RADIO RECEIVER WITH BRACKET (for Radio Receiver Type with USB Audio System)
INSTALL RADIO AND DISPLAY RECEIVER WITH BRACKET (for Radio and Display Type)
INSTALL NAVIGATION RECEIVER WITH BRACKET (for Navigation Receiver Type)
INSTALL CENTER INSTRUMENT CLUSTER FINISH PANEL SUB-ASSEMBLY (w/ USB Audio System)
Radio Receiver -- Installation |
| 1. INSTALL RADIO RECEIVER ASSEMBLY (for Radio Receiver Type without USB Audio System) |
| 2. INSTALL NO. 1 RADIO BRACKET (for Radio Receiver Type without USB Audio System) |
Install the No. 1 radio bracket with the 4 screws.
| 3. INSTALL NO. 2 RADIO BRACKET (for Radio Receiver Type without USB Audio System) |
Install the No. 2 radio bracket with the 4 screws.
| 4. INSTALL RADIO RECEIVER ASSEMBLY (for Radio Receiver Type with USB Audio System) |
| 5. INSTALL NO. 1 RADIO BRACKET (for Radio Receiver Type with USB Audio System) |
Install the No. 1 radio bracket with the 3 screws.
| 6. INSTALL NO. 2 RADIO BRACKET (for Radio Receiver Type with USB Audio System) |
Install the No. 2 radio bracket with the 3 screws.
| 7. INSTALL RADIO AND DISPLAY RECEIVER ASSEMBLY (for Radio and Display Type) |
| 8. INSTALL EXTENSION MODULE (for Radio and Display Type) |
Connect the connector to install the extension module.
Connect the each connector to install the navigation wire.
| 9. INSTALL NO. 1 RADIO BRACKET (for Radio and Display Type) |
w/o Navigation System:
Install the No. 1 radio bracket with the 3 screws.
w/ Navigation System:
Install the No. 1 radio bracket with the 5 screws.
| 10. INSTALL NO. 2 RADIO BRACKET (for Radio and Display Type) |
w/o Navigation System:
Install the No. 2 radio bracket with the 3 screws.
w/ Navigation System:
Install the No. 2 radio bracket with the 5 screws.
| 11. INSTALL NAVIGATION RECEIVER ASSEMBLY (for Navigation Receiver Type) |
| 12. INSTALL NO. 1 RADIO BRACKET (for Navigation Receiver Type) |
Install the No. 1 radio bracket with the 4 screws.
| 13. INSTALL NO. 2 RADIO BRACKET (for Navigation Receiver Type) |
Install the No. 2 radio bracket with the 4 screws.
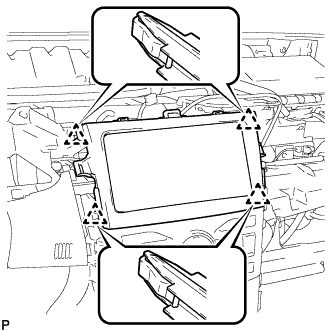
| 14. INSTALL RADIO RECEIVER WITH BRACKET (for Radio Receiver Type without USB Audio System) |
Connect each connector.
Engage the 4 clips.
- CAUTION:
- When installing the radio receiver with bracket, check that the wire harness and No. 2 antenna cord sub-assembly are not caught between the radio receiver with bracket and the instrument panel reinforcement assembly. Failure to do so may cause a short circuit.
Install the radio receiver with bracket with the 4 bolts.
| 15. INSTALL RADIO RECEIVER WITH BRACKET (for Radio Receiver Type with USB Audio System) |
Connect each connector.
Install the radio receiver with bracket with the 4 bolts.
- CAUTION:
- When installing the radio receiver with bracket, check that the wire harness and No. 2 antenna cord sub-assembly are not caught between the radio receiver with bracket and the instrument panel reinforcement assembly. Failure to do so may cause a short circuit.
| 16. INSTALL RADIO AND DISPLAY RECEIVER WITH BRACKET (for Radio and Display Type) |
Connect each connector.
Install the radio and display receiver with bracket with the 4 bolts.
- CAUTION:
- When installing the radio and display receiver with bracket, check that the wire harness and No. 2 antenna cord sub-assembly are not caught between the radio and display receiver with bracket and the instrument panel reinforcement assembly. Failure to do so may cause a short circuit.
| 17. INSTALL NAVIGATION RECEIVER WITH BRACKET (for Navigation Receiver Type) |
Connect each connector.
Engage the 4 clips.
- CAUTION:
- When installing the navigation receiver with bracket, check that the wire harness and No. 2 antenna cord sub-assembly are not caught between the navigation receiver with bracket and the instrument panel reinforcement assembly. Failure to do so may cause a short circuit.
Install the navigation receiver with bracket with the 4 bolts.
| 18. INSTALL CENTER INSTRUMENT CLUSTER FINISH PANEL SUB-ASSEMBLY (w/ USB Audio System) |
Engage the 4 clips to install the center instrument cluster finish panel sub-assembly.
 |
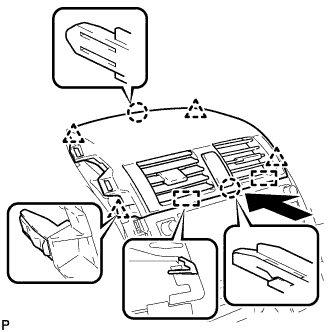
| 19. INSTALL CENTER INSTRUMENT PANEL REGISTER ASSEMBLY |
Connect each connector.
w/o Daytime Running Light:
Engage the clamp.
Engage the 2 guides, 2 claws and 4 clips, and install the center instrument panel register assembly.
 |
| 20. INSTALL INSTRUMENT PANEL FINISH PANEL END LH |
Engage the 2 claws and 2 clips, and then install the instrument panel finish panel end LH.
 |
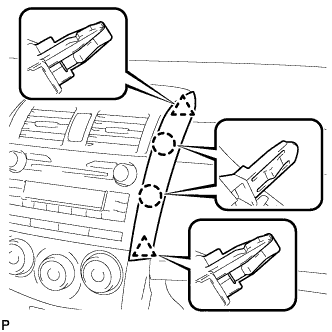
| 21. INSTALL INSTRUMENT PANEL FINISH PANEL END RH |
Engage the 2 claws and 2 clips, and then install the instrument panel finish panel end RH.
 |
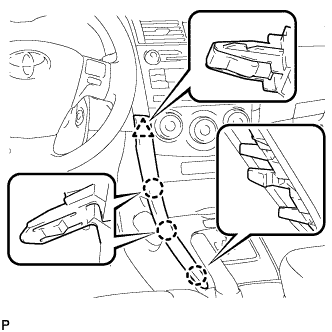
| 22. INSTALL LOWER INSTRUMENT PANEL FINISH PANEL LH |
Engage the 3 claws and clip, and then install the lower instrument panel finish panel LH.
 |
| 23. INSTALL LOWER INSTRUMENT PANEL FINISH PANEL RH |
Engage the 3 claws and clip, and then install the lower instrument panel finish panel RH.
 |