REMOVE CENTER INSTRUMENT CLUSTER FINISH PANEL SUB-ASSEMBLY (w/ USB Audio System)
REMOVE RADIO RECEIVER WITH BRACKET (for Radio Receiver Type without USB Audio System)
REMOVE RADIO RECEIVER WITH BRACKET (for Radio Receiver Type with USB Audio System)
REMOVE RADIO AND DISPLAY RECEIVER WITH BRACKET (for Radio and Display Type)
REMOVE NAVIGATION RECEIVER WITH BRACKET (for Navigation Receiver Type)
REMOVE NO. 2 RADIO BRACKET (for Radio Receiver Type without USB Audio System)
REMOVE NO. 1 RADIO BRACKET (for Radio Receiver Type without USB Audio System)
REMOVE RADIO RECEIVER ASSEMBLY (for Radio Receiver Type without USB Audio System)
REMOVE NO. 2 RADIO BRACKET (for Radio Receiver Type with USB Audio System)
REMOVE NO. 1 RADIO BRACKET (for Radio Receiver Type with USB Audio System)
REMOVE RADIO RECEIVER ASSEMBLY (for Radio Receiver Type with USB Audio System)
REMOVE RADIO AND DISPLAY RECEIVER ASSEMBLY (for Radio and Display Type)
REMOVE NAVIGATION RECEIVER ASSEMBLY (for Navigation Receiver Type)
Radio Receiver -- Removal |
| 1. REMOVE LOWER INSTRUMENT PANEL FINISH PANEL LH |
Disengage the 3 claws and clip, and then remove the lower instrument panel finish panel LH.
 |
| 2. REMOVE LOWER INSTRUMENT PANEL FINISH PANEL RH |
Disengage the 3 claws and clip, and then remove the lower instrument panel finish panel RH.
 |
| 3. REMOVE INSTRUMENT PANEL FINISH PANEL END LH |
Apply protective tape to the area shown in the illustration.
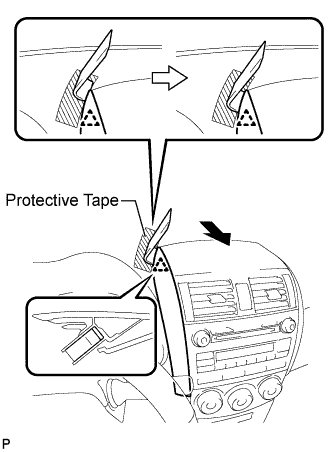 |
Insert a roof moulding remover and slide it toward the clip.
Pull the remover with both hands to disengage the clip as shown in the illustration.
Disengage the 2 claws and clip, and remove the instrument panel finish panel end LH.
 |
| 4. REMOVE INSTRUMENT PANEL FINISH PANEL END RH |
Apply protective tape to the area shown in the illustration.
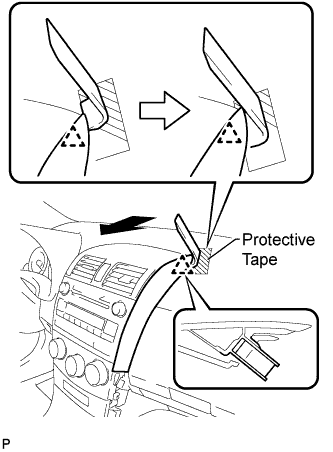 |
Insert a roof moulding remover and slide it toward the clip.
Pull the remover with both hands to disengage the clip as shown in the illustration.
Disengage the 2 claws and clip, and remove the instrument panel finish panel end RH.
 |
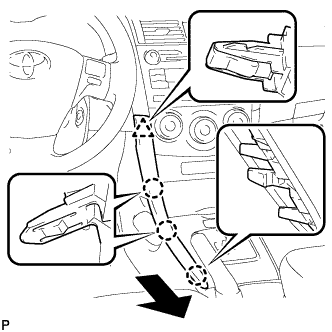
| 5. REMOVE CENTER INSTRUMENT PANEL REGISTER ASSEMBLY |
Disengage the 2 claws, 4 clips, and 2 guides.
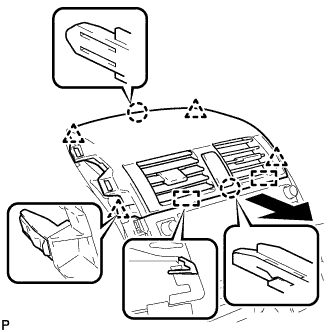 |
w/o Daytime Running Light:
Disengage the clamp.
Disconnect each connector and remove the center instrument panel register assembly.
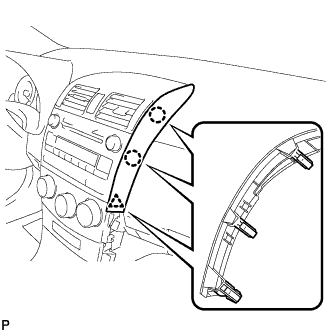
| 6. REMOVE CENTER INSTRUMENT CLUSTER FINISH PANEL SUB-ASSEMBLY (w/ USB Audio System) |
Disengage the 4 clips and remove the center instrument cluster finish panel sub-assembly.
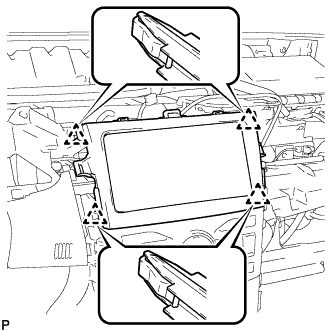 |
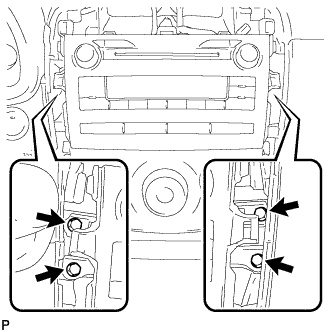
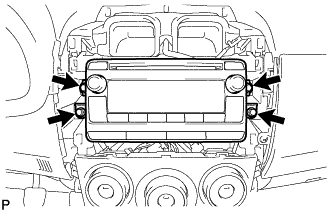
| 7. REMOVE RADIO RECEIVER WITH BRACKET (for Radio Receiver Type without USB Audio System) |
Remove the 4 bolts.
 |
Pull the radio receiver with bracket toward the rear of the vehicle and disengage the 4 clips.
 |
Disconnect each connector and remove the radio receiver with bracket.
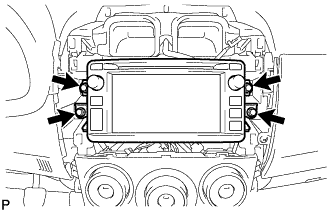
| 8. REMOVE RADIO RECEIVER WITH BRACKET (for Radio Receiver Type with USB Audio System) |
Remove the 4 bolts.
 |
Disconnect each connector and remove the radio receiver with bracket.
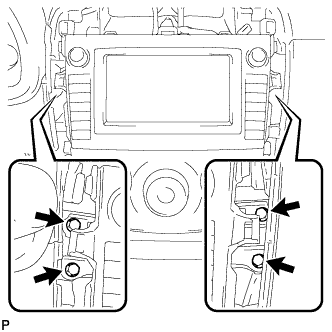
| 9. REMOVE RADIO AND DISPLAY RECEIVER WITH BRACKET (for Radio and Display Type) |
Remove the 4 bolts.
 |
Disconnect each connector and remove the radio and display receiver with bracket.
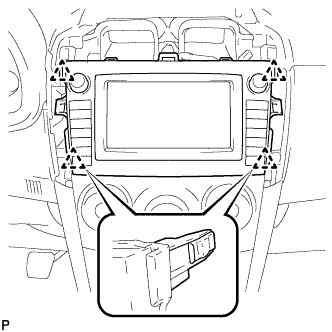
| 10. REMOVE NAVIGATION RECEIVER WITH BRACKET (for Navigation Receiver Type) |
Remove the 4 bolts.
 |
Pull the navigation receiver with bracket toward the rear of the vehicle and disengage the 4 clips.
 |
Disconnect each connector and remove the navigation receiver with bracket.
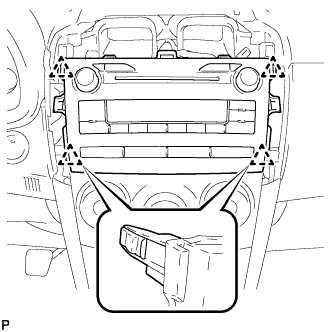
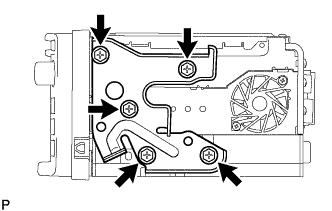
| 11. REMOVE NO. 2 RADIO BRACKET (for Radio Receiver Type without USB Audio System) |
Remove the 4 screws and No. 2 radio bracket.
Text in Illustration *A for TMC Made *B except TMC Made
 |
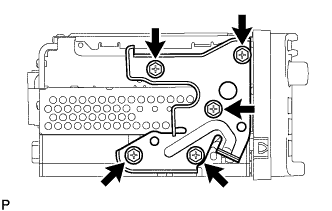
| 12. REMOVE NO. 1 RADIO BRACKET (for Radio Receiver Type without USB Audio System) |
Remove the 4 screws and No. 1 radio bracket.
Text in Illustration *A for TMC Made *B except TMC Made
 |
| 13. REMOVE RADIO RECEIVER ASSEMBLY (for Radio Receiver Type without USB Audio System) |
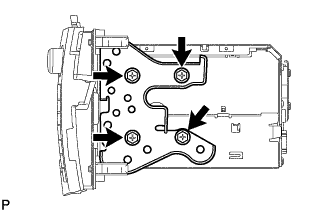
| 14. REMOVE NO. 2 RADIO BRACKET (for Radio Receiver Type with USB Audio System) |
Remove the 3 screws and No. 2 radio bracket.
Text in Illustration *A for TMC Made *B except TMC Made
 |
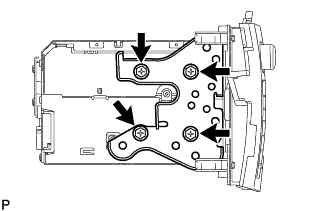
| 15. REMOVE NO. 1 RADIO BRACKET (for Radio Receiver Type with USB Audio System) |
Remove the 3 screws and No. 1 radio bracket.
Text in Illustration *A for TMC Made *B except TMC Made
 |
| 16. REMOVE RADIO RECEIVER ASSEMBLY (for Radio Receiver Type with USB Audio System) |
| 17. REMOVE NO. 2 RADIO BRACKET (for Radio and Display Type) |
w/o Navigation System:
Remove the 3 screws and No. 2 radio bracket.
Text in Illustration *A for TMC Made *B except TMC Made

w/ Navigation System:
Remove the 5 screws and No. 2 radio bracket.
| 18. REMOVE NO. 1 RADIO BRACKET (for Radio and Display Type) |
w/o Navigation System:
Remove the 3 screws and No. 1 radio bracket.
Text in Illustration *A for TMC Made *B except TMC Made

w/ Navigation System:
Remove the 5 screws and No. 1 radio bracket.
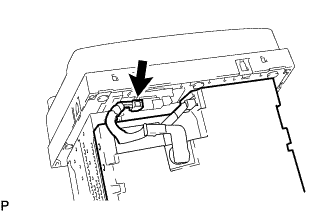
| 19. REMOVE EXTENSION MODULE (for Radio and Display Type) |
Disconnect each connector.
Disconnect the connector to remove the extension module.
 |
| 20. REMOVE RADIO AND DISPLAY RECEIVER ASSEMBLY (for Radio and Display Type) |
| 21. REMOVE NO. 2 RADIO BRACKET (for Navigation Receiver Type) |
Remove the 4 screws and No. 2 radio bracket.
 |
| 22. REMOVE NO. 1 RADIO BRACKET (for Navigation Receiver Type) |
Remove the 4 screws and No. 1 radio bracket.
 |
| 23. REMOVE NAVIGATION RECEIVER ASSEMBLY (for Navigation Receiver Type) |