Brake Actuator (W/ Vsc) Installation
Brake. Corolla. Zre142 Aze141
INSTALL BRAKE ACTUATOR
INSTALL BRAKE ACTUATOR WITH BRACKET
INSTALL WINDSHIELD WASHER JAR ASSEMBLY
INSTALL RADIATOR RESERVE TANK SUB-ASSEMBLY
INSTALL FRONT BUMPER ASSEMBLY
INSTALL GENERATOR ASSEMBLY
BLEED BRAKE SYSTEM
INSTALL FRONT WHEEL RH
INSPECT ACTUATOR WITH TECHSTREAM
Brake Actuator (W/ Vsc) -- Installation |
| 1. INSTALL BRAKE ACTUATOR |
Install the brake actuator to the brake actuator bracket assembly with the 3 bolts.
- Torque:
- 5.4 N*m{55 kgf*cm, 48 in.*lbf}
- NOTICE:
- If installing a new brake actuator, do not remove the hole plugs before connecting the brake lines because the new brake actuator is filled with brake fluid.
- Do not carry the brake actuator by the connector.
- Tighten the 3 bolts in the order shown in the illustration.
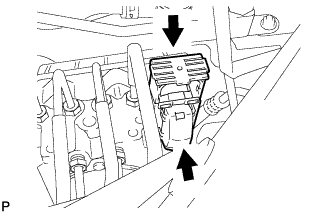
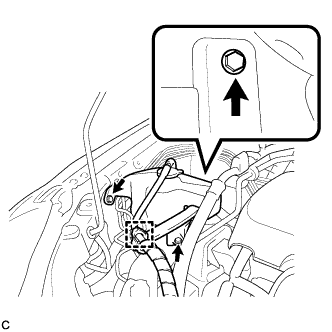
| 2. INSTALL BRAKE ACTUATOR WITH BRACKET |
Install the brake actuator with bracket to the body with the 2 bolts and nut.
- Torque:
- 19 N*m{194 kgf*cm, 14 ft.*lbf}
- NOTICE:
- Do not damage the brake lines or wire harness.
- Tighten the 2 bolts and nut in the order shown in the illustration.
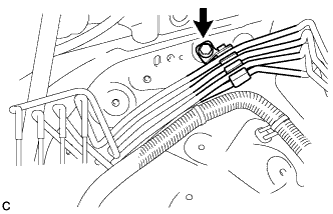
Temporarily tighten each brake line to the correct positions of the brake actuator with bracket as shown in the illustration.
- HINT:
- *1: To front wheel cylinder RH
- *2: To front wheel cylinder LH
- *3: To rear wheel cylinder RH
- *4: To rear wheel cylinder LH
- *5: From 1st master cylinder chamber
- *6: From 2nd master cylinder chamber
Using a union nut wrench (10 mm) and union nut wrench (12 mm), fully tighten each brake line.
- Torque:
- without a union nut wrench (10 mm):
- 15 N*m{155 kgf*cm, 11 ft.*lbf}
- with a union nut wrench (10 mm):
- 14 N*m{143 kgf*cm, 10 ft.*lbf}
- without a union nut wrench (12 mm):
- 20 N*m{200 kgf*cm, 14 ft.*lbf}
- with a union nut wrench (12 mm):
- 18 N*m{178 kgf*cm, 13 ft.*lbf}
- NOTICE:
- Use a torque wrench with a fulcrum length of 250 mm (9.84 in.).
- This torque value is effective when the union nut wrench is parallel to the torque wrench.
Install the brake line clamp with the bolt.
- Torque:
- 5.4 N*m{55 kgf*cm, 48 in.*lbf}
Connect the actuator connector.
- NOTICE:
- Make sure that the connector is locked securely.
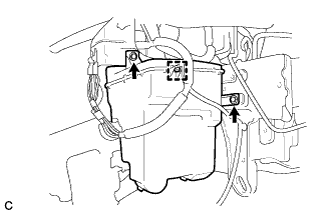
| 3. INSTALL WINDSHIELD WASHER JAR ASSEMBLY |
Install the windshield washer jar assembly and clamp to the body with the 2 bolts.
- Torque:
- 5.5 N*m{56 kgf*cm, 49 in.*lbf}
Install the bolt and connect the washer hoses and motor connectors.
- Torque:
- 5.5 N*m{56 kgf*cm, 49 in.*lbf}
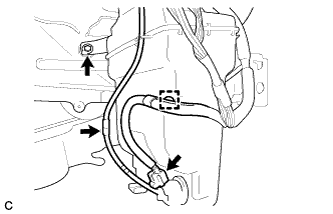
| 4. INSTALL RADIATOR RESERVE TANK SUB-ASSEMBLY |
Install the radiator reserve tank sub-assembly with the 3 bolts.
- Torque:
- 7.0 N*m{71 kgf*cm, 62 in.*lbf}
| 5. INSTALL FRONT BUMPER ASSEMBLY |
(COROLLA_ZRE142 RM000002WCL011X.html)
| 6. INSTALL GENERATOR ASSEMBLY |
- for 2ZR-FE: COROLLA_ZRE142 RM00000219400JX.html
- for 2AZ-FE: COROLLA_ZRE142 RM0000026ZB01OX.html
(COROLLA_ZRE142 RM000000SRF03MX.html)
| 8. INSTALL FRONT WHEEL RH |
| 9. INSPECT ACTUATOR WITH TECHSTREAM |
(COROLLA_ZRE142 RM000002VQ702JX.html)