Speed Sensor -- Installation |
| 1. INSTALL SPEED SENSOR NC |
Coat a new O-ring with ATF WS and install it to the speed sensor.
Install the speed sensor with the bolt.
- Torque:
- 8.8 N*m{90 kgf*cm, 78 in.*lbf}
 |
Connect the speed sensor connector.
| 2. INSTALL SPEED SENSOR NT |
Coat a new O-ring with ATF WS and install it to the speed sensor.
Install the speed sensor with the bolt.
- Torque:
- 11 N*m{115 kgf*cm, 8 ft.*lbf}
 |
Connect the speed sensor connector.
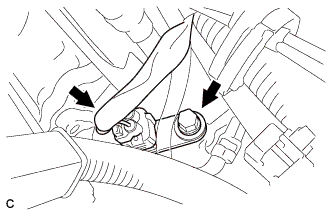
| 3. INSTALL TRANSMISSION OIL FILLER TUBE SUB-ASSEMBLY |
Apply ATF to a new O-ring, and install it to the transmission oil filler tube sub-assembly.
Install the transmission oil filler tube sub-assembly to the automatic transaxle with the bolt.
- Torque:
- 5.5 N*m{56 kgf*cm, 49 in.*lbf}
 |
Connect the transmission wire connector, park/neutral position switch connector and 2 wire harness clamps.
Install the transmission oil level gauge sub-assembly to the transmission oil filler tube sub-assembly.
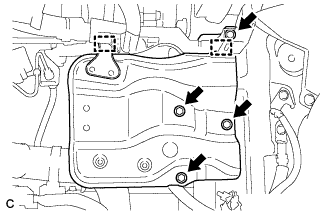
| 4. INSTALL BATTERY CARRIER |
Install the battery carrier with the 4 bolts.
- Torque:
- 13 N*m{133 kgf*cm, 10 ft.*lbf}
 |
Connect the 2 wire harness clamps.
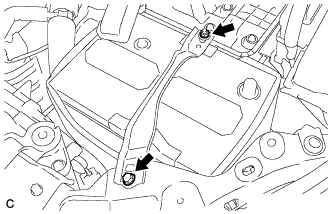
| 5. INSTALL BATTERY |
Install the battery tray, battery and battery insulator.
Install the battery clamp with the bolt and nut.
- Torque:
- Bolt:
- 6.5 N*m{66 kgf*cm, 58 in.*lbf}
- Nut:
- 3.5 N*m{36 kgf*cm, 31 in.*lbf}
 |
Connect the battery cables.
- Torque:
- 5.4 N*m{55 kgf*cm, 48 in.*lbf}
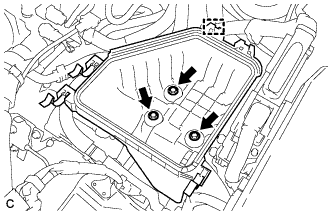
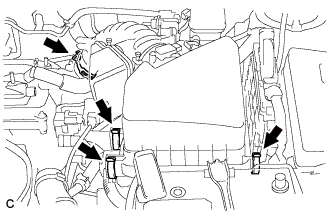
| 6. INSTALL AIR CLEANER CASE |
Install the air cleaner case with the 3 bolts.
- Torque:
- 7.0 N*m{71 kgf*cm, 62 in.*lbf}
 |
Install the engine wire clamp to the air cleaner case.
Install the air cleaner filter element.
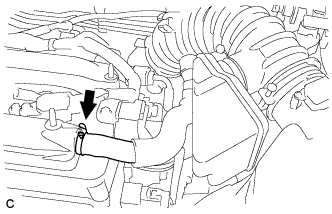
| 7. INSTALL AIR CLEANER CAP SUB-ASSEMBLY |
Install the air cleaner cap sub-assembly with hose and lock the 3 clamps.
 |
Tighten the air cleaner hose clamp.
Connect the ventilation hose.
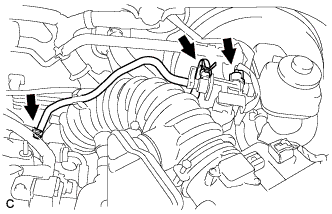
 |
Connect the 2 vacuum hoses and No. 1 vacuum switching valve connector.
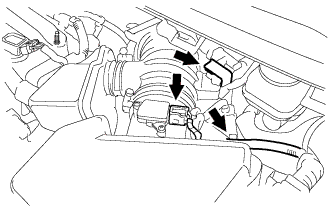
 |
Connect the 2 wire harness clamps and the mass air flow meter connector.
 |
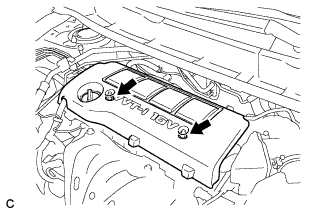
| 8. INSTALL NO. 1 ENGINE COVER SUB-ASSEMBLY |
Install the No. 1 engine cover sub-assembly with the 2 nuts.
 |
| 9. CONNECT CABLE TO NEGATIVE BATTERY TERMINAL |
- NOTICE:
- When disconnecting the cable, some systems need to be initialized after the cable is reconnected (COROLLA_ZRE142 RM00000315Z05EX.html).