Fuel Tank -- Installation |
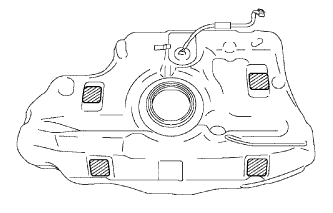
| 1. INSTALL FUEL TANK CUSHION |
Install new fuel tank cushions onto the fuel tank.
 |
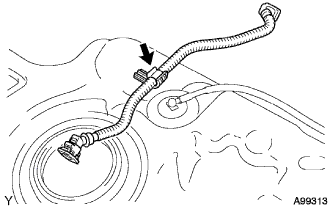
| 2. INSTALL FUEL TANK VENT HOSE |
Install the fuel tank vent hose onto the fuel hose clamp.
 |
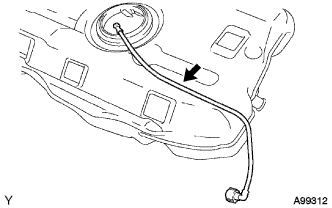
| 3. INSTALL FUEL TANK MAIN TUBE SUB-ASSEMBLY |
Install the fuel tank main tube onto the fuel tank.
 |
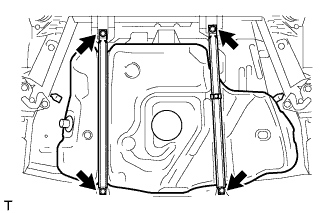
| 4. INSTALL FUEL TANK ASSEMBLY |
Set the fuel tank on a transmission jack.
Operate the transmission jack, then install the fuel tank into the vehicle.
 |
Install the 2 No. 1 fuel tank bands with the 4 bolts.
- Torque:
- 39 N*m{400 kgf*cm, 29 ft.*lbf}
 |
| 5. INSTALL FUEL TANK FILLER PIPE SUB-ASSEMBLY |
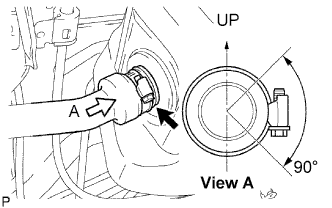
Connect the fuel tank filler pipe hose to the fuel tank.
- NOTICE:
- Make sure that the hose clamp is facing in the correct direction when installing.
 |
Engage the claw, then install the fuel tank filler pipe cover onto the fuel tank filler pipe.
 |
| 6. CONNECT FUEL TANK MAIN TUBE SUB-ASSEMBLY |
Connect the fuel tank main tube.
Align the fuel tube connector with the pipe, then push the fuel tube connector in until it comes into contact with the seat to connect the fuel tank main tube to the pipe, then push the retainer up until the claws lock.
- NOTICE:
- Check that there are no scratches or foreign objects around the connecting surfaces of the fuel tube connector and pipe before performing this work.
- After connecting the fuel tank main tube, check that the fuel tank main tube is securely connected by pulling on the fuel tube connector and pipe.
 |
| 7. CONNECT BREATHER TUBE FUEL HOSE |
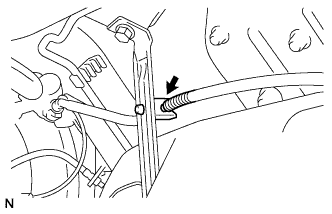
Connect the breather tube fuel hose to the hose clamp.
 |
Connect the breather tube fuel hose.
Align the fuel hose connector with the pipe, then push the fuel hose connector in until the retainer makes a "click" sound to connect the breather tube fuel hose to the pipe.
- NOTICE:
- Check that there are no scratches or foreign objects around the connecting surfaces of the fuel tube connector and pipe before performing this work.
- After connecting the breather tube fuel hose, check that the fuel pump tube is securely connected by pulling on the fuel tube connector and pipe.
 |
| 8. CONNECT FUEL TANK VENT HOSE |
Connect the fuel tank vent hose.
Align the fuel tube connector with the pipe, then push the fuel tube connector in until it comes into contact with the seat to connect the fuel tank vent hose to the pipe.
Slide the retainer of the fuel tube connector to lock the claws as shown in the illustration.
- NOTICE:
- Check that there are no scratches or foreign objects around the connecting surfaces of the fuel tube connector and pipe before performing this work.
- After connecting the fuel tank vent hose, check that the fuel tank vent hose is securely connected by pulling on the fuel tube connector.
 |
| 9. INSTALL NO. 1 FUEL TANK PROTECTOR |
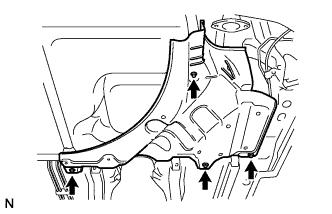
Install the No.1 fuel tank protector with the 4 bolts.
- Torque:
- 5.5 N*m{56 kgf*cm, 49 in.*lbf}
 |
| 10. CONNECT PARKING BRAKE CABLE |
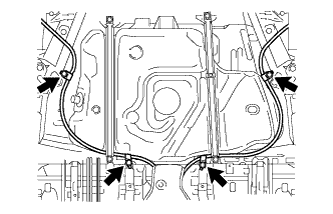
Install the parking cables with the 4 bolts.
- Torque:
- 5.4 N*m{55 kgf*cm, 48 in.*lbf}
 |
| 11. INSTALL CENTER EXHAUST PIPE ASSEMBLY |
- HINT:
| 12. ADD FUEL |
| 13. INSTALL FUEL SUCTION TUBE ASSEMBLY WITH PUMP AND GAUGE |
Install the fuel suction with pump and gauge tube assembly to the fuel tank (COROLLA_ZRE142 RM0000022XU05YX.html).
| 14. CONNECT CABLE TO NEGATIVE BATTERY TERMINAL |
Connect the cable to the negative battery terminal.
- Torque:
- 5.4 N*m{55 kgf*cm, 48 in.*lbf}
| 15. INSPECT FOR FUEL LEAK |
Check fuel pump operation.
Connect the Techstream to the DLC3.
Turn the ignition switch to ON and turn the Techstream on.
- NOTICE:
- Do not start the engine.
Enter the following menus: Powertrain / Engine and ECT / Active Test / Control the Fuel Pump / Speed.
Check for pressure in the fuel inlet tube from the fuel line. Check that sounds of fuel flowing from the fuel tank can be heard. If no sounds can be heard, check the integration relay, fuel pump, ECM and wiring connectors.
Check for fuel leaks.
There is no fuel leakage after performing maintenance anywhere on the fuel system. If there is a fuel leak, repair or replace parts as necessary.
Turn the ignition switch off.
Disconnect the Techstream from the DLC3.
| 16. INSPECT FOR EXHAUST GAS LEAK |